Skip to content
  • GDPR Privacy Policy
  • Copyright Policy
  • Disclaimer
  • Terms & Conditions
Tasted Nest
  • Home
  • Appetizers
  • Desserts
  • Salads
  • Breakfast
  • Dinner
  • Privacy Policy
  • Contact
  • About

NO-ING-IMG

Pumpkin Cream Cheese Muffins Irresistibly Delicious

January 14, 2026July 20, 2025 by Chef Tavio
Creating perfect pumpkin cream cheese muffins starts with the right ingredients. Here's what you'll need: - 1 ½ cups all-purpose flour - 1 teaspoon baking powder - 1 teaspoon baking soda - 1 teaspoon ground cinnamon - ½ teaspoon ground nutmeg - ½ teaspoon salt - ½ cup vegetable oil - 1 cup pumpkin puree (canned or fresh) - 1 cup granulated sugar - 2 large eggs - 1 teaspoon vanilla extract - 4 ounces cream cheese, softened - ¼ cup powdered sugar - 1 teaspoon lemon juice - ½ cup chopped walnuts or pecans (optional) Each ingredient plays a role in creating that soft, flavorful muffin. The flour gives it structure, while baking powder and baking soda help it rise. The spices bring warmth and comfort, and the pumpkin puree adds moisture and a lovely color. The cream cheese filling is a delightful surprise that makes these muffins stand out. You can add nuts for crunch, but they are optional. For the full recipe, you can refer to the section above. Let’s get started! 1. Preheat your oven to 375°F (190°C). Prepare your muffin tin by lining it with paper liners or greasing it lightly. This step helps the muffins come out easily. 2. In a medium bowl, combine 1 ½ cups of all-purpose flour, 1 teaspoon of baking powder, 1 teaspoon of baking soda, 1 teaspoon of ground cinnamon, ½ teaspoon of ground nutmeg, and ½ teaspoon of salt. Whisk these dry ingredients together well. 3. In a large bowl, mix ½ cup of vegetable oil, 1 cup of pumpkin puree, 1 cup of granulated sugar, 2 large eggs, and 1 teaspoon of vanilla extract. Whisk until this mixture is smooth and creamy. 1. Gradually fold the dry ingredient mix into the wet mix. Use a spatula or wooden spoon for this. 2. Mix gently until just combined. The batter can remain slightly lumpy. Avoid overmixing to keep the muffins tender. 1. In a small bowl, beat 4 ounces of softened cream cheese with ¼ cup of powdered sugar and 1 teaspoon of lemon juice. Mix until it’s smooth and creamy. This filling adds a delightful surprise to each muffin. 2. When adding the cream cheese filling, use a spoon to create a swirl effect. This adds an artistic touch to your muffins. 1. Fill each muffin cup about one-third full with pumpkin batter. Add a spoonful of the cream cheese mixture in the center. Top with more pumpkin batter until each cup is about two-thirds full. 2. If you like, sprinkle chopped walnuts or pecans on top for extra crunch. 3. Bake the muffins for 20-25 minutes. Check for doneness by inserting a toothpick into the center. If it comes out clean, your muffins are ready! 4. Let the muffins cool in the pan for about 5 minutes. Then transfer them to a wire rack to cool completely. Enjoy these muffins warm or at room temperature. For extra sweetness, dust them with powdered sugar before serving. For the full recipe, check out my detailed cooking guide! To make the best pumpkin cream cheese muffins, avoid overmixing the batter. When you mix too much, the muffins become dense and tough. Stir just until the dry ingredients blend with the wet ones. A few lumps are okay; they help keep the muffins light and fluffy. Cooling is key for the best texture. After baking, let the muffins sit in the pan for about 5 minutes. This helps them firm up without sticking. Then, move them to a wire rack. This allows air to flow around them, keeping the muffins soft. Serve these muffins warm or at room temperature. To make them extra special, dust them with powdered sugar before serving. You can also sprinkle cinnamon on top for a lovely touch. Adding chopped nuts not only looks nice but also adds a great crunch. Each muffin has about 200 calories. You also get 3 grams of protein and 8 grams of fat. If you want to make a healthier version, consider using whole wheat flour instead of all-purpose flour. You can swap out sugar for a natural sweetener like honey or maple syrup. This keeps the flavor while cutting down on refined sugars. For more options, check the Full Recipe for details on ingredient swaps. {{image_4}} Error: Error code: 429 - {'error': {'message': 'Rate limit reached for gpt-4o-mini in organization org-zFeAnX8gJvsCtEtJubNX3NN3 on tokens per min (TPM): Limit 200000, Used 200000, Requested 2266. Please try again in 679ms. Visit https://platform.openai.com/account/rate-limits to learn more.', 'type': 'tokens', 'param': None, 'code': 'rate_limit_exceeded'}} To keep your pumpkin cream cheese muffins fresh, follow these steps: - Let them cool completely on a wire rack. - Place muffins in an airtight container. - Keep them at room temperature for up to 3 days. - For longer storage, freeze them! Wrap each muffin in plastic wrap. - Place wrapped muffins in a freezer-safe bag. They can last up to 3 months in the freezer. When you’re ready to enjoy your muffins again, here are my tips: - For best results, use an oven. Preheat it to 350°F (175°C). - Unwrap the muffins and place them on a baking sheet. - Heat for about 10-15 minutes until warm. - You can also use a microwave. Heat for about 15-20 seconds. - This method works well, but the oven keeps the texture nice. These tips will help you savor the deliciousness of your pumpkin cream cheese muffins! Check out the full recipe for more details. How do I know when my muffins are done? Your muffins are done when a toothpick inserted in the center comes out clean. This means they are fully cooked inside. If the toothpick has batter on it, give them a few more minutes. Can I make these muffins ahead of time? Yes, you can make these muffins ahead of time. Bake them, then store them in an airtight container. They stay fresh for about three days at room temperature. What can I use instead of cream cheese? If you want to replace cream cheese, use mascarpone or Greek yogurt. Both give a creamy texture and flavor. How long do these muffins last at room temperature? These muffins last about three days at room temperature. Keep them in a cool, dry place to prevent spoilage. Can I use fresh pumpkin instead of canned? Yes, you can use fresh pumpkin puree. Just cook and mash the pumpkin to get a smooth texture similar to canned. What’s the best way to mix muffin batter? To mix muffin batter, combine wet and dry ingredients separately first. Then, fold the dry mix into the wet mix gently. This keeps your muffins light and fluffy. Can I add more sugar for extra sweetness? You can add more sugar if you like sweeter muffins. Start with a couple of tablespoons more and taste the batter. Adjust based on your preference. This article covered all you need to make delicious pumpkin muffins. We explored the key ingredients, step-by-step instructions, and helpful tips. I shared ways to customize flavors and presented storage methods to keep muffins fresh. In my experience, following these steps will lead to perfect muffins every time. Remember, baking is both a science and an art. Enjoy your baking journey!

Are you ready to bite into a warm, flavorful delight? Pumpkin cream cheese muffins are the perfect fall treat that you’ll crave year-round! In this article, I’ll walk you through …

Read more

Categories Desserts Tags NO-ING-IMG

Maple Frosted Apple Blondies Irresistible Treat Recipe

January 14, 2026July 20, 2025 by Chef Tavio
To make these delicious maple frosted apple blondies, gather the following ingredients: - 1 cup unsalted butter, melted - 1 cup packed brown sugar - 2 large eggs - 1 teaspoon vanilla extract - 1 ½ cups all-purpose flour - 1 teaspoon baking powder - ½ teaspoon baking soda - ¼ teaspoon salt - 1 cup diced tart apples (preferably Granny Smith) - ½ teaspoon ground cinnamon - ½ cup chopped walnuts (optional) For the Maple Frosting: - 2 tablespoons unsalted butter, softened - 1 cup powdered sugar - 2 tablespoons pure maple syrup - 1 tablespoon milk (adjust for desired consistency) You can easily swap some ingredients if needed. Here are a few ideas: - Butter: Use coconut oil or applesauce for a dairy-free version. - Brown Sugar: White sugar works if you’re in a pinch. - Eggs: Use flax eggs for a vegan option. Mix 1 tablespoon of ground flaxseed with 2.5 tablespoons of water. - Flour: Whole wheat flour can replace all-purpose flour for a healthier twist. - Nuts: Try pecans or omit them for nut-free blondies. Fresh apples make a big difference in taste. Here’s how to pick the best ones: - Look for firmness: Apples should feel solid and heavy for their size. - Check the skin: Choose apples with smooth, unblemished skin. - Smell: A sweet, fruity aroma often indicates ripeness. - Varieties: Go for Granny Smith for tartness or Honeycrisp for sweetness. Using fresh apples ensures your blondies are packed with flavor. Remember, this recipe brings together simple ingredients for a delightful treat, so make each choice count! For the complete guide on making these blondies, see the Full Recipe. 1. Prepare the Baking Pan and Oven: First, preheat your oven to 350°F (175°C). Grease a 9x9-inch baking pan or line it with parchment paper. This step helps with easy removal later. 2. Cream the Butter and Sugar: In a large bowl, mix the melted butter and brown sugar. Whisk until smooth. This helps create a rich base for your blondies. 3. Incorporate the Eggs: Add the eggs one at a time. Mix well after each egg. Stir in the vanilla extract for extra flavor. 4. Mix Dry Ingredients: In a different bowl, sift together the flour, baking powder, baking soda, salt, and cinnamon. Mix until combined. 5. Combine Wet and Dry Mixtures: Gradually add the dry mix to the butter-sugar mixture. Stir gently until just combined. Be mindful not to overmix. 6. Fold in Apples and Nuts: Carefully fold in the diced apples and nuts if you choose to use them. Spread the mixture evenly in your prepared pan. 7. Bake: Place the pan in your preheated oven. Bake for 25-30 minutes. Check for doneness by inserting a toothpick in the center. It should come out clean. The blondies will have a light golden color. 8. Cool the Blondies: After baking, let the blondies cool in the pan for about 10 minutes. Next, transfer them to a wire rack to cool completely. 9. Prepare the Frosting: In a medium bowl, mix the softened butter, powdered sugar, maple syrup, and milk. Beat until smooth. Add more milk if you want a thinner frosting. 10. Frost the Blondies: Once the blondies are cooled, spread the frosting evenly over the top. Make sure every bite gets a taste of that sweet maple goodness. Now you have a delicious batch of maple frosted apple blondies! For the full recipe, feel free to check the details. Enjoy your baking! To make your blondies moist, follow this simple advice: - Use melted butter for rich flavor. - Measure flour carefully; too much can dry them out. - Avoid overmixing the batter. Mix until just combined. - Add diced apples for extra moisture and flavor. These steps help create that perfect, soft texture. Want to boost the flavor of your blondies? Here are some ideas: - Mix in different spices like nutmeg or allspice. - Use brown sugar for a deeper caramel taste. - Add a splash of lemon juice for brightness. - Consider adding chocolate chips or dried fruit for variety. These simple tweaks take your blondies to the next level. Watch out for these common errors: - Using cold eggs can affect mixing. Always use room temperature eggs. - Forgetting to line your pan can lead to sticking. Grease it or use parchment paper. - Not cooling the blondies before frosting can cause the icing to melt. - Overbaking can make them dry. Start checking at 25 minutes. Avoiding these mistakes ensures tasty blondies every time. {{image_4}} You can easily switch up the nuts in your blondies. Walnuts add a lovely crunch, but pecans work just as well. If you want a bit of sweetness, try adding some toasted almonds. They bring a nice flavor that pairs with the apples and maple frosting. For a nut-free option, skip the nuts altogether. The blondies will still be delicious! If maple frosting isn't your favorite, don't worry! You can try cream cheese frosting for a tangy twist. Simply mix cream cheese with powdered sugar and a splash of vanilla. Another option is a chocolate ganache. Melt chocolate with cream for a rich topping. Each frosting adds a new taste to the blondies. Experiment and find your favorite! To make these blondies gluten-free, swap the all-purpose flour with a gluten-free blend. Make sure the blend has xanthan gum to help with texture. You can also use almond flour for a unique flavor. Just keep in mind that the baking time may change slightly. Check for doneness a few minutes early. Enjoy these sweet treats without gluten worries! For the full recipe, refer back to the provided details. After you bake your maple frosted apple blondies, let them cool completely. Once cool, store them in an airtight container. This keeps them fresh and moist. Place a piece of parchment paper between layers if you stack them. They will last for about 3 to 5 days at room temperature. If you want them to last longer, refrigerate them. In the fridge, they can stay good for up to a week. Freezing blondies is easy and a great way to save some for later. First, let your blondies cool completely. Then, cut them into squares. Wrap each square tightly in plastic wrap. Place the wrapped squares in a freezer-safe bag or container. You can freeze them for up to three months. When you are ready to enjoy them, simply thaw them in the fridge overnight. Sometimes, blondies can become stale. If you find this, don’t worry! You can revive them. Preheat your oven to 350°F (175°C). Place the blondies in a baking dish. Cover them with aluminum foil to keep them from drying out. Heat them for about 10 minutes. This warms them up and softens them. You can also drizzle some maple syrup on top for extra moisture and flavor. Enjoy your revived treat! Yes, you can use different apples. While Granny Smith apples work best, you can try Honeycrisp or Fuji apples. These types add sweetness and texture. Just remember, tart apples keep a nice balance in flavor. To check if the blondies are done, insert a toothpick into the center. If it comes out clean or with a few moist crumbs, they are ready. The edges should look slightly golden, and the center should feel firm but soft. For clean cuts, let the blondies cool completely. Use a sharp knife to cut them into squares. Wipe the knife with a damp cloth between cuts. This method prevents sticking and keeps the edges neat. Enjoy serving your delicious treats! For more details, you can check the Full Recipe. This blog post covered the key steps to make delicious blondies. We talked about choosing the right ingredients, including fresh apples and safe substitutes. You learned how to prepare, bake, and frost them perfectly. I shared tips to keep them moist and avoid common mistakes. Plus, we explored fun variations and storage tips to enjoy blondies later. In the end, you have all the tools to create a tasty treat. Happy baking!

Welcome to a delightful world of flavor with my Maple Frosted Apple Blondies! This easy recipe will become your go-to treat for any occasion. Imagine soft, sweet blondies packed with …

Read more

Categories Desserts Tags NO-ING-IMG

My Best Pumpkin Muffins Recipe Easy and Tasty Treat

January 14, 2026July 20, 2025 by Chef Tavio
- 1 cup canned pumpkin puree - 1/2 cup vegetable oil - 1 cup brown sugar, packed tightly - 2 large eggs, room temperature - 1 teaspoon pure vanilla extract - 1 1/2 cups all-purpose flour - 1 teaspoon baking soda - 1/2 teaspoon baking powder - 1 teaspoon pumpkin pie spice - 1/2 teaspoon ground cinnamon - 1/4 teaspoon salt - 1/2 cup chopped walnuts or pecans - 1/4 cup chocolate chips My best pumpkin muffins recipe starts with simple and tasty ingredients. The key is to use fresh pumpkin puree for rich flavor. You can also use canned pumpkin puree if you are short on time. I like to use vegetable oil for a moist texture. Brown sugar adds a lovely, warm sweetness. The eggs help the muffins rise and bind the mix. Pure vanilla extract gives a delightful aroma that makes you smile. The dry ingredients are just as important. Flour gives structure. Baking soda and baking powder help the muffins rise. Pumpkin pie spice and cinnamon add warmth. Salt balances the sweetness. You can make these muffins your own with optional add-ins. Chopped walnuts or pecans add crunch. Chocolate chips bring a sweet surprise. Feel free to mix and match to suit your taste. For the full recipe, check out My Best Pumpkin Muffins Recipe. It will guide you through each step! Error: Error code: 429 - {'error': {'message': 'Rate limit reached for gpt-4o-mini in organization org-zFeAnX8gJvsCtEtJubNX3NN3 on tokens per min (TPM): Limit 200000, Used 198756, Requested 2298. Please try again in 316ms. Visit https://platform.openai.com/account/rate-limits to learn more.', 'type': 'tokens', 'param': None, 'code': 'rate_limit_exceeded'}} To achieve the best muffin rise, first, make sure your baking powder is fresh. Old baking powder can cause flat muffins. Fill each muffin cup only two-thirds full to allow space for rising. Avoiding overmixing is key for tender muffins. Mix until just combined. A few lumps are okay! Overmixing can make the muffins tough, so be gentle. To enhance taste, try adding spices. A pinch of nutmeg or a dash of ginger can elevate your muffins. These spices bring warmth and depth to each bite. Adding citrus zest, like orange or lemon, adds freshness. A teaspoon of zest can brighten the flavor. It pairs perfectly with pumpkin and spices, making a delightful muffin. For serving suggestions, try placing the muffins on a pretty plate. Dust them with powdered sugar for a sweet touch. You can also drizzle a simple icing on top for added sweetness. For creative plating options, stack muffins in a basket lined with a cloth. This gives a cozy feel. Top each muffin with extra nuts or a sprinkle of cinnamon for a great look! {{image_4}} You can easily change the flavor of your pumpkin muffins. Here are two fun ideas: - Maple pumpkin muffins: Replace some of the sugar with maple syrup. This gives a sweet, warm taste. - Chocolate swirl pumpkin muffins: Add chocolate chips into the batter. You can also swirl in some melted chocolate for a rich flavor. Need to fit your muffins to special diets? Here’s how: - Gluten-free pumpkin muffins: Use a gluten-free flour blend instead of all-purpose flour. This keeps the muffins soft and tasty. - Vegan pumpkin muffins: Substitute eggs with applesauce or flaxseed. Use plant-based oil for the right texture. Make your muffins festive or unique with simple additions: - Holiday-themed pumpkin muffins: Add spices like nutmeg or cloves for a holiday twist. - Incorporating cranberries or dried fruits: Toss in dried cranberries or raisins. They add a lovely texture and flavor. These variations make my best pumpkin muffins recipe even more exciting! Store your pumpkin muffins at room temperature. Keep them in a cool, dry spot. Use an airtight container to keep them fresh. They taste best within two days. If you want to keep them longer, refrigerate them. Muffins stay fresh in the fridge for up to a week. You can freeze pumpkin muffins for later. Wrap each muffin in plastic wrap. Then, place them in a freezer-safe bag. They last for about three months in the freezer. To thaw, move a muffin to the fridge overnight. For a quick reheat, pop it in the microwave for a few seconds. To keep your muffins fresh, always use airtight containers. This step helps prevent drying out. You can also add moisture-seeking ingredients like applesauce or yogurt. These help retain moisture and flavor. For added taste, consider adding a slice of bread in the container. This trick keeps muffins soft and fresh longer. For the full recipe, check out My Best Pumpkin Muffins Recipe. How do I know when my muffins are done? You can tell your muffins are done by inserting a toothpick into the center. If it comes out clean, the muffins are ready. They should bounce back slightly when you touch them. Overbaking can make them dry, so keep an eye on the time. Can I substitute fresh pumpkin for canned? Yes, you can use fresh pumpkin instead of canned. Just make sure to cook it until soft, then puree it. Canned pumpkin is often thicker and smoother, so you might need to adjust your recipe slightly. What is the best way to measure flour? The best way to measure flour is to spoon it into a measuring cup and level it off with a knife. Avoid scooping directly from the bag, as this can pack the flour down and give you too much. How do I make my muffins less dense? To make your muffins less dense, avoid overmixing the batter. Mix just until the ingredients combine. Also, make sure your baking soda and baking powder are fresh, as old leavening agents can affect rise. What can I use instead of eggs? If you want to replace eggs, you can use applesauce or mashed bananas. About 1/4 cup of either works well for each egg. This adds moisture and sweetness to the muffins. Can I use other types of sugar? Yes, you can use different sugars like coconut sugar or maple sugar. These will change the flavor a bit but can still work well in your muffins. Just keep the measurements the same for the best results. You can find My Best Pumpkin Muffins Recipe [here](#) for easy printing. This recipe is simple and fun to make. You can save it for future use to enjoy these tasty treats again. Just click the link to access all the details! You learned how to make amazing pumpkin muffins from start to finish. We covered essential and optional ingredients, step-by-step baking instructions, helpful tips, and fun variations. Remember, creating delicious muffins is about balance and practice. Don't be afraid to try new flavors or add-ins. With this guide, you can impress friends and family with your baking skills. Enjoy making and sharing these tasty treats!

Fall is the perfect time for warm, delicious pumpkin muffins that fill your kitchen with cozy scents. I’m excited to share my easy and tasty pumpkin muffins recipe that anyone …

Read more

Categories Dinner Tags NO-ING-IMG

Pumpkin Chocolate Chip Streusel Bread Delight

January 14, 2026July 20, 2025 by Chef Tavio
- 1 ½ cups all-purpose flour - 1 teaspoon baking powder - 1 teaspoon baking soda - ½ teaspoon salt - 1 teaspoon ground cinnamon - ½ teaspoon ground nutmeg - ½ teaspoon ground ginger - ½ cup granulated sugar - ½ cup brown sugar, tightly packed - ½ cup vegetable oil - 1 cup pumpkin puree (canned or freshly made) - 2 large eggs - 1 teaspoon vanilla extract - 1 cup semi-sweet chocolate chips - Streusel Topping: - ¼ cup all-purpose flour - ¼ cup brown sugar, tightly packed - 2 tablespoons cold butter, diced into small pieces - ½ teaspoon ground cinnamon To make Pumpkin Chocolate Chip Streusel Bread, you need a mix of dry and wet ingredients. Start with dry ones. You will need flour, baking powder, baking soda, salt, and spices. The spices add warmth and depth. For the wet ingredients, combine both sugars with oil. Then, mix in pumpkin puree, eggs, and vanilla. The puree gives it moisture and flavor. Next, you’ll add chocolate chips. They add sweetness and a lovely texture. Don't forget the streusel topping! It adds crunch and flavor. The topping combines flour, brown sugar, butter, and cinnamon. All these ingredients come together to create a delicious bread. If you want to see the complete process, check the Full Recipe. - Preheat oven to 350°F (175°C) - Grease a 9x5 inch loaf pan Start by preheating your oven. This step is key to getting that perfect bake. Grease the loaf pan well. It helps the bread slide out without sticking. - Combine flour, baking powder, baking soda, salt, and spices - Whisk until evenly mixed In a medium bowl, mix the dry ingredients. Combine the flour, baking powder, baking soda, salt, and spices like cinnamon and nutmeg. Whisk them well. This helps the flavors blend together. - Blend sugars and vegetable oil - Add pumpkin puree, eggs, and vanilla; mix until smooth In a larger bowl, blend the sugars with the vegetable oil. Make sure there are no lumps. Then, add the pumpkin puree, eggs, and vanilla. Mix until it’s smooth and creamy. - Gradually incorporate dry ingredients into wet mixture - Stir until just combined; fold in chocolate chips Now, take the dry mix and add it to the wet mix. Stir gently until just combined. You want it mixed, but not overworked. Finally, fold in the chocolate chips. This adds sweetness and richness to the bread. - Prepare streusel topping and sprinkle over the batter - Bake for 55-65 minutes; check with a toothpick For the streusel, mix flour, brown sugar, and cold butter in a small bowl. Use your fingers to make crumbs. Sprinkle this over the batter in the loaf pan. Now, bake it! Set a timer for 55-65 minutes. Use a toothpick to check doneness. It should come out clean or with a few moist crumbs. - Cool in the pan for 10 minutes - Transfer to wire rack to cool completely Once baked, let the bread cool in the pan for about 10 minutes. This helps it set. Then, flip it onto a wire rack to cool completely. Enjoy the sweet aroma filling your kitchen! For the Full Recipe, check the details above. To make great pumpkin chocolate chip streusel bread, start with correct measurements. Weighing or measuring cups can help. This step ensures your bread rises well and has the right texture. Next, mix gently. Overmixing can make the bread tough. Stir until you see no dry flour, but leave some lumps. This keeps the bread tender and soft. You can serve this bread warm or at room temperature. Warm bread tastes best, and the chocolate chips melt slightly. For a fun twist, spread cream cheese on each slice. You can also sprinkle powdered sugar on top. This adds a sweet touch and makes it look pretty. To boost the flavor, you can add extra spices. Try more cinnamon or a pinch of cloves. This gives the bread a warm taste. Also, experiment with different chocolate chips. Use dark, white, or even milk chocolate. Each type adds its own unique flavor. For the full recipe, check out the details above. {{image_4}} You can add walnuts or pecans to the batter. These nuts bring a lovely crunch. Chopped nuts blend well with the soft bread. They also add extra flavor and nutrition. Just fold them in gently before baking. If you need a gluten-free option, use a gluten-free flour blend. This swap works well for those avoiding gluten. The taste and texture remain delightful with this change. Make sure to check your flour blend for best results. Want to switch it up? Add dried fruit like cranberries or raisins. These fruits complement the pumpkin and chocolate nicely. They add sweetness and chewiness to each bite. Feel free to experiment with your favorite dried fruits! For detailed instructions, check out the Full Recipe. You can store the bread wrapped in plastic wrap for up to 3 days. This keeps it fresh and moist. I recommend placing it in a cool, dry spot in your kitchen. If you want it to last longer, keep it in the fridge for up to 1 week. Just make sure to wrap it well to prevent it from drying out. Chilling can make the flavors even better! For longer storage, freeze slices in an airtight container for up to 3 months. This way, you can enjoy a slice whenever you crave it. Just let it thaw on the counter or warm it up in the oven for a fresh taste. You can find the full recipe in the earlier section if you want to make this delicious bread! Yes, ensure it’s well-pureed. Fresh pumpkin can add a nice touch. Just roast and mash it until smooth. A toothpick should come out clean or with moist crumbs. If it comes out wet, bake a bit longer. Yes, substitute vegetable oil and use dairy-free chocolate. This change keeps it soft and tasty. Add more granulated or brown sugar to the batter. Start with a tablespoon more and taste. Absolutely! It makes a great breakfast bread or snack. Enjoy a slice with coffee or tea. Yes, adjust baking time to about 20-25 minutes in a muffin tin. Watch them closely for doneness. This blog post covered how to make delicious pumpkin bread from scratch. You learned about key ingredients, preparation steps, and helpful tips. Remember to mix dry and wet ingredients carefully and avoid overmixing for the best texture. Feel free to add nuts or explore gluten-free options to customize your bread. Whether it's for breakfast or dessert, this recipe is sure to please. Enjoy the baking process, and don't hesitate to share your creations!

Are you ready to indulge in a warm, cozy treat? This Pumpkin Chocolate Chip Streusel Bread is the perfect blend of sweet and spiced. With a moist texture, rich chocolate …

Read more

Categories Desserts Tags NO-ING-IMG

My Mom’s Old Fashioned Vegetable Beef Soup Delight

January 14, 2026July 20, 2025 by Chef Tavio
This soup is packed with love and rich flavors. Here are the main ingredients: - 1 lb beef chuck, cut into 1-inch cubes - 2 tablespoons vegetable oil - 1 large onion, diced - 2 garlic cloves, minced - 3 medium carrots, sliced - 2 celery stalks, chopped - 4 cups beef broth, preferably low sodium - 2 cups water - 1 can (14.5 oz) diced tomatoes, with their juices - 1 cup green beans, trimmed and cut into 1-inch pieces - 1 cup corn kernels (fresh, frozen, or canned) - 2 medium potatoes, diced into bite-sized pieces - 1 teaspoon dried thyme - 1 bay leaf - Salt and pepper to taste - Fresh parsley, finely chopped (for garnish) You can personalize this soup with some tasty add-ins. Consider these options: - Peas for a pop of color and sweetness - Bell peppers for extra crunch - Mushrooms for a rich, earthy taste - Spinach or kale for added greens - A splash of Worcestershire sauce for depth Seasoning makes this soup shine. Besides salt and pepper, try these: - Fresh herbs like thyme or rosemary for a bright taste - A pinch of red pepper flakes for some heat - Lemon juice for a zesty finish - A dollop of sour cream for creaminess Garnish with fresh parsley to add a splash of color. This soup is comforting and perfect for any day. The Full Recipe will guide you through making this delightful dish. Start by gathering all your ingredients. You will need: - 1 lb beef chuck, cut into 1-inch cubes - 2 tablespoons vegetable oil - 1 large onion, diced - 2 garlic cloves, minced - 3 medium carrots, sliced - 2 celery stalks, chopped - 4 cups beef broth, preferably low sodium - 2 cups water - 1 can (14.5 oz) diced tomatoes, with their juices - 1 cup green beans, trimmed and cut into 1-inch pieces - 1 cup corn kernels (fresh, frozen, or canned) - 2 medium potatoes, diced into bite-sized pieces - 1 teaspoon dried thyme - 1 bay leaf - Salt and pepper to taste - Fresh parsley, finely chopped (for garnish) Next, chop the onion, garlic, carrots, celery, and potatoes. This makes cooking easier. In a large pot or Dutch oven, heat the vegetable oil over medium-high heat. Add the beef cubes in a single layer. Sear them for 5-7 minutes until they are browned on all sides. Stir them to cook evenly. Once the beef is browned, take it out and set it aside. In the same pot, toss in the diced onion and minced garlic. Sauté these for 2-3 minutes until the onion is soft and smells great. Now, add the sliced carrots and chopped celery to the pot. Cook these for about 5 minutes. This step helps to soften the veggies. Return the seared beef to the pot. Pour in the beef broth, water, diced tomatoes, green beans, corn, and diced potatoes. Mix everything well. Stir in the dried thyme, bay leaf, salt, and pepper. Turn the heat up to bring it to a boil. Once boiling, lower the heat to let it simmer. Cover the pot and cook for 1.5 to 2 hours. This makes the beef tender and flavors blend well. After cooking, taste the soup. Add more salt and pepper if needed. Don’t forget to remove the bay leaf before serving. Ladle the soup into bowls. Garnish each bowl with fresh chopped parsley. This adds a nice touch and bright color. Serve hot and enjoy the warmth of my mom's old fashioned vegetable beef soup. For the full recipe, check out the details above. To make beef soup great, start with good beef. I love using chuck roast. It has just the right fat to keep it moist and tender. Sear the beef well to build flavor. Don't rush this step! It adds depth to your soup. Next, use fresh veggies. Fresh carrots, celery, and onions make a huge difference. They add sweetness and crunch. When you sauté them, they release their natural sugars, which adds a nice taste. Lastly, let the soup simmer. This time allows all the flavors to blend. A slow simmer for one and a half to two hours gives you the best taste. To make my mom's soup healthier, swap some ingredients. Use lean beef, like sirloin, instead of chuck. You can also add more vegetables. Think zucchini, bell peppers, or spinach. These add fiber and nutrients without many calories. Next, consider using low-sodium broth. This helps control the salt intake. You can always add salt later if needed. Lastly, try to use whole grain bread instead of white bread. This will give you more fiber and nutrients. You don’t need fancy tools for this soup, but a few key items help. A large pot or Dutch oven is essential. It distributes heat evenly. This ensures everything cooks well. A good cutting board and chef's knife are a must. They make chopping veggies fast and easy. Lastly, a ladle makes serving soup much simpler. It lets you get the right amount in each bowl without spills. For the full recipe, check the section above! {{image_4}} If you want to make a vegetarian or vegan soup, skip the beef. Use mushrooms for a meaty texture. Add chickpeas or lentils for protein. Swap beef broth with vegetable broth for flavor. You can keep all the veggies from the original recipe. Carrots, celery, and potatoes give great taste. This will still be hearty and satisfying. You can change the meat for a different flavor. Try chicken or turkey instead of beef. These meats cook quickly, so adjust your cooking time. You can also use ground beef or sausage for a different texture. For a smoky flavor, add some diced ham or bacon. Each choice brings a new twist to the soup. To boost flavor, add herbs and spices. Fresh herbs like rosemary or basil can add brightness. A splash of Worcestershire sauce gives depth. You can also toss in a dash of hot sauce for heat. For a sweeter note, add a bit of sugar or honey. Experimenting with flavors makes the soup your own. Check the [Full Recipe] for more tips! To store leftover soup, let it cool first. Pour it into an airtight container. Make sure to leave some space at the top for expansion. Seal the container tightly and place it in the fridge. This soup stays good for about three to four days. If you want to freeze the soup, use freezer-safe containers. Fill the containers, leaving some space at the top. You can also use freezer bags. Make sure to squeeze out as much air as possible before sealing. The soup can last up to three months in the freezer. When you are ready to eat it, just thaw in the fridge overnight. When reheating the soup, you can use the stove or microwave. For the stove, pour the soup into a pot. Heat it over medium heat, stirring often. This helps it heat evenly. If using a microwave, place the soup in a microwave-safe bowl. Heat it in short bursts, stirring in between. This prevents hot spots. Always check the temperature before serving. Enjoy your soup warm and delicious! To make this soup in a slow cooker, start by browning the beef. Heat oil in a skillet. Add the beef and cook until brown. This step adds great flavor. After browning, place the beef in the slow cooker. Then, add the diced onion, garlic, carrots, celery, beef broth, and all other ingredients. Set your slow cooker to low for 6-8 hours or high for 4 hours. Check the beef for tenderness at the end. If it is tender, your soup is ready! This method makes it easy and keeps the soup warm while you go about your day. If you need a substitute for beef broth, you have options. Use chicken broth for a lighter taste. Vegetable broth works well for a vegetarian option. You can also use water with added seasonings. Adding soy sauce or Worcestershire sauce will boost the flavor. Make sure to choose a broth that suits your taste. The broth is a key part of this soup, so pick one you enjoy. This soup can last about 3-4 days in the fridge. Store it in an airtight container to keep it fresh. When you want to eat it again, just reheat it on the stove or in the microwave. If you notice any off smells or changes in color, it’s best to throw it away. Always trust your senses when it comes to food safety. For the complete recipe, check out Mom's Hearty Vegetable Beef Soup. This blog post covered how to make my mom's old-fashioned vegetable beef soup. We discussed key ingredients, add-ins, and seasonings to enhance flavor. I shared step-by-step cooking instructions and valuable tips for a healthier soup. We even explored variations, storage tips, and answered common questions. Remember, cooking is about experimenting. Don’t hesitate to add your twist. Enjoy your soup journey!

Comfort food warms the soul, and nothing beats my mom’s old-fashioned vegetable beef soup. This delightful recipe blends tender beef with fresh veggies, creating a tasty dish that’s perfect for …

Read more

Categories Dinner Tags NO-ING-IMG

Delicious Homemade Salsa in Five Minutes Fresh Dip

January 14, 2026July 20, 2025 by Chef Tavio
- 3 ripe tomatoes, finely diced - 1 small red onion, finely chopped - 1 jalapeño pepper, seeded and minced - 2 cloves of garlic, minced - 1/4 cup fresh cilantro, roughly chopped - Juice of 2 fresh limes Fresh ingredients make the best salsa. Choose ripe tomatoes for sweetness. Red onion adds a nice crunch and sharp flavor. The jalapeño gives it a spicy kick. If you like heat, keep the seeds. Garlic brings a bold taste. Fresh cilantro adds a bright note to the mix. Limes add acidity and freshness, making the flavors pop. - Salt - Black pepper - Optional ground cumin Salt and pepper are key. They enhance all the flavors. Adjust them to your taste. If you want a smoky touch, add ground cumin. It gives a nice depth to your salsa. Remember, seasoning is important for a balanced dip. - Medium mixing bowl - Fork or spoon - Measuring cups and spoons Gather your tools before starting. A medium mixing bowl is perfect for combining the ingredients. Use a fork or spoon to mix everything gently. Measuring cups and spoons help get the right amounts. Having everything ready makes the process smooth and fast. You can whip up this fresh dip in just five minutes! For the complete recipe, check the full recipe section. - Finely dice 3 ripe tomatoes and chop 1 small red onion. - Seed and mince 1 jalapeño pepper. - Mince 2 cloves of garlic and chop 1/4 cup of fresh cilantro. - Mix all prepared ingredients in a medium bowl. - Squeeze the juice of 2 fresh limes over the mixture. - Add salt, freshly ground black pepper, and optional 1/4 teaspoon of ground cumin. - Gently fold all ingredients together without mashing the tomatoes. Taste your salsa to adjust the seasoning as needed. This fresh dip is all about balance and brightness. If you want more zing, add a bit more lime juice. This step helps keep the flavors lively. Pair it with crispy tortilla chips for the perfect snack. Enjoy making this zesty five-minute salsa! You can find the full recipe above. To get the best flavor in your salsa, always taste it. After mixing, check for salt and lime. Add more if needed. Fresh ingredients are key. Use ripe tomatoes and fresh cilantro for a bright taste. Fresh ingredients give your salsa life and a vibrant flavor. Serve your salsa with crispy tortilla chips. This creates a fun and tasty snack. You can also transfer the salsa to a small bowl. Place it on a colorful plate to impress your guests. For a final touch, add a sprig of cilantro on top. This adds a pop of color and freshness. If you want to make salsa ahead, it can taste even better. Letting it sit for a few hours helps the flavors mix. Store it in the fridge for up to three days. Always check for freshness before serving. If you see any changes in color or smell, it's best to toss it out. {{image_4}} You can easily switch some ingredients in your salsa. For a crunchy twist, use green bell pepper instead of jalapeño. This makes the salsa milder and adds a fresh taste. You can also add fruits for sweetness. Chunks of mango or pineapple bring a fun flavor. They pair well with the tartness of the lime. Do you like your salsa mild or spicy? If you want mild salsa, just skip the jalapeño. Instead, use a small amount of sweet bell pepper. For a spicy kick, try adding serrano peppers. They pack more heat than jalapeños. Always taste as you go. This way, you find the perfect spice level for your taste. Want a creamier salsa? Add some ripe avocado. Mash it up and mix it in for a smooth texture. It makes the salsa richer and adds healthy fats. Another idea is to add smoked ingredients. Try smoked paprika or chipotle peppers. These will give your salsa a deep, rich flavor that surprises your taste buds. You want to keep your salsa fresh and tasty. The best way to store it is in an airtight container. Glass jars or plastic containers work great. These containers prevent air from spoiling the salsa. Make sure the lid is on tight before you put it in the fridge. Store your salsa in the main part of the fridge, not the door. The door can get warm when you open it, which is not good for salsa. Homemade salsa lasts about 5 to 7 days in the fridge. Keep an eye on it, though! Look out for signs of spoilage. If you see mold or if the salsa smells sour, it’s time to toss it. Fresh salsa should smell bright and zesty. You can freeze homemade salsa if you want to keep it longer. First, pour the salsa into a freezer-safe container. Leave some space at the top because it will expand when frozen. Seal the container well, and label it with the date. To thaw your salsa, take it out of the freezer and place it in the fridge overnight. You can also thaw it in a bowl of cold water. Once thawed, stir it well before using. Frozen salsa is great for soups or sauces. For the full recipe, check out the Zesty Five-Minute Salsa. To make salsa less watery, you can follow a few simple tips: - Use firm tomatoes. They have less water than soft ones. - Seed your tomatoes before dicing. This helps reduce extra liquid. - Drain any excess liquid after dicing. Let diced tomatoes sit for a few minutes. - Add ingredients that absorb moisture. Chopped onions or even a bit of corn can help. - Chill your salsa before serving. This allows flavors to blend while reducing moisture. Yes, you can use canned tomatoes in salsa. Canned tomatoes are convenient and save time. They come in many styles, like diced or crushed. Here’s how they compare to fresh: - Canned tomatoes often have a richer taste. They are picked at peak ripeness. - Fresh tomatoes have a brighter, more vibrant flavor. They can add a nice crunch if you prefer that texture. - If using canned, drain excess liquid. This prevents your salsa from becoming too watery. - Choose tomatoes packed in juice or puree for a thicker texture. When it comes to chips, you have great options for pairing with salsa: - Tortilla chips are classic. Their corn flavor complements salsa well. - Pita chips add a nice crunch and are a bit different. - Veggie chips offer a healthier twist and a unique taste. - Homemade chips can be fun! Cut tortillas into triangles and bake them until crispy. - Always serve chips warm for the best flavor experience. In this article, we explored how to make fresh salsa from scratch. We covered essential ingredients like ripe tomatoes and jalapeños, detailed preparation steps, and offered tips for the best flavor. You can mix it up by trying different ingredients or adjusting spice levels. Fresh salsa adds zest to meals and is easy to store or freeze. Remember, the quality of your ingredients makes all the difference. Enjoy making your own salsa and share it with friends!

Craving a burst of flavor in just five minutes? You’re in the right place! In this post, I’ll show you how to whip up delicious homemade salsa using fresh ingredients …

Read more

Categories Appetizers Tags NO-ING-IMG

Rosemary Garlic Pull Apart Bread Irresistible Delight

January 14, 2026July 20, 2025 by Chef Tavio
For the best Rosemary Garlic Pull Apart Bread, gather these simple ingredients: - 3 ½ cups all-purpose flour - 1 packet (2 ¼ teaspoons) active dry yeast - 1 cup warm water (about 110°F/45°C) - ¼ cup extra virgin olive oil - 2 teaspoons granulated sugar - 1 teaspoon sea salt - 4 cloves garlic, finely minced - 2 tablespoons fresh rosemary, finely chopped (or 1 tablespoon dried rosemary) - ½ teaspoon freshly cracked black pepper - ½ cup unsalted butter, melted - Optional: extra rosemary sprigs for garnish Each ingredient plays a key role in creating flavor. The flour gives structure, while the yeast helps the bread rise. Warm water activates the yeast. Olive oil adds richness, and garlic provides a warm, savory note. You can use fresh or dried rosemary, but fresh yields a brighter taste. The butter, combined with garlic and rosemary, makes each piece of bread rich and flavorful. Don't skip the optional rosemary sprigs—they add a lovely touch when you serve the bread. For the complete process, check out the Full Recipe. To start, you need to activate your yeast. In a small bowl, mix warm water, sugar, and active dry yeast. The water should be warm but not hot. Let this sit for about 5-10 minutes. You will know it's ready when it becomes frothy and bubbly. In a large mixing bowl, combine the flour and salt. Stir them well. Next, create a well in the center of this mixture. Pour in the frothy yeast mixture and the olive oil. Mix this with a wooden spoon until it forms a dough. Move the dough to a floured surface. Knead for about 5-7 minutes until it feels smooth and elastic. Once your dough is ready, form it into a ball. Place it in a greased bowl. Cover the bowl with a damp cloth or plastic wrap. Let it rise in a warm area for about 1 hour, or until it doubles in size. After the dough has risen, punch it down gently to remove air bubbles. Divide the dough into small pieces, about 1-1.5 inches wide. In a separate bowl, mix the melted butter, minced garlic, chopped rosemary, and black pepper. Dip each dough piece into this mixture, coating it well. Stack the coated pieces in a greased bundt or cake pan. Cover the pan with a cloth. Allow the dough to rise for a second time for 30 minutes. Preheat your oven to 350°F (175°C). Bake the bread for 25-30 minutes. It should turn golden brown and sound hollow when tapped. You can find the full recipe for Rosemary Garlic Pull Apart Bread above. To get the right dough texture, it should feel soft and slightly sticky. This means you need enough moisture. If it’s too dry, add a little water. If it's too wet, sprinkle in some flour. A common mistake is over-kneading the dough. Knead just until it is smooth and elastic. This helps make the bread light and fluffy. Adding herbs can make your bread special. Try mixing in thyme or oregano for a new taste. You can also add a pinch of red pepper flakes for heat. For dipping oils, use high-quality olive oil. Infuse it with garlic or herbs to match your bread. This adds a burst of flavor every time you dip. For gatherings, serve the bread warm and fresh. Place it on a nice platter and add some small bowls of oil for dipping. You can sprinkle sea salt on top for an added touch. Pair this bread with soups or salads. It also goes well with grilled meats. The warm bread complements any meal and brings everyone together. {{image_4}} You can enhance the flavor by adding cheese to the dough pieces. For this, use cheeses like mozzarella, cheddar, or fontina. These cheeses melt well and create a gooey, rich texture. You can stuff small pieces of dough with cheese before dipping them in the garlic rosemary butter. This adds a delightful surprise in each bite. Want a twist on the classic? Try different herbs for your pull apart bread. You could use thyme, oregano, or basil. Each herb brings its own unique flavor. Mixing herbs can create a more complex taste. Just chop them finely and mix them in with the garlic and butter. Your bread will become an herb lover's dream. If you need a vegan version, you can make simple swaps. Use almond or oat milk instead of dairy. Substitute the butter with coconut oil or a vegan spread. For gluten-free bread, you can use almond flour or a gluten-free all-purpose blend. Make sure to add a binding agent like xanthan gum if needed. These adjustments keep the bread tasty while meeting your dietary needs. For more details, check out the Full Recipe for Rosemary Garlic Pull Apart Bread! To keep your rosemary garlic pull apart bread fresh, store it at room temperature. Wrap the bread in plastic wrap or aluminum foil. This method helps maintain moisture and flavor. It stays tasty for about 2 to 3 days when stored this way. If you see any signs of mold, it’s best to toss it out. For long-term storage, freezing is the way to go. Wrap the cooled bread tightly in plastic wrap. Then, place it in a freezer-safe bag. This method keeps the bread fresh for up to 3 months. When you're ready to enjoy it again, thaw it in the fridge overnight. To reheat, place the bread in a preheated oven at 350°F (175°C) for about 10-15 minutes. This warms it through and revives that lovely texture. Enjoy it warm for the best taste. For more details on making this bread, check out the Full Recipe. To make this bread, you need about two hours. You will spend around 30 minutes preparing the dough. Next, let the dough rise for one hour. After that, shape the bread and let it rise again for 30 minutes. Finally, bake it for 25 to 30 minutes. Yes, you can use dried herbs. Dried rosemary works well, but it has less flavor than fresh. Use one tablespoon of dried rosemary for every two tablespoons of fresh. The taste will change a bit, but it will still be tasty. You can prepare the dough in advance. After shaping it, cover and place it in the fridge overnight. The next day, let it sit at room temperature for about 30 minutes before baking. This way, you save time without losing flavor. I recommend using a bundt pan for a lovely shape. It helps the bread rise beautifully and gives a great presentation. A cake pan also works if you don’t have a bundt pan. Just make sure it’s greased well. To check doneness, look for a golden brown color. You can also tap the bottom of the bread. If it sounds hollow, it’s ready. Another tip is to use a toothpick; it should come out clean when inserted. For the full recipe, check out Rosemary Garlic Pull Apart Bread. This blog post covered how to make delicious Rosemary Garlic Pull Apart Bread. We explored the key ingredients, step-by-step instructions, and tips for perfecting your bread. You learned variations, like adding cheese and making it vegan or gluten-free. Lastly, we discussed storage methods for keeping your bread fresh. By trying this recipe, you’ll enjoy warm, flavorful bread that impresses everyone. Enjoy this fun baking adventure!

If you crave warm, aromatic, and mouthwatering bread, you’ve found the right recipe. My Rosemary Garlic Pull Apart Bread is a delight for the senses. Imagine soft, buttery pieces infused …

Read more

Categories Appetizers Tags NO-ING-IMG

Mason Jar Caprese Pasta Salad Fresh and Flavorful Meal

January 14, 2026July 18, 2025 by Chef Tavio
- 2 cups cooked pasta (fusilli or rotini recommended) - 1 cup cherry tomatoes, halved - 1 cup fresh mozzarella balls (bocconcini) - 1/2 cup fresh basil leaves - 1/4 cup red onion, thinly sliced - 1/4 cup extra virgin olive oil - 2 tablespoons balsamic vinegar - Salt and black pepper to taste - Optional: 1 tablespoon pesto for an added flavor kick To start, you need fresh ingredients. The pasta should be cooked until just right, or al dente. Fusilli or rotini work best for this dish. These shapes hold the dressing well. Next, grab ripe cherry tomatoes. Halve them for a burst of flavor in every bite. Fresh mozzarella balls add creaminess. Bocconcini works perfectly here. Don’t forget the fresh basil leaves. They add a nice aroma and taste. Thinly sliced red onion gives a bit of crunch and sharpness. For the dressing, use good quality extra virgin olive oil. It adds richness and depth. Balsamic vinegar gives a sweet and tangy kick. Season with salt and black pepper to taste. If you want extra flavor, add a tablespoon of pesto. It makes the salad even more special. Gather all these ingredients for a fresh and colorful Mason jar Caprese pasta salad. For the full recipe, check the section above. To cook pasta al dente, start by boiling water in a pot. Add a pinch of salt to the water. Then, add your pasta. I suggest using fusilli or rotini for this dish. Cook the pasta based on the package instructions, usually around 8 to 10 minutes. Check the pasta a minute or two before the time is up. You want it to be firm but not hard. Once it's done, drain it in a colander. Rinse the pasta under cold water to stop the cooking. This cooling step is key for layering. Set the cooled pasta aside. In a large mixing bowl, combine your cooled pasta with fresh ingredients. Add 1 cup of halved cherry tomatoes, 1 cup of fresh mozzarella balls, 1/2 cup of basil leaves, and 1/4 cup of thinly sliced red onion. Gently toss everything together. Next, let's make the dressing. In a separate bowl, whisk together 1/4 cup of extra virgin olive oil, 2 tablespoons of balsamic vinegar, and a pinch of salt and black pepper. If you like, add 1 tablespoon of pesto for extra flavor. Drizzle this dressing over the pasta mixture and toss again. Make sure every piece is coated well. Now, let's layer our jars for the best taste and look. Start by pouring a thin layer of dressing at the bottom. This helps keep the pasta from getting soggy. Next, add your pasta mixture. Layer in more cherry tomatoes and mozzarella balls. Finally, top with fresh basil leaves. This will look great and keep the basil fresh. Seal each jar tightly. It’s best to chill them for at least 30 minutes. This helps the flavors blend well. For a lovely touch, serve each jar with a small fork or spoon. You can even tie a sprig of basil around the jar with twine. Enjoy your Mason jar Caprese pasta salad! Layering your salad in the jar is key. Start with the dressing at the bottom. This keeps the pasta from getting soggy. Then, add the pasta next. It acts like a barrier. Follow with cherry tomatoes and mozzarella. Lastly, place fresh basil on top. This keeps the herbs vibrant and fresh. To prevent sogginess, rinse your pasta with cold water after cooking. It cools the pasta and stops cooking. You want it to be firm, not mushy. Mason jar salads look great. You can serve them at picnics, parties, or lunch. For a fun touch, attach a small fork or spoon on the side. You can also tie a sprig of basil around the jar with twine. It makes each jar feel special. Pair this salad with crusty bread or a light soup. It balances the meal and adds flavor. Fresh herbs bring your salad to life. Add basil leaves for a bright taste. You can also experiment with other herbs. Parsley or oregano can add unique notes. Let the salad rest for at least 30 minutes before serving. This allows the flavors to blend. The longer it sits, the better it tastes. {{image_4}} You can change the pasta type in this salad. Try using penne, farfalle, or even whole wheat pasta. Each brings a new texture and flavor. You can also switch up the vegetables based on what is fresh. In summer, add zucchini or bell peppers. In winter, use roasted butternut squash or kale for warmth. Changing the dressing can elevate your salad. Instead of balsamic, use a lemon vinaigrette for a fresh twist. You can add some garlic or crushed red pepper for a kick. To create a rustic Caprese twist, include sun-dried tomatoes or a drizzle of pesto. Both add depth and richness. For a gluten-free version, use gluten-free pasta. Many brands offer great options that cook well. If you want a vegan salad, skip the mozzarella. Use avocado or marinated tofu as a creamy substitute. These swaps keep your salad tasty and accommodating for all diets. To keep your Mason jar Caprese pasta salad fresh, start with clean jars. Wash them in hot, soapy water. After drying, pack your salad tightly but gently. This helps keep air out and flavors in. You can layer the ingredients in the jars or mix them. When layering, put the dressing on the bottom. This keeps the pasta from getting soggy. Close the jars with tight lids to seal in the freshness. For leftovers, store them in the same jars if possible. This way, you save time and space. If you have extra salad that won't fit in the jars, use an airtight container. Keep it in the fridge for best results. Your Mason jar Caprese pasta salad will stay fresh for about three to five days in the fridge. The key is to keep it cold and sealed. If you notice the tomatoes getting soft or the basil wilting, it's time to eat it! Freezing is not recommended for this salad. The texture of the pasta and fresh ingredients will change when frozen. However, you can prepare the pasta and dressing ahead of time, then assemble when you're ready to eat. This keeps everything fresh and tasty. If you want to check the full recipe, you’ll find all the details there. I recommend using fusilli or rotini pasta. These shapes work well because they hold the dressing nicely. Their curves trap the flavors, making each bite taste great. You can also use penne or farfalle if you like. Just make sure the pasta is cooked al dente. This means it should be firm, not mushy. The right pasta shape helps create a fun texture in your salad. Yes, you can make this salad ahead of time! I suggest preparing it a few hours before serving. This allows the flavors to blend well. If you want to make it even earlier, you can assemble the jars a day in advance. Just keep them in the fridge. Just remember to add the dressing last. This will keep your pasta from getting soggy. The longer it sits, the better it tastes! Serving this salad at a gathering is simple! Each mason jar acts as a perfect portion. You can give each guest their own jar. This makes it easy for people to grab and eat. For a fun touch, attach a small fork or spoon to each jar. If you want to add some flair, tie a basil sprig around the jar with twine. This makes your meal look beautiful and inviting. Enjoy the smiles when you serve it! This blog post shared an easy and tasty Mason Jar Caprese Pasta Salad recipe. You learned about the key ingredients, cooking techniques, and perfect layering tips. You also saw ways to mix and match flavors, adjust for diets, and store leftovers. In conclusion, this salad is not only simple but also fun to make. Enjoy your fresh, healthy meal in a jar!

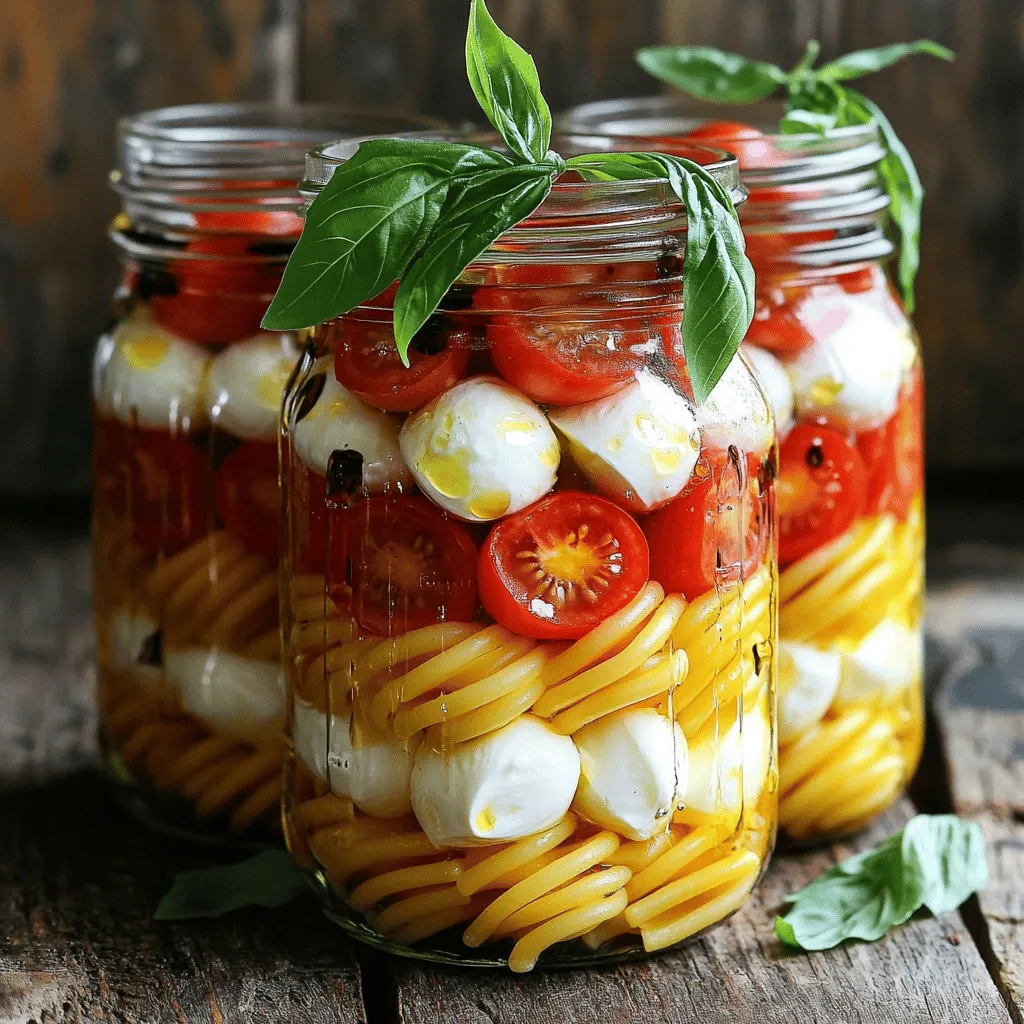
Looking for a fresh and flavorful meal that’s easy to make? Try my Mason Jar Caprese Pasta Salad! Packed with vibrant ingredients like cherry tomatoes, mozzarella, and fresh basil, this …

Read more

Categories Salads Tags NO-ING-IMG

Healthy Fudgy Double Chocolate Muffins Irresistible Treat

January 14, 2026July 18, 2025 by Chef Tavio
- 1 cup whole wheat flour - 1/2 cup unsweetened cocoa powder - 1 teaspoon baking powder - 1/2 teaspoon baking soda - 1/4 teaspoon salt - 1/2 cup honey or maple syrup - 1/2 cup unsweetened applesauce - 1/4 cup coconut oil, melted - 2 large eggs - 1 teaspoon vanilla extract - 1/2 cup dark chocolate chips (dairy-free if desired) Whole wheat flour adds fiber, helping with digestion. Cocoa powder is rich in antioxidants. Baking powder and baking soda help the muffins rise. The salt balances flavors. Honey or maple syrup acts as a natural sweetener, providing vitamins. Applesauce keeps the muffins moist and adds natural sweetness. Coconut oil is a healthy fat that can boost heart health. Eggs provide protein and help bind the ingredients. Vanilla extract adds flavor without extra sugar. Dark chocolate chips offer a rich taste and antioxidants. If you need gluten-free muffins, swap whole wheat flour for almond or oat flour. For a vegan option, replace eggs with flax eggs or chia seeds mixed with water. Use agave syrup instead of honey for a vegan sweetener. If you have a nut allergy, make sure to choose a chocolate that is allergen-free. Instead of coconut oil, you can use vegetable oil or applesauce for fat. Start with a clean kitchen. Gather all your ingredients. You will need whole wheat flour, cocoa powder, baking powder, baking soda, salt, honey, applesauce, coconut oil, eggs, vanilla, and dark chocolate chips. This will help you stay organized and make the process smooth. 1. Preheat your oven to 350°F (175°C). This is key for even baking. 2. Prepare your muffin tin. Use paper liners or grease it lightly with coconut oil. 3. In a medium bowl, mix the dry ingredients: whole wheat flour, cocoa powder, baking powder, baking soda, and salt. Whisk until smooth. 4. In a larger bowl, combine the wet ingredients: honey or maple syrup, applesauce, melted coconut oil, eggs, and vanilla. Blend until creamy. 5. Slowly add the dry mix to the wet mix. Stir gently with a spatula until just combined. A few lumps are okay. 6. Fold in the dark chocolate chips. This gives each muffin a rich chocolate flavor. 7. Scoop the batter into the muffin cups. Fill them about three-quarters full for perfect rising. 8. Bake for 15 to 18 minutes. Test doneness with a toothpick; it should come out mostly clean. 9. Let muffins cool in the tin for 5 minutes. Then, transfer them to a wire rack to cool completely. - Don’t overmix the batter. This keeps the muffins soft and fudgy. - Use room temperature eggs. They blend better and help create a smooth mixture. - Keep an eye on baking time. Every oven is different, so check early to avoid overbaking. - Allow muffins to cool in the tin briefly. This helps them hold their shape and texture. For the full recipe, refer to the complete instructions above. Happy baking! To make your muffins moist and fudgy, use unsweetened applesauce. It adds moisture without extra fat. Also, make sure not to overmix your batter. Stir gently until just combined. This keeps the muffins soft. Adding dark chocolate chips helps too. They melt slightly during baking, creating pockets of gooey chocolate. One common mistake is overbaking. Check your muffins at 15 minutes. If a toothpick comes out clean or with a few crumbs, they are done. Another mistake is using cold ingredients. Make sure your eggs and other ingredients are at room temperature. This helps create a smoother batter. Having the right tools can make baking easier. Here are some must-haves: - Mixing bowls: Use a large bowl for wet and a medium bowl for dry ingredients. - Whisk: A good whisk helps blend your wet ingredients well. - Muffin tin: Use a non-stick muffin tin or line it with paper liners. - Ice cream scoop: This gives you even portions of batter. - Toothpick: Perfect for testing if your muffins are done. With these tips, your Healthy Fudgy Double Chocolate Muffins will be a hit. For the full recipe, check earlier in the article. Enjoy your baking! {{image_4}} You can make these muffins gluten-free. Use gluten-free flour instead of whole wheat flour. Choose a blend that works well for baking. Almond flour or oat flour are good choices. The texture will be slightly different, but still delicious. Ensure that all other ingredients are also gluten-free. This way, everyone can enjoy them! To create a vegan version, swap the eggs for flax eggs. Mix 1 tablespoon of ground flaxseed with 2.5 tablespoons of water for each egg. Let it sit for a few minutes until it thickens. Use maple syrup instead of honey for sweetness. This keeps the muffins plant-based, tasty, and moist. Adding extras can boost flavor and texture. Consider mixing in walnuts or pecans for a nutty crunch. Dried fruits like cherries or cranberries can add sweetness. For a fun twist, try a dash of espresso powder to enhance the chocolate flavor. You can also fold in some peanut butter or almond butter for added richness. Each choice brings a unique touch to your muffins! For the full recipe and more details, check out the complete instructions. To keep your Healthy Fudgy Double Chocolate Muffins fresh, store them in an airtight container. This will help maintain their moisture and texture. You can place them on the counter for up to three days. If you want to keep them longer, refrigerate them for up to a week. Make sure they cool completely before sealing them. This prevents any extra moisture from forming inside the container. Freezing muffins is a great way to save them for later. First, let the muffins cool down completely. Then, wrap each muffin in plastic wrap. This helps keep them from drying out. After that, place all wrapped muffins in a freezer-safe bag. Try to remove as much air as possible from the bag. You can freeze them for up to three months. When you're ready to eat one, just take it out and let it thaw at room temperature. Reheating your muffins brings back that fresh-baked taste. You can use the microwave for quick reheating. Place a muffin on a microwave-safe plate. Heat it for about 10 to 15 seconds. If you want a crispy top, use the oven. Preheat your oven to 350°F (175°C). Heat the muffin for about 5 to 7 minutes. Either way, enjoy your treat warm with a cup of coffee or tea! For the full recipe, check out the cooking guide. Yes, you can swap applesauce for mashed bananas or yogurt. Both options add moisture. If you want a thicker muffin, use Greek yogurt. For a sweeter taste, ripe bananas work well. Just remember that these swaps may slightly change the flavor and texture. To check if your muffins are done, insert a toothpick into the center. If it comes out clean or with a few moist crumbs, they are ready. Baking usually takes 15 to 18 minutes. Keep an eye on them to avoid overcooking. These muffins use whole wheat flour instead of white flour. Whole grains add fiber and nutrients. We also use honey or maple syrup instead of sugar, which offers natural sweetness. Applesauce replaces oil, cutting down on fat. Dark chocolate chips provide antioxidants too. These choices make the muffins a better option for your health. For the full recipe, check the section above. These healthy fudgy double chocolate muffins are tasty and easy to make. We covered the best ingredients, their benefits, and good substitutions. You now have clear, step-by-step baking instructions and tips to avoid common mistakes. Plus, I shared ways to adjust the recipe for gluten-free and vegan diets. Storing and reheating muffins properly ensures they stay delicious. Remember, a little practice will help you perfect these muffins. Enjoy baking and sharing these treats with friends and family!

Craving something sweet that doesn’t compromise your health? You’ve come to the right place! In this recipe for Healthy Fudgy Double Chocolate Muffins, you’ll uncover a treat that’s not only …

Read more

Categories Desserts Tags NO-ING-IMG

Irresistible Fig Jam Recipes for Every Occasion

January 14, 2026July 18, 2025 by Chef Tavio
To make a tasty fig jam, gather these simple items: - 2 pounds fresh figs, stems removed and chopped into quarters - 1 cup granulated sugar - 1/4 cup freshly squeezed lemon juice - 1 teaspoon pure vanilla extract - 1 teaspoon ground cinnamon - 1/4 teaspoon sea salt If you cannot find fresh figs, try these options: - Dried figs work well. Soak them in warm water for 30 minutes. - Use other fruits like peaches or plums for a different flavor. - Apples can mimic the sweetness, but adjust sugar if needed. You will need a few basic tools to make this jam: - A large mixing bowl for combining the figs and sugar - A large pot to cook the jam - A stirring spoon to mix the ingredients - A ladle for pouring the jam into jars - Pre-sterilized glass jars for storing the jam Using the right tools makes the process smoother. Each step flows better with good equipment. This helps you enjoy making your fig jam even more. For the full recipe, check the details above. First, gather your figs. You need 2 pounds of fresh figs. Remove the stems and chop them into quarters. In a large mixing bowl, add the chopped figs and 1 cup of granulated sugar. Toss gently until the figs are well coated. This mix should sit for about 30 minutes. This step helps the figs release their natural juices. After the figs have sat, transfer the mixture into a large pot. Place it over medium heat. Add 1/4 cup of freshly squeezed lemon juice, 1 teaspoon of pure vanilla extract, 1 teaspoon of ground cinnamon, and 1/4 teaspoon of sea salt. Stir well to combine all the ingredients. Bring the mixture to a gentle boil while stirring frequently. Once it boils, reduce the heat to low. Let it simmer uncovered for about 30 to 40 minutes. Stir it occasionally. The jam is ready when the figs soften and break down, and the mixture thickens. To check if your jam is set, drop a spoonful onto a chilly plate. Let it cool for a few seconds. If it holds its shape and does not run, your jam is ready. Pour the hot jam into pre-sterilized glass jars, leaving about 1/4 inch of space at the top. Wipe the rims of the jars with a clean cloth for a good seal. Screw on the lids tightly. Let the jars cool at room temperature for a couple of hours. For longer storage, consider processing them in a hot water bath for shelf stability. For the full recipe, check out the Irresistible Fig Jam Delight section. To get the right thickness for your fig jam, watch the cooking time. Simmer it for about 30 to 40 minutes. Stir it often to stop it from burning. When the figs soften, check the texture. Use a cold plate test to see if it sets well. Just drop a spoonful on the plate. If it stays put, you are good to go! You can make your fig jam extra special. Try adding a splash of balsamic vinegar for a tangy twist. A bit of ginger adds a warm spice. For a herbal note, consider fresh rosemary or thyme. These flavors can really brighten the jam and make it unique. Feel free to mix and match your favorites! One big mistake is using unripe figs. They won't break down well and taste sour. Also, do not rush the simmering process. If you cook it too fast, the jam may burn. Lastly, don’t skip the lemon juice. It helps balance sweetness and keeps the jam fresh. Follow these tips for a perfect result every time! {{image_4}} You can make your fig jam even better by adding fun flavors. Try mixing in a few tablespoons of chopped nuts, like walnuts or almonds. They give a nice crunch. You can also add herbs like rosemary or thyme for a twist. A splash of brandy or bourbon can add depth. If you love spice, try adding a pinch of cayenne or fresh ginger. If you want to swap sugar, many options work well. Honey is a great choice; it adds its own flavor and sweetness. Maple syrup gives a nice, rich taste. You can also try agave nectar or coconut sugar. Just remember, each sweetener will change the flavor a bit, so taste as you go! Fig jam is great on toast, but it can do so much more. Spread it on pancakes or waffles for a sweet breakfast. Mix it into yogurt for a tasty snack. You can also pair fig jam with cheese for a fancy appetizer. Try it with brie or goat cheese. It’s a hit at any gathering. For a fun dessert, serve it with ice cream or in a parfait. The possibilities are endless! Homemade fig jam lasts about three weeks in the fridge. If you can it properly, it can last up to a year. To keep it fresh, watch for any signs of spoilage like mold or off smells. Always use clean utensils to avoid contamination. Store fig jam in clean, sterilized glass jars. Make sure to leave some space at the top for expansion. Tightly screw on the lids to keep air out. Keep the jars in a cool, dark place if you do not open them right away. Once opened, move the jar to the fridge. Use a water bath canner to preserve your fig jam. Sterilize your jars and lids before filling them. Fill jars with hot jam, leaving 1/4 inch space. Wipe the rims to remove any residue. Seal the jars and process them for about 10-15 minutes. Let them cool completely before storing. Following these steps ensures your fig jam stays tasty and safe to eat. For a delicious start, check out the Full Recipe for Irresistible Fig Jam Delight. Yes, you can use dried figs. However, the taste and texture will change. Dried figs lack moisture, which fresh figs have. To use dried figs, soak them in warm water for about 30 minutes. This will help them soften. After soaking, chop the figs and follow the same steps in the recipe. To check if your jam is ready, use a cold plate. Drop a spoonful of jam on it. Wait a few seconds, then tilt the plate. If the jam holds its shape, it is ready. You can also check the thickness with a spoon. If it coats the back of the spoon, it's ready to jar. Fig jam pairs well with many foods. Here are some great options: - Soft cheeses like brie or goat cheese - Toasted baguette slices - Crackers - Yogurt or oatmeal - Roasted meats, especially pork or chicken - Ice cream or cheesecake These pairings will bring out the sweet and savory notes of the jam. Enjoy trying different combinations! This blog post covered making fig jam from fresh figs. You learned about key ingredients, helpful tools, and easy steps. I shared tips for perfecting texture and flavor. You can try various mix-ins for unique flavors and ways to store your jam safely. Remember, making fig jam can be fun and rewarding. With practice, you can create delicious spreads to enjoy or share. Enjoy your fig jam journey and get creative in the kitchen!

Fig jam is a sweet treat that makes any meal special. In this post, I’ll share irresistible fig jam recipes that fit every occasion. Whether you’re new to canning or …

Read more

Categories Desserts Tags NO-ING-IMG
Older posts
Newer posts
← Previous Page1 … Page66 Page67 Page68 … Page73 Next →

TASTED NEST

Where Flavor Finds a Home 🍳🏡 — warm, simple, and crave-worthy recipes made for real life, from stovetop mornings to backyard dinners.

PAGES

Home About Contact Privacy Policy Terms & Conditions Cookie Policy GDPR Policy Copyright Policy Disclaimer

CATEGORIES

Appetizers Desserts Salads Breakfast Dinner
Copyright © 2026 Tasted Nest. All rights reserved.