Skip to content
  • GDPR Privacy Policy
  • Copyright Policy
  • Disclaimer
  • Terms & Conditions
Tasted Nest
  • Home
  • Appetizers
  • Desserts
  • Salads
  • Breakfast
  • Dinner
  • Privacy Policy
  • Contact
  • About

NO-ING-IMG

Pumpkin Spice Latte Overnight Oats Tasty Recipe

January 14, 2026October 18, 2025 by Chef Tavio
To make these tasty oats, you need the following ingredients: - 1 cup rolled oats - 1 cup milk of choice (almond, oat, soy, or regular) - 1/2 cup canned pumpkin puree - 1 tablespoon maple syrup (or honey for sweetness) - 1 teaspoon pumpkin pie spice - 1/2 teaspoon vanilla extract - 1 tablespoon chia seeds - A pinch of salt These ingredients come together to create a creamy and flavorful dish. You can easily modify this recipe to fit your needs: - Dairy-Free: Use almond, oat, or soy milk. - Gluten-Free: Ensure you use certified gluten-free oats. - Low Sugar: Replace maple syrup with a sugar-free sweetener. These swaps keep the taste while meeting your diet. Add some flair to your oats with these fun toppings: - Whipped cream for a rich texture - Crushed nuts for a crunchy bite - An extra sprinkle of pumpkin pie spice for more flavor These toppings make your oats even more delightful! Start by taking a mixing bowl. Add 1 cup of rolled oats to it. Next, pour in 1 cup of your favorite milk. It can be almond, oat, soy, or regular. Then, add 1/2 cup of canned pumpkin puree. This gives your oats that wonderful pumpkin flavor. Now, we need to sweeten it up! Add 1 tablespoon of maple syrup or honey. This will make your oats tasty. After that, sprinkle in 1 teaspoon of pumpkin pie spice. This spice mix makes it feel like fall. Don’t forget to add 1/2 teaspoon of vanilla extract for extra flavor. Finally, toss in 1 tablespoon of chia seeds and a pinch of salt. The chia seeds help with the texture. Mix all these ingredients well until you have a creamy texture. Now, it’s time to divide the mixture. Spoon the mix into jars or containers. Make sure each jar gets an even amount. This way, every serving is just right. Seal the jars tightly with lids. Put the jars in the refrigerator overnight. If you’re in a hurry, let them soak for at least 4 hours. This soaking helps the oats absorb the milk and soften. The next morning, take the jars from the fridge. Open one and stir the oats again. If they seem too thick, add a splash of milk. Stir until you get your desired texture. You can serve your oats cold or warm them up in the microwave. For a fun touch, add whipped cream on top. You can also sprinkle some crushed nuts for crunch. A little extra pumpkin pie spice on top gives it that autumn vibe. Enjoy your delicious pumpkin spice latte overnight oats! To get the best texture, use rolled oats. They soak well and stay chewy. Mix your ingredients well to ensure every oat gets flavored. If your oats are too thick the next day, add a little milk. Stir it up until it feels just right. Maple syrup adds a nice sweetness, but honey works too. For a twist, try adding a bit of brown sugar or agave syrup. You can also boost flavor with vanilla extract or a dash of nutmeg. If you love extra spice, add more pumpkin pie spice. Make these overnight oats the night before for a quick breakfast. You can prepare them in jars for easy grab-and-go meals. Store them in the fridge for up to three days. This way, you always have a tasty and healthy meal ready. {{image_4}} You can easily make pumpkin spice latte overnight oats dairy-free. Simply swap regular milk for almond, oat, or soy milk. These choices work well and keep the oats creamy. If you want to make it vegan, use maple syrup instead of honey for sweetness. This way, you still get that tasty flavor without any animal products. Feel free to get creative with flavors! You can add a scoop of peanut butter or almond butter for a nutty twist. Want more sweetness? Try adding mashed banana or a drizzle of agave syrup. You can also mix in some chocolate chips or cocoa powder for a chocolatey version. Each of these changes can make your oats unique and exciting. When the holidays come around, you can change the recipe to fit the season. Try adding cranberries or apples for a festive touch. You can also sprinkle some nutmeg or cinnamon on top for extra warmth. For a winter version, mix in peppermint extract for a refreshing flavor. These seasonal twists bring a new vibe to your overnight oats while keeping them delicious. To keep your pumpkin spice latte overnight oats fresh, store them in airtight jars. Make sure the lids fit tightly. This prevents air from getting in and keeps your oats creamy. Place the jars in the fridge right after you make them. They will stay good for up to 5 days. You can freeze these oats if you want to save them for later. Simply scoop the oats into freezer-safe containers. Leave some space at the top for expansion. Seal the containers tightly. When you want to eat them, take a jar out of the freezer. Place it in the fridge overnight to thaw. If you're in a hurry, you can also thaw them in the microwave. These oats last for about 5 days in the fridge. If you notice any mold or an off smell, throw them away. If the oats look dry or have separated, they may be past their prime. Fresh oats should smell sweet and have a smooth texture. Always check before you dig in! Yes, you can use quick oats. They cook faster and soak up liquid quickly. This change will make your oats softer and creamier. Just remember they may not have the same chewy texture as rolled oats. If you like a smoother consistency, go for it! To lower the sugar, reduce or skip the maple syrup. You can also use unsweetened milk. Adding spices like cinnamon or nutmeg can enhance flavor without added sugar. Try using ripe bananas or applesauce as natural sweeteners. They add sweetness and nutrition too! Chia seeds are not necessary, but they add great benefits. They help thicken the oats and boost nutrition. Chia seeds are rich in fiber and omega-3s. If you don't have them, you can skip them or replace with ground flaxseed. This article covered making pumpkin spice latte overnight oats. We explored key ingredients, steps, tips, and variations. You can customize this dish for your diet and taste. Remember to store it correctly to keep it fresh. Whether you choose to make it vegan or add your favorite toppings, you have many options. Enjoy this tasty treat any time of year! Now, it’s time for you to get cooking and enjoy your delicious creation.

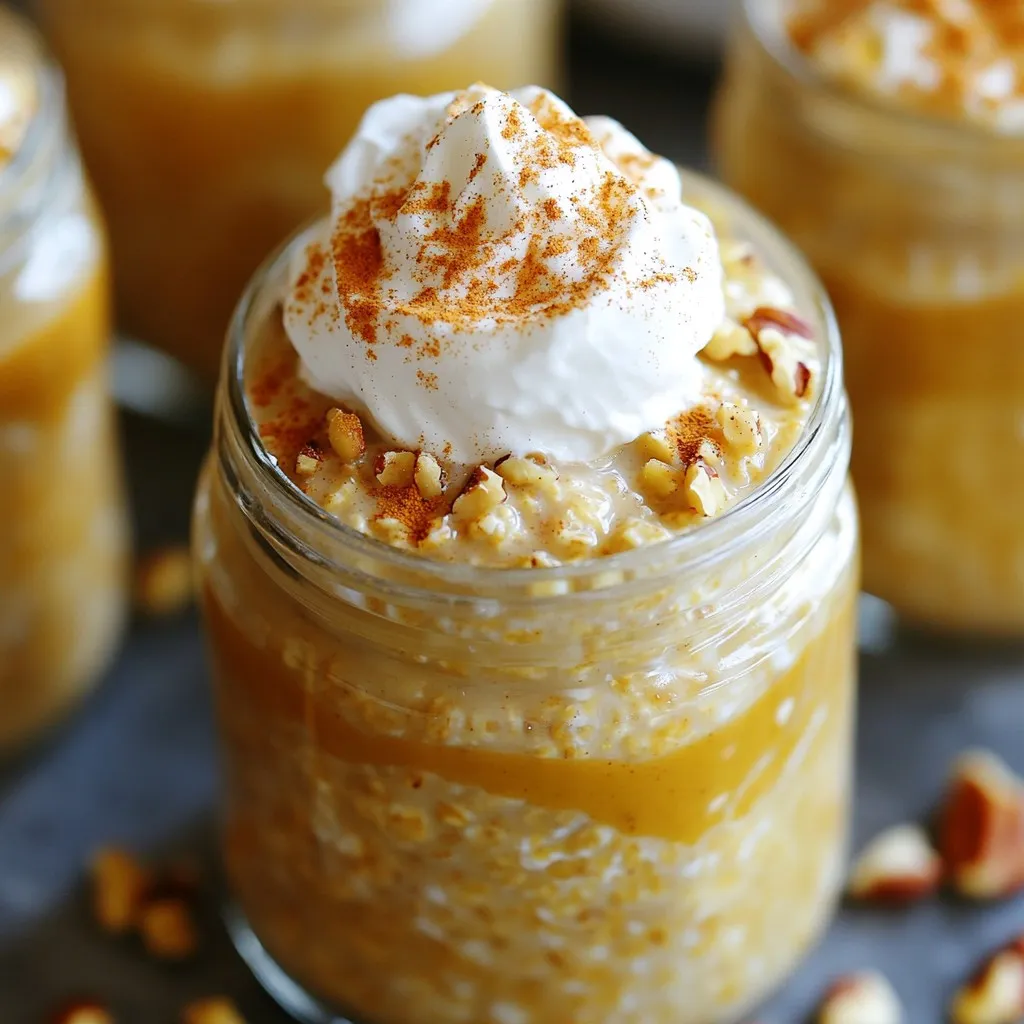
Are you craving the cozy flavors of fall? My Pumpkin Spice Latte Overnight Oats recipe is the perfect solution. Not only do they pack the comforting taste of your favorite …

Read more

Categories Breakfast Tags NO-ING-IMG

Savory Slow Cooker Honey Garlic Beef Sliders Recipe

January 14, 2026October 18, 2025 by Chef Tavio
- 2 lbs beef chuck roast - 1/2 cup honey - 1/4 cup soy sauce (or tamari) - 4 cloves garlic, minced - 1 tablespoon fresh ginger, grated - 1 teaspoon freshly ground black pepper - 1/2 teaspoon crushed red pepper flakes - 1 cup beef broth - 12 slider buns - 1 cup coleslaw mix - 1/4 cup sliced green onions To make these sliders, you need a few key items. The beef chuck roast provides a rich flavor and tender texture. Honey adds sweetness, while soy sauce gives saltiness. Garlic and ginger bring bold flavors to the mix. Black pepper and red pepper flakes add a little kick. Beef broth keeps everything moist and tasty. Finally, you’ll need slider buns, coleslaw mix for crunch, and green onions for garnish. - Gluten-free options: Use tamari instead of soy sauce for a gluten-free choice. - Alternative sweeteners: Maple syrup or agave can replace honey for a different taste. - Different cuts of beef: You can also use brisket or round roast. Each will change the flavor and texture slightly. Feel free to swap ingredients based on what you have or what you like. Cooking should feel fun and flexible! Start by cutting the beef chuck roast into large chunks. Trim off any excess fat. This helps the beef cook evenly. Next, season the beef well. Use freshly ground black pepper and add crushed red pepper flakes if you want some heat. This seasoning boosts the flavor of the meat. In a medium bowl, mix the sauce ingredients. Combine honey, soy sauce, minced garlic, grated ginger, and beef broth. Whisk them well until the sauce is smooth. The right balance of honey and soy sauce gives a sweet and savory taste. This sauce will coat the beef as it cooks, making it extra tasty. Transfer the seasoned beef chunks into the slow cooker. Pour the honey garlic sauce over the beef. Make sure every piece gets coated. Cover the slow cooker with its lid. Set it to cook on low for 6 to 8 hours. The beef will become very tender and easy to shred when it's done. Once cooking is complete, carefully take the beef out of the slow cooker. Use tongs to avoid burns. Shred the beef into bite-sized pieces using two forks. This method is quick and effective. After shredding, return the meat to the slow cooker. Mix it well with the remaining sauce so every bit of beef is coated. If you like toasted buns, lightly toast them in a skillet or toaster. Take the bottom half of each bun. Scoop on the honey garlic beef mixture generously. Add a handful of coleslaw mix for a nice crunch. Finish with sliced green onions for color and fresh taste. Cap each slider with the top half of the bun. - Seasoning adjustments for different preferences: If you like more spice, add extra crushed red pepper flakes. For a sweeter taste, try adding a bit more honey. You can also use low-sodium soy sauce if you want to control the salt. Adjust these ingredients to fit your taste. - Cooking time variations based on slow cooker models: Every slow cooker heats differently. If your model cooks fast, check the beef after 5 hours on low. If it seems tough, let it cook longer. The beef should be very tender and easy to shred. - Plating suggestions for serving: For a great look, serve the sliders on a wooden board. This gives a rustic feel. You can stack them in rows or arrange them in a circle. - Garnishing tips with green onions and lime: Top each slider with green onions for color. Add lime wedges on the side to give a fresh touch. This brightens the dish and adds flavor. - Best beverages to serve with sliders: These sliders go great with iced tea or lemonade. A light beer also fits well. Choose drinks that balance the sweet and savory flavors of the beef. - Side dishes that complement the meal: Serve with crispy sweet potato fries or a fresh salad. A tangy coleslaw pairs well too. These sides add crunch and freshness, making your meal complete. {{image_4}} You can swap beef for chicken or pork. Chicken thighs work great in this recipe. They stay moist and tender. For pork, use a pork shoulder. It will give you juicy sliders. If you want plant-based options, use jackfruit or mushrooms. Jackfruit shreds well and soaks up flavor. Mushrooms add a rich, earthy taste. Both can replace beef in this dish. To boost flavors, add herbs and spices. Fresh herbs like cilantro or basil brighten the dish. Spice it up with smoked paprika or cumin for a twist. You can even add a splash of lime juice for zest. Experiment with sauces too. Try barbecue sauce for a smoky kick or teriyaki sauce for a sweet touch. Mixing different sauces can make your sliders unique. For healthier sliders, use lean cuts of meat. Trim off any excess fat. You can also use less honey or choose a sugar-free alternative. This will lower the calorie count. If you need gluten-free options, use tamari instead of soy sauce. Look for gluten-free buns to complete your meal. For dairy-free needs, skip any creamy toppings. Instead, use extra coleslaw for crunch. To store leftover beef sliders, first let them cool. Then, place the beef in a shallow container. Cover it tightly with a lid or plastic wrap. This keeps the beef fresh. You can also store the buns separately to avoid sogginess. Use airtight containers for best results. They help maintain flavor and texture. When it's time to reheat your sliders, avoid the microwave. Instead, use an oven or skillet. For the oven, preheat it to 350°F. Place the sliders on a baking sheet and cover with foil. Heat for about 10-15 minutes. This method keeps the buns from getting soggy. If using a skillet, heat on low and cover with a lid. Check to ensure they warm evenly. You can freeze the cooked beef for later meals. Let the beef cool completely, then place it in freezer bags. Remove as much air as possible before sealing. You can freeze slider buns too, but wrap them tightly in plastic wrap first. To use, thaw the beef in the fridge overnight and reheat as described above. This makes meal prep easy and quick! You should cook the beef for 6 to 8 hours on low. This long cook time makes the beef tender and easy to shred. The slow cooker allows the flavors to blend well, giving you that rich taste. Yes, you can prepare this recipe ahead of time. You can cook the beef and store it in the fridge for up to three days. Just reheat it before serving. You can also freeze it for later use. Some great sides include: - Sweet potato fries - Coleslaw - Potato salad - Mixed green salad These sides complement the sweet and savory flavors of the sliders. Absolutely! You can try different sauces like teriyaki or BBQ sauce. Each sauce will give a unique twist to the sliders. Just keep the honey and garlic to maintain some of the original flavor. The beef is done when it is tender and shreds easily with a fork. If it isn’t shredding well, let it cook for another hour. The goal is to have melt-in-your-mouth beef for your sliders. In this blog post, I covered how to make delicious honey garlic beef sliders. We explored the main ingredients and possible substitutions. I shared clear step-by-step cooking instructions for your ease. You learned tips for perfecting the recipe and creative variations to try. Finally, I included storage info to keep leftovers fresh. Enjoy creating these sliders and make them your own! Happy cooking!

Are you ready to elevate your game day snacks? Let me introduce you to my Savory Slow Cooker Honey Garlic Beef Sliders! These tender sliders are packed with flavor from …

Read more

Categories Dinner Tags NO-ING-IMG

Creamy Spinach Artichoke Tortellini Bake Delight

January 14, 2026October 18, 2025 by Chef Tavio
- 12 oz. cheese tortellini (fresh or frozen) - 1 cup frozen spinach, thoroughly thawed and well-drained - 1 cup canned artichoke hearts, rinsed, drained, and roughly chopped The main ingredients make this dish creamy and rich. Cheese tortellini provides a soft, cheesy bite. Frozen spinach adds a healthy green touch. Canned artichokes give a nice, tangy flavor. - 1 cup cream cheese, softened to room temperature - 1 cup sour cream - 1 cup grated Parmesan cheese - 1 cup shredded mozzarella cheese - 2 cloves garlic, finely minced Cream cheese and sour cream create a thick, smooth base. Parmesan cheese adds a salty, nutty taste. Mozzarella brings a melty texture on top. Garlic gives a warm, savory kick. - 1/2 teaspoon red pepper flakes (optional, adjust to taste) - Salt and freshly ground black pepper to taste - 1 tablespoon olive oil - Fresh parsley, finely chopped (for garnish) Red pepper flakes add spice. Salt and black pepper enhance flavor. Olive oil adds richness while baking. Fresh parsley gives a bright, colorful finish. This mix of ingredients makes the creamy spinach artichoke tortellini bake a delight. Each bite bursts with flavor and comfort. 1. Preheat your oven to 375°F (190°C). This step is key for a good bake. 2. Cook the tortellini in a large pot of salted boiling water. Follow the package instructions. Once done, drain and set aside. 1. Mix cream cheese, sour cream, and Parmesan in a medium bowl. Use a whisk to make it smooth. This gives the dish its creamy texture. 2. Fold in spinach and artichokes. Add the thawed spinach and chopped artichokes to the creamy mix. Gently combine them to keep the mix fluffy. 1. Transfer to the baking dish. Use a greased 9x13-inch dish. Spread the mix evenly with a spatula. 2. Top with mozzarella and bake. Sprinkle shredded mozzarella on top. Drizzle with olive oil. Bake for 20-25 minutes until golden brown and bubbly. Enjoy the aroma as it bakes! - Avoiding mushy tortellini: Cook the tortellini just until they are al dente. This means they should be firm and slightly chewy. If you overcook them, they will turn mushy during baking. - Ensuring creamy texture: Mix the cream cheese, sour cream, and Parmesan well until smooth. This step is key for a creamy base. Make sure there are no lumps. - Garnishing with parsley: Once your bake is done, sprinkle freshly chopped parsley on top. This adds color and freshness to your dish. It also helps to brighten up the rich flavors. - Serving options: You can serve this dish in individual bowls. Each portion looks fancy and is easy to enjoy. For a family-style option, serve it straight from the baking dish. - Adding spices or herbs: You can add a pinch of garlic powder or Italian herbs for more flavor. Red pepper flakes are great too, especially if you like a bit of heat. - Drizzling additional olive oil: A drizzle of olive oil right before serving adds richness. It makes every bite even more delicious. {{image_4}} You can easily switch up the ingredients in this dish. Here are some fun swaps: - Using different pasta types: Instead of cheese tortellini, try using ravioli or penne. They both work well with the creamy sauce. - Incorporating other vegetables: Add bell peppers, mushrooms, or zucchini for extra flavor and texture. Just chop them small and mix them in. Want to make this dish fit your diet? Here are some ways: - Making it gluten-free: Use gluten-free tortellini. Many brands offer great options that taste just as good. - Vegan substitutions: Swap cream cheese and sour cream for vegan alternatives. Nutritional yeast can add a cheesy flavor too. You can boost the taste with a few simple changes: - Adding protein: Toss in cooked chicken, sausage, or shrimp. This adds heartiness and makes it a full meal. - Experimenting with different cheese blends: Try mixing in gouda, cheddar, or feta for a unique twist. Each cheese gives a different taste and creaminess. Feel free to play around with these variations. They can make your Creamy Spinach Artichoke Tortellini Bake even more special! To store your leftovers, let the dish cool first. Place it in an airtight container. This helps keep it fresh. You can store it in the fridge for up to three days. When reheating, use a microwave or oven. If using the microwave, reheat in short bursts. Stir in between to ensure even heating. If using the oven, cover the dish with foil to keep it moist. Heat it at 350°F (175°C) until warm, about 15-20 minutes. You can freeze this dish if you want to save some for later. Make sure it cools completely first. Transfer the bake to a freezer-safe container. It can last up to three months in the freezer. When you are ready to eat, thaw it in the fridge overnight. To reheat, place it in a preheated oven at 350°F (175°C) for about 30-35 minutes. Remove the cover for the last 10 minutes to get a nice, bubbly top. In the fridge, this creamy spinach artichoke tortellini bake stays good for about three days. Look for signs of spoilage. If you see any mold or notice an off smell, it's best to throw it out. Always trust your senses. When in doubt, don't eat it. Enjoy your dish fresh, but know it can be handy later! Yes, you can use fresh spinach. Just wash and chop it. Sauté it in a pan until it wilts. This gives a nice flavor and texture. It also adds a vibrant color to your dish. If you use fresh, aim for about four cups. To replace cream cheese, try using Greek yogurt. It gives a similar creaminess but with a tangy taste. You can also use blended silken tofu for a dairy-free option. Both choices will keep your dish rich and flavorful. This dish is already vegetarian. Just ensure that your tortellini has no meat. Most cheese tortellini is meat-free. You can also add more veggies, like bell peppers or mushrooms, to boost nutrition and flavor. Absolutely! You can prepare everything in advance. Just cover the dish and store it in the fridge. When ready to bake, preheat your oven and pop it in. It may need a few extra minutes in the oven if chilled. Check the top for a golden brown color. The cheese should be bubbly and melted. You can also insert a knife in the center. If it comes out warm, your dish is ready. Let it cool slightly before serving for the best taste. Tortellini bake combines rich flavors with simple steps. You learned about key ingredients, like cheese tortellini and spinach, that make this dish shine. The creamy mixture and careful baking bring it all together. Tips on garnishing and serving help elevate your meal. You can even make variations to fit your taste. Whether served fresh or saved for later, this dish delights. Enjoy creating your tortellini bake; it’s simple and satisfying.

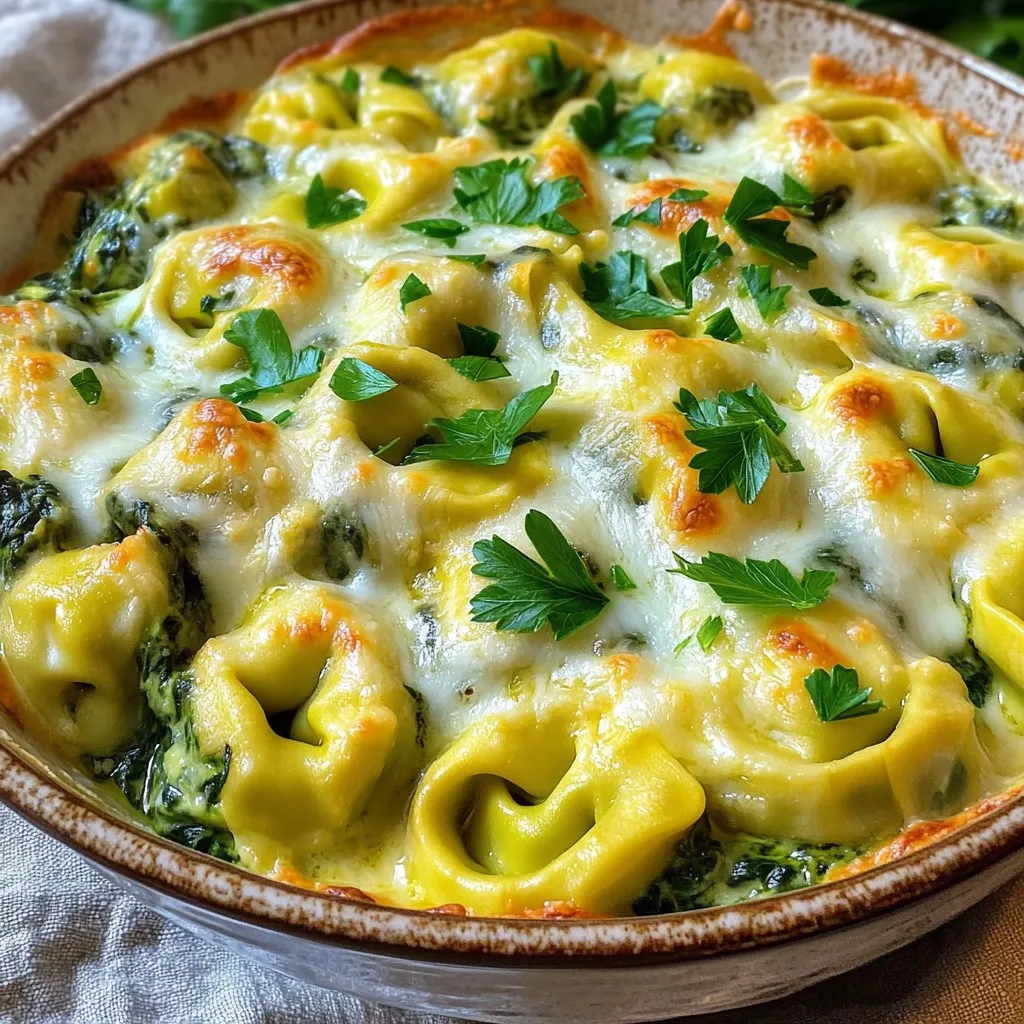
Are you craving a warm, comforting dish that’s easy to make? Look no further than my Creamy Spinach Artichoke Tortellini Bake Delight! This creamy bake combines cheese tortellini, rich artichokes, …

Read more

Categories Dinner Tags NO-ING-IMG

Caramelized Banana Bread Oatmeal Cups Flavorful Treat

January 14, 2026October 18, 2025 by Chef Tavio
- 2 ripe bananas - 2 cups rolled oats - 1/2 cup almond milk - 1/4 cup brown sugar - 1/4 cup walnuts, chopped - 1/4 cup chocolate chips - 1 teaspoon vanilla extract - 1 teaspoon ground cinnamon - 1/4 teaspoon ground nutmeg - 1/2 teaspoon baking powder - Pinch of salt The main ingredients for these oatmeal cups are simple yet flavorful. The ripe bananas add natural sweetness and moisture. The rolled oats provide a hearty base. Almond milk gives a creamy texture. Brown sugar enhances the overall sweetness. You can add walnuts for crunch or chocolate chips for extra sweetness. Both options make the cups more fun and tasty. For seasoning, vanilla extract brings warmth. Ground cinnamon and nutmeg add spice. Baking powder helps the cups rise. A pinch of salt balances the flavors. These ingredients create a delightful treat. Each bite is a mix of banana bread and oatmeal. You can enjoy them warm, topped with caramelized bananas for a special touch. - Preheat oven to 350°F (175°C). - Grease muffin tin or line with parchment paper. This helps the oatmeal cups come out easily. - Mash bananas until smooth. This makes them blend well. - Combine mashed bananas with oats, milk, and brown sugar. Mix until smooth. - Add vanilla, cinnamon, nutmeg, baking powder, and salt. Stir well to combine. - Spoon the mixture into the muffin tin. Fill each cup about three-quarters full. - Bake for 20-25 minutes. Look for a golden brown color on top. - In a small pan, melt butter or coconut oil over medium heat. - Add banana slices and sauté for 2-3 minutes. They should turn golden. - For extra sweetness, sprinkle a little brown sugar on the bananas while cooking. This step is key for adding a sweet touch to your oatmeal cups. The warm, caramelized bananas create a wonderful flavor contrast with the soft oatmeal. Enjoy these steps, and your kitchen will smell amazing! - Mix all your ingredients well. This helps the flavors blend and ensures even baking. - To check if your oatmeal cups are done, use a toothpick. Insert it into the center. If it comes out clean, they are ready. - For extra sweetness, drizzle honey or maple syrup over the warm cups. - Add a sprinkle of cinnamon and fresh banana slices on top for a lovely finish. - You can swap almond milk for any milk you like. Dairy or coconut milk both work well. - Try adding different fruits, like berries or apples. Chopped nuts can add crunch and flavor too. {{image_4}} You can easily make these oatmeal cups vegan. First, swap almond milk for any non-dairy milk you like. Soy, coconut, and oat milk work well. Next, replace brown sugar with maple syrup. This change adds a lovely flavor and keeps it plant-based. If you're avoiding gluten, use gluten-free rolled oats instead of regular oats. Many brands offer certified gluten-free oats. Also, check any optional add-ins, like chocolate chips and nuts, to ensure they are gluten-free. This way, everyone can enjoy these tasty cups! For those who love chocolate, here's a fun twist. You can increase the amount of chocolate chips. Add more if you want a sweet treat. Another option is to mix in cocoa powder. This will give your oatmeal cups a rich chocolate flavor. Perfect for chocolate lovers! To keep your Caramelized Banana Bread Oatmeal Cups fresh, store them in an airtight container at room temperature. If you want them to last longer, place them in the fridge. This helps keep the moisture in and prevents them from drying out. When you're ready to enjoy your oatmeal cups again, a quick warm-up in the microwave works well. Just pop one in for about 20-30 seconds. For a better texture, reheat them in the oven. Set your oven to 350°F (175°C) and heat them for about 5-7 minutes. This way, they stay nice and soft. You can freeze your oatmeal cups before or after baking. If you freeze them before baking, just spoon the mixture into the muffin tin, cover it, and place it in the freezer. If they are baked, let them cool first, then wrap them well in plastic wrap or foil. When you're ready to eat, thaw them overnight in the fridge for the best results. These oatmeal cups last about three days at room temperature. If you store them in the fridge, they can last up to a week. Just keep them in an airtight container to stay fresh. Yes, you can make these oatmeal cups ahead of time! Prepare the cups, bake them, and let them cool. Then, store them in the fridge. You can also freeze them for up to three months. Just thaw them overnight in the fridge before reheating. If you don't have bananas, try using applesauce or pureed pumpkin. Both options work well and add moisture. You can also use mashed sweet potatoes or even yogurt for a different flavor. You learned how to make caramelized banana bread oatmeal cups. With simple ingredients like ripe bananas, oats, and almond milk, you can create a tasty snack. Don’t forget the tips for baking and customizing! These oatmeal cups are great for busy mornings. They store well and can be made ahead of time. Whether you prefer them vegan or gluten-free, there’s an option for everyone. So, gather your ingredients and start baking today. Enjoy a delicious treat that’s both easy and satisfying!

Looking for a quick, tasty treat that’s perfect for breakfast or a snack? These Caramelized Banana Bread Oatmeal Cups are a game changer! With just a few simple ingredients like …

Read more

Categories Breakfast Tags NO-ING-IMG

Sheet-Pan Honey Garlic Salmon Asparagus Delight

January 14, 2026October 18, 2025 by Chef Tavio
To make sheet-pan honey garlic salmon with asparagus, you need a few simple ingredients. Each one adds flavor and health benefits. - 4 salmon fillets (approximately 6 oz each) - 1 bunch of asparagus, with woody ends trimmed and stalks lightly washed - 1/4 cup honey - 3 tablespoons soy sauce (or tamari for a gluten-free option) - 3 cloves garlic, finely minced - 1 tablespoon fresh ginger, grated - 1 tablespoon extra virgin olive oil - Sea salt and freshly cracked black pepper to taste - Sesame seeds for a crunchy garnish - Fresh cilantro leaves for garnish (optional, for added flavor and color) Using fresh ingredients makes a big difference. Salmon is rich in omega-3 fats. Asparagus is full of vitamins. Honey gives a sweet touch. Soy sauce adds umami. Garlic and ginger bring warmth and depth. To make this dish, gather all items before you start cooking. It helps in keeping things organized and fun. This way, you can enjoy the cooking process without any stress. Each ingredient plays a role in creating that perfect honey garlic flavor profile. Now that we have the ingredients, let’s move on to the next step and get cooking! - Set your oven to 400°F (200°C). This temperature cooks the salmon perfectly. - Prepare a large sheet pan. Line it with parchment paper for easy cleanup. - In a small bowl, mix together 1/4 cup honey, 3 tablespoons soy sauce, 3 minced garlic cloves, and 1 tablespoon grated ginger. - Whisk these ingredients until smooth. This mixture gives the dish its sweet and savory flavor. - Place 4 salmon fillets skin-side down on one side of the sheet pan. - Season each fillet with sea salt and black pepper. This adds great taste. - Drizzle half of the honey garlic mixture over the salmon. Make sure each fillet is coated well. - On the other side of the pan, arrange the trimmed asparagus in a single layer. - Drizzle the asparagus with 1 tablespoon olive oil. Sprinkle with salt and pepper for added flavor. - Pour the remaining honey garlic mixture over the asparagus. Toss gently to coat. - Transfer the sheet pan to your preheated oven. - Bake for 12-15 minutes. Check the salmon; it should be opaque and flake easily with a fork. The asparagus should be tender but still slightly crunchy. - After baking, take the sheet pan out of the oven. Let it rest for a couple of minutes. This helps lock in the flavors. - Plate the salmon and asparagus together. Garnish with sesame seeds and fresh cilantro for a nice touch. To perfect the honey garlic sauce, balance the sweetness and saltiness. If you like a sweeter sauce, add more honey. For a saltier flavor, increase the soy sauce. Taste as you mix. This way, you can find the right balance for your palate. To ensure perfect flakiness, check the salmon often. You want it to look opaque and break apart easily with a fork. Bake it for 12-15 minutes at 400°F. Avoid overcooking by checking a bit early. Remember, the salmon will keep cooking a little after you take it out. Achieving the right texture for asparagus is key. Look for bright green stalks that are tender but still crisp. They should bend slightly without breaking. If you can't find fresh asparagus, you can swap it for green beans or broccoli. Both will work well in this dish. {{image_4}} You can easily swap the salmon for other fish. Try trout or cod for a fresh twist. Both offer a mild taste and cook well like salmon. If you prefer shrimp, they work great too! For vegetables, asparagus is fantastic but not the only choice. Broccoli, green beans, or bell peppers can be used instead. Just make sure they are cut to similar sizes for even cooking. To boost flavor, add spices or herbs. A sprinkle of paprika gives warmth. Fresh herbs like parsley or dill can brighten the dish. You can also add a pinch of red pepper flakes for heat. For a sweet and spicy mix, add sriracha or chili paste to the honey garlic sauce. This gives your dish a fun kick. It’s a great way to please different taste buds. This dish is great on its own, but sides can elevate your meal. Serve it with rice or quinoa for a hearty touch. A fresh salad pairs well too, adding crunch and color. To make it a complete meal, consider adding a grain and a side of roasted veggies. This not only fills you up but also adds more nutrients and flavors. To keep your honey garlic salmon and asparagus fresh, store leftovers in the fridge. Use an airtight container. This will help keep the flavors locked in. Aim to eat leftovers within two days for the best taste. If you have extra salmon or asparagus, you can freeze them. Wrap each piece tightly in plastic wrap, then place them in a freezer bag. This method prevents freezer burn. They can last about three months in the freezer. When reheating, I suggest using the oven. Preheat it to 275°F (135°C). Place the salmon and asparagus on a baking sheet. Cover them with foil to keep moisture in. Heat for about 10-15 minutes. This method helps keep the texture firm and tasty. Avoid using a microwave, as it can dry out the salmon. If you must use it, do so on low power and check often. This will help keep your meal juicy and enjoyable. You can tell if the salmon is done by looking for a few signs: - The flesh should be opaque. - It should flake easily with a fork. - The internal temperature should reach 145°F (63°C). These signs ensure your salmon is cooked just right and safe to eat. Yes, you can use frozen salmon. Just keep these tips in mind: - Thaw the salmon completely before cooking. - Place it in the fridge overnight to thaw. - You can also use the microwave for quick thawing. Using frozen salmon may require a few extra minutes of baking. If you need a honey alternative, try these options: - Maple syrup for a similar sweetness. - Agave nectar for a plant-based choice. - Brown sugar mixed with a little water. These substitutes maintain the flavor, making your dish delicious. Yes, you can prepare parts of the recipe ahead of time: - Mix the honey garlic sauce and store it in the fridge. - Season the salmon and asparagus a few hours before cooking. This saves time during busy weeknights and helps the flavors meld. Cooking salmon with asparagus and honey garlic sauce is simple and fun. You learned how to prepare the dish from start to finish. We covered important tips for perfecting flavors and textures. Remember to adjust the sauce to match your taste. Feel free to use different fish or veggies as well. Lastly, store leftovers properly and reheat them to maintain the taste. Enjoy your delicious meal, and don't hesitate to experiment with the recipe for your own twist!

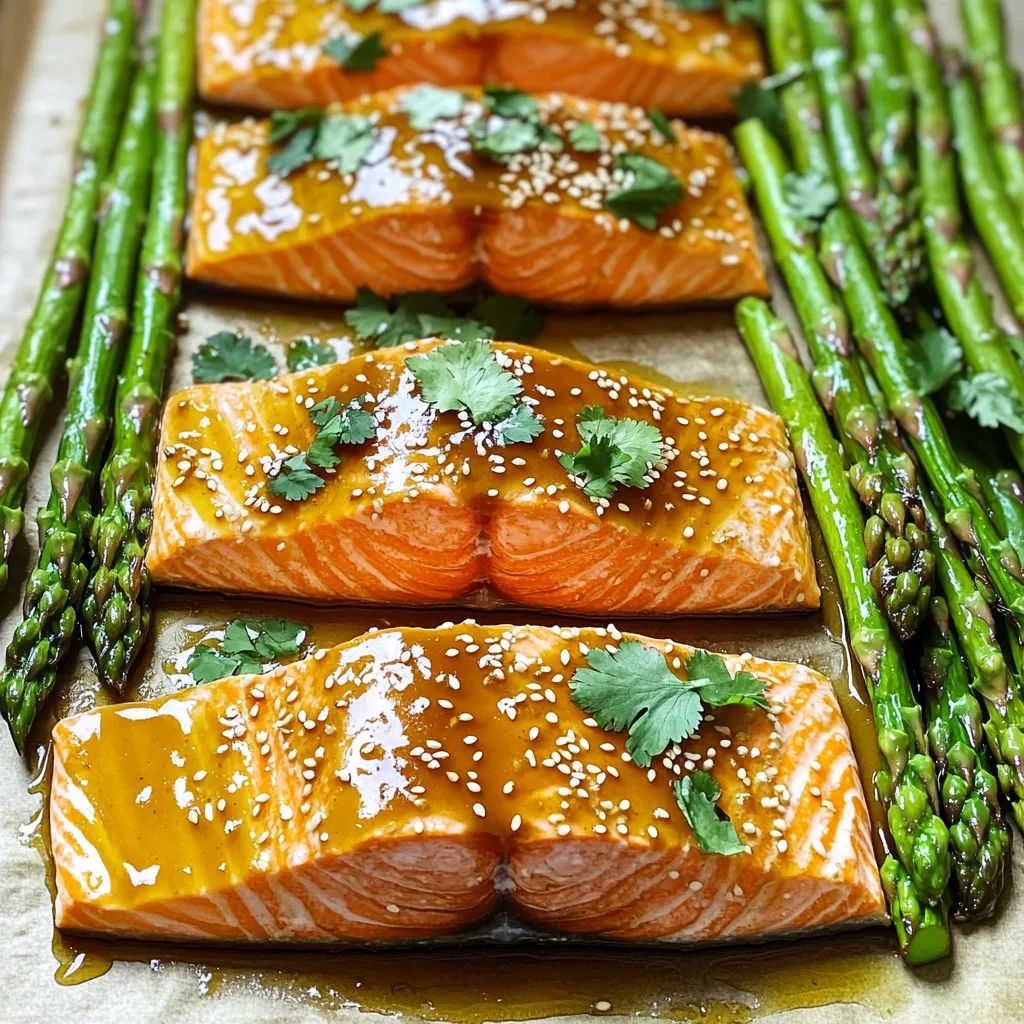
Are you looking for a quick and tasty dinner idea? This Sheet-Pan Honey Garlic Salmon Asparagus Delight is your answer! With just a few simple ingredients, you can whip up …

Read more

Categories Dinner Tags NO-ING-IMG

Savory Sheet Pan Teriyaki Pineapple Chicken Dish

January 14, 2026October 15, 2025 by Chef Tavio
For this tasty dish, you will need: - 1 lb boneless, skinless chicken thighs - 1 cup fresh pineapple, cut into 1-inch cubes - 1 bell pepper (red or yellow), sliced into strips - 1 small red onion, cut into wedges - 1 cup snap peas, trimmed These ingredients bring together sweet and savory flavors. The chicken thighs stay juicy and tender during cooking. Fresh pineapple adds a tropical twist. Seasoning is key to making this dish pop. You will use: - 1/4 cup teriyaki sauce (store-bought or homemade) - 2 tablespoons extra-virgin olive oil - 2 cloves garlic, finely minced - 1 teaspoon fresh ginger, grated - Salt and freshly cracked black pepper, to taste - Sesame seeds, for garnish - Fresh cilantro leaves, for garnish The teriyaki sauce gives a rich flavor. Garlic and ginger provide a lovely aroma. Garnishes like sesame seeds and cilantro add a fresh touch. Feel free to make it your own! You can add: - Different vegetables like broccoli or carrots - A sprinkle of red pepper flakes for heat - A splash of lime juice for brightness These optional ingredients let you play with flavors. Mix and match based on what you love or have on hand. First, set your oven to 425°F (220°C). This is key for cooking the chicken and veggies right. Line a large rimmed baking sheet with parchment paper. This makes cleaning easy. In a medium bowl, mix together the teriyaki sauce, olive oil, minced garlic, and grated ginger. Whisk it until smooth and set it aside. Now, take the chicken thighs and place them on the baking sheet. Space them out so they cook evenly. Sprinkle salt and freshly cracked black pepper on top. Drizzle half of the teriyaki mixture over the chicken to add flavor. Next, put the cubed pineapple, sliced bell pepper, onion wedges, and snap peas around the chicken. This adds color and makes it look nice. Pour the rest of the teriyaki mixture over the chicken and veggies. This boosts the taste even more. Once everything is arranged, pop the baking sheet in the preheated oven. Bake for 20-25 minutes. Check the chicken; it should reach 165°F (75°C) to be safe to eat. The vegetables should be tender but still bright in color. After baking, carefully take the sheet out of the oven. Let it rest for a few minutes. This allows the juices to settle in the chicken. For the final touch, sprinkle sesame seeds on top. Add fresh cilantro leaves for a burst of color and flavor. Serve it warm and enjoy your savory teriyaki pineapple chicken! When picking chicken thighs, look for ones that are plump and moist. Fresh thighs should have a light pink color. Avoid any that appear dull or have an off smell. Bone-in thighs offer more flavor, but boneless thighs are easier to eat. Skinless thighs are lower in fat. However, a bit of fat adds flavor and juiciness. Always check the sell-by date to ensure quality. To get crisp and colorful veggies, cut them into even sizes. This helps them cook at the same rate. Use fresh vegetables for the best taste. Bell peppers and snap peas should be bright and firm. I recommend using a mix of textures, like crunchy snap peas with softer onions. Toss them in a bit of olive oil and season with salt and pepper. This enhances their natural flavors. Keep an eye on them as they cook, so they stay vibrant. For a tasty teriyaki sauce, start with a base of soy sauce. Add some honey or brown sugar for sweetness. A splash of rice vinegar gives it a nice tang. Fresh ginger and garlic add a rich flavor. Mix these ingredients in a bowl and whisk until smooth. If you want a thicker sauce, simmer it for a few minutes on the stove. This brings out the flavors. Homemade sauce allows you to control the taste and sweetness, making it special. {{image_4}} You can make a tasty vegetarian version. Swap out the chicken for firm tofu. Cut the tofu into cubes, just like the pineapple. Marinate it in the teriyaki sauce for flavor. This gives you a hearty base. Add all the same colorful veggies. You still get a mix of sweet and savory. This dish works great over rice or quinoa for a filling meal. Feel free to change the veggies based on what you have. You can use broccoli, carrots, or zucchini. Each adds its own taste and crunch. If you can't find snap peas, green beans work well too. Choose what you like or what's in season. This way, you make the dish your own and still enjoy that bright color. Chicken thighs are juicy and tender. They soak in the teriyaki sauce well. But if you want to go meatless, tofu is a great choice. Tofu absorbs flavors, making it delicious. Both chicken and tofu give you a protein boost. Choose what fits your diet or mood. You can't go wrong with either option! To keep your teriyaki pineapple chicken fresh, store it in an airtight container. Let the dish cool down first. Once it reaches room temperature, seal it tight. This method helps keep flavors intact and prevents drying. You can enjoy leftovers for up to three days in the fridge. For reheating, use the oven for the best flavor. Preheat your oven to 350°F (175°C). Place the chicken and veggies in an oven-safe dish. Cover it with foil to lock in moisture. Heat for about 15-20 minutes, or until warm throughout. You can also use the microwave, but be careful not to overcook it. If you want to save some for later, freezing works well. First, let the dish cool completely. Then, portion it into freezer-safe bags or containers. Squeeze out excess air to avoid freezer burn. You can freeze it for up to three months. To eat, thaw overnight in the fridge and reheat as mentioned. Yes, you can use chicken breasts. They cook faster than thighs. Make sure to slice them into even pieces. This will help them cook evenly. Keep an eye on the baking time. Chicken breasts take about 15-20 minutes to cook. Check the internal temperature. It should reach 165°F (75°C). To make a low-sodium teriyaki sauce, use low-sodium soy sauce. You can mix it with honey or maple syrup for sweetness. Add minced garlic and grated ginger for flavor. This will keep the taste bold and fresh while cutting down on salt. You can also add water to dilute it. Start with a 1:1 ratio of soy sauce and water. Sheet pan teriyaki pineapple chicken pairs well with rice or quinoa. You can also serve it with a fresh salad. For a fun twist, try it in a wrap. Add some crunchy veggies to make it colorful. Another great option is to serve it alongside steamed broccoli or snap peas. These sides enhance the meal and add more nutrition. In this post, we covered how to make Teriyaki Pineapple Chicken. We explored main ingredients, baking methods, and how to customize to your taste. I shared tips for choosing chicken thighs and cooking vegetables perfectly. You can adapt the dish with vegetarian options or different proteins. Lastly, we discussed storage and reheating to keep your meal fresh. Enjoy experimenting with flavors and make this dish your own!

Are you ready to spice up your dinner routine? This Savory Sheet Pan Teriyaki Pineapple Chicken dish combines sweet pineapple with savory chicken for a meal that hits all the …

Read more

Categories Dinner Tags NO-ING-IMG

Pumpkin Cream Cold Brew Copycat Simple and Tasty Drink

January 14, 2026October 15, 2025 by Chef Tavio
- 1 cup cold brew coffee - 1/2 cup heavy cream - 2 tablespoons pumpkin purée - 2 tablespoons maple syrup - 1/2 teaspoon vanilla extract - 1/2 teaspoon pumpkin spice blend - Whipped cream for topping - Ground cinnamon for garnish These ingredients make your Pumpkin Cream Cold Brew delightful and tasty. First, you need cold brew coffee. It gives the drink a rich flavor. You can make it at home or buy it. Next, get heavy cream. It adds a creamy texture and richness. Pumpkin purée is key for that fall flavor. It gives a smooth base. Maple syrup adds sweetness, but you can adjust it to your taste. Vanilla extract enhances the flavors. Pumpkin spice blend brings warmth and a cozy aroma. Don’t forget the whipped cream! It makes your drink look fancy. Ground cinnamon is perfect for a final touch. It adds warmth and a lovely scent. These ingredients come together to create a drink that warms your heart and your taste buds. To make the pumpkin cream, start by mixing the ingredients. In a mixing bowl, whisk together: - 1/2 cup heavy cream - 2 tablespoons pumpkin purée - 2 tablespoons maple syrup - 1/2 teaspoon vanilla extract - 1/2 teaspoon pumpkin spice blend Mix until the cream is velvety and well combined. Make sure there are no lumps for a smooth texture. This creamy blend adds rich flavor to your drink. Now, it’s time to assemble your drink. Pour 1 cup of cold brew coffee into a serving glass. You can use store-bought or homemade cold brew, based on your choice. Next, drizzle the pumpkin cream mixture into the coffee. Use a spoon to gently stir it. This creates a beautiful marbled effect. Try not to stir too much, so the colors swirl nicely. For the finishing touches, add a generous dollop of whipped cream on top. This creates a lovely dome. Then, sprinkle a light layer of ground cinnamon across the whipped cream. This adds an aromatic touch. Serve your drink right away. Enjoy your homemade Pumpkin Cream Cold Brew over ice for a refreshingly tasty experience! To get a smooth pumpkin cream, whisk well. Use a hand whisk or electric mixer. Start slow to mix all the ingredients. This helps blend the heavy cream and pumpkin purée. If lumps form, keep whisking until smooth. A good texture makes your drink more enjoyable. You can change the sweetness by adding maple syrup. Start with two tablespoons and taste. If you want it sweeter, add more syrup. For a stronger pumpkin flavor, add more pumpkin spice. This makes the drink richer and more flavorful. Adjust it to fit your taste. Choose clear glassware to show off your drink. The layers of coffee and pumpkin cream look great. You can also use a cinnamon stick as a garnish. This adds flavor and looks nice. These small details make your drink more appealing. {{image_4}} You can switch up the sweetness in your Pumpkin Cream Cold Brew. Here are two great options: - Agave syrup: This sweetener has a mild taste. It blends well with your drink. Just use the same amount as maple syrup. - Honey: Honey adds a unique flavor. Use a bit less than maple syrup, as honey is sweeter. If you want a dairy-free drink, try these substitutions: - Substituting heavy cream: Use coconut cream or almond milk for a creamy texture. Both options keep the flavors rich. - Using plant-based cold brew: Make your cold brew with oat milk or almond milk. These plant-based coffees add a nice twist. Get creative with your drink by adding seasonal flavors: - Adding flavored syrups: Try caramel or vanilla syrup. These can enhance the taste and give a fun twist. - Incorporating other spices: Mix in nutmeg or ginger for extra warmth. These spices can bring out the pumpkin flavor even more. To keep your cold brew coffee fresh, store it in an airtight container. A glass jar works well and keeps flavors intact. Cold brew coffee can last up to two weeks in the fridge. However, I suggest using it within a week for the best taste. Always check for any off smells before use. For the pumpkin cream mixture, store it in a sealed container in the fridge. It stays fresh for about three days. If you have leftovers, you can repurpose them in several ways. Try adding it to pancakes, waffles, or even smoothies for a tasty treat. You can also mix it into oatmeal for a breakfast boost. To make cold brew coffee at home, use a simple method. Start with coarsely ground coffee. Combine one cup of coffee grounds with four cups of cold water in a large jar or pitcher. Stir the mixture well. Cover it and let it steep in the fridge for 12 to 24 hours. After steeping, strain the coffee using a fine mesh sieve or a coffee filter. This method gives you a smooth, rich coffee base for your Pumpkin Cream Cold Brew. Yes, you can use instant coffee as an alternative. Mix two tablespoons of instant coffee with one cup of cold water. Stir until it dissolves. While instant coffee won’t give you the same flavor as cold brew, it’s a quick option. If you want a richer taste, consider adding more instant coffee or using strong brewed coffee. This way, you still enjoy a tasty drink. Yes, this recipe is great for meal prep. You can make the pumpkin cream mixture ahead of time. Store it in the fridge for up to three days. Just whisk it again before using. The cold brew can also be made in advance. Keep it in the fridge for up to two weeks. This makes it easy to grab and enjoy your drink whenever you like. To adjust the recipe for more servings, simply scale the ingredients. For two servings, use two cups of cold brew coffee and one cup of heavy cream. Also, double the pumpkin purée, maple syrup, vanilla extract, and pumpkin spice blend. When making larger batches, remember to mix well for a smooth texture. This way, you can share your delicious drink with friends or family. This blog post showed you how to make a tasty pumpkin cream drink. You learned about the key ingredients, step-by-step instructions, and tips for the best texture. I also shared fun variations to suit your taste. Remember, you can customize flavors and use different sweeteners. Store leftovers properly to enjoy later. Get ready to impress your friends with this drink. It’s simple, fun, and perfect for the season. Enjoy every sip!

Craving that cozy fall drink? You don’t need to hit the café! With my Pumpkin Cream Cold Brew Copycat recipe, you can whip up a delicious, creamy treat at home. …

Read more

Categories Desserts Tags NO-ING-IMG

High-Protein Chocolate Chip Cookie Dough Bites Recipe

January 14, 2026October 15, 2025 by Chef Tavio
Here's what you need to make high-protein chocolate chip cookie dough bites: - 1 cup almond flour - 1/2 cup rolled oats - 1/2 cup vanilla-flavored protein powder - 1/4 cup almond butter - 1/4 cup pure maple syrup - 1/4 cup mini dark chocolate chips - 1 teaspoon pure vanilla extract - Pinch of sea salt - 1-2 tablespoons almond milk (as needed) Each ingredient plays a key role. Almond flour gives a nutty base. Rolled oats add texture and fiber. The vanilla protein powder boosts the protein level. Almond butter adds creaminess and flavor. Pure maple syrup sweetens the mix with natural sugar. Mini dark chocolate chips add a fun chocolate burst. Pure vanilla extract enhances the taste. A pinch of sea salt balances the sweetness. Almond milk makes the dough smooth if needed. With these ingredients, you can create a tasty and healthy snack. Enjoy the process of mixing and tasting! Start by taking a large bowl. In it, combine 1 cup of almond flour, 1/2 cup of rolled oats, and 1/2 cup of vanilla-flavored protein powder. Use a whisk or spoon to mix these dry ingredients well. This step is key. Thorough mixing ensures no clumps remain. It helps all the flavors blend smoothly later. Next, grab a separate bowl. In this bowl, whisk together 1/4 cup of almond butter, 1/4 cup of pure maple syrup, 1 teaspoon of pure vanilla extract, and a pinch of sea salt. Keep whisking until the mixture is smooth and creamy. A creamy consistency helps all the flavors come together. This mixture will add moisture and sweetness. Now, it’s time to combine your wet and dry ingredients. Slowly pour the wet mixture into the bowl with the dry mix. Stir continuously until a dough begins to form. If your dough is too crumbly, add 1 tablespoon of almond milk at a time. Mix well after each addition until the dough feels smooth. Once you have the right texture, gently fold in 1/4 cup of mini dark chocolate chips. This gives each bite a nice chocolatey flavor. Use your hands or a small scoop to shape the dough into bite-sized balls. Place them onto a lined baking sheet. After shaping, chill the cookie dough bites in the fridge for about 30 minutes. Chilling is important. It helps the bites firm up nicely. For serving, arrange the bites on a colorful plate for an eye-catching look. You can drizzle a little extra almond butter on top or sprinkle some sea salt for extra flavor and style. Enjoy your tasty, high-protein snack! To get the right dough, look for a thick and slightly sticky texture. If it feels dry, add almond milk slowly. One tablespoon at a time works best. For taste, balance sweetness with a pinch of sea salt. If you want more chocolate flavor, add extra mini dark chocolate chips. Keep your cookie dough bites fresh by storing them in an airtight container. Place them in the fridge for up to a week. If you want to store them longer, freeze the bites. Use parchment paper between layers to avoid sticking. They can last for three months in the freezer. These cookie dough bites are packed with protein from the vanilla protein powder and almond butter. This helps to build muscle and keeps you full longer. They are a healthy snack option, rich in good fats and fiber from almond flour and oats. Enjoy guilt-free snacking with these delicious bites! {{image_4}} You can make these bites gluten-free by using oat flour. Oat flour blends well and keeps the texture nice. For a vegan option, swap almond butter with sunflower seed butter. You can use agave syrup instead of maple syrup for sweetness. To make your cookie dough bites even better, add nuts or dried fruits. Chopped walnuts or cranberries bring extra texture and flavor. You can also try flavored protein powders, like chocolate or peanut butter, for a twist on the taste. Serve these bites with a dip like yogurt or melted dark chocolate. They taste great as a snack or dessert. For a fun twist, press the dough into a baking dish and cut it into bars. This makes it easy to share! Store your cookie dough bites at room temperature for a short time. They stay fresh for about 2 days. For longer storage, keep them in the fridge. They will last for up to a week. Use an airtight container to keep them fresh. Glass or plastic containers work well. To freeze your cookie dough bites, place them on a baking sheet first. Make sure they are not touching each other. Freeze them for about an hour until firm. After that, transfer them to a freezer-safe bag or container. They can last for up to 3 months in the freezer. When you want to eat them, take them out and let them thaw in the fridge overnight. Batch cooking is a great way to save time. You can double or even triple the recipe. After making the dough, shape it into bites. Use a small scoop for even sizes. This way, you have ready-to-eat snacks for the week. Portioning them helps control serving sizes and keeps things neat. To make these bites healthier, you can try a few simple swaps. Use a natural sweetener like stevia or monk fruit instead of maple syrup. You can also add more protein by using a higher protein powder or adding seeds like chia or flaxseeds. Lastly, you can mix in some chopped nuts for added crunch and nutrients. Yes, you can use different types of protein powder. Whey, pea, or hemp protein can work well. Just keep in mind that the flavor and texture may change slightly. Always check the protein content to keep these bites high in protein. If you need a substitute for almond butter, try peanut butter or sunflower seed butter. Both offer a similar creamy texture and taste. If you want a nut-free option, sunflower seed butter is a great choice. These cookie dough bites last about one week in the fridge. Store them in an airtight container to keep them fresh. If you want to keep them longer, you can freeze them for up to three months. Yes, you can easily adjust the sweetness. Add a bit more maple syrup or reduce it based on your taste. You can also use sugar-free sweeteners to control the sweetness without adding extra calories. You can create tasty cookie dough bites with simple ingredients like almond flour and protein powder. Mixing dry and wet ingredients helps achieve a smooth texture. Chilling the bites improves their consistency. Experimenting with flavors lets you customize to your taste. In the end, making these bites is easy and fun. They offer great nutrition and taste. Store them well, and enjoy healthy snacks anytime. Dive into the variations to keep things fresh and exciting!

Craving a sweet treat that also packs a protein punch? You’re in the right place! This High-Protein Chocolate Chip Cookie Dough Bites recipe combines tasty ingredients like almond flour and …

Read more

Categories Desserts Tags NO-ING-IMG

Honey Sriracha Brussels Sprouts Crispy and Flavorful

January 14, 2026October 15, 2025 by Chef Tavio
To make Honey Sriracha Brussels Sprouts, gather these simple items: - 1 pound Brussels sprouts, trimmed and halved - 3 tablespoons honey - 2 tablespoons Sriracha sauce - 2 tablespoons extra virgin olive oil - 1 teaspoon garlic powder - 1 teaspoon onion powder - Salt and freshly ground black pepper, to taste - 2 tablespoons sesame seeds (for garnish) - 2 green onions, sliced thinly (for garnish) Each ingredient plays a vital role. The Brussels sprouts provide a crisp base. Honey adds sweetness, while Sriracha gives heat. Olive oil helps with roasting, making them crispy. Garlic and onion powder enhance the flavor. Salt and pepper season the dish perfectly. Sesame seeds and green onions add a nice touch on top. Now that you have your ingredients, you can enjoy the journey of cooking. Each step is simple and rewarding. Trust me, these Brussels sprouts will be a hit! - Preheat your oven to 400°F (200°C). This heat helps the sprouts get crispy. - In a big bowl, add the halved Brussels sprouts. Pour in the olive oil, garlic powder, onion powder, and a good pinch of salt and pepper. Mix well until all the sprouts are coated. - Line a baking sheet with parchment paper for easy cleanup. Spread the Brussels sprouts out on the sheet in a single layer. - Roast them in the oven for 20-25 minutes. Stir halfway through to ensure they brown evenly. Look for a golden color and a crispy texture. - While the sprouts roast, whisk together honey and Sriracha sauce in a small bowl until smooth. - You can adjust the heat by adding more or less Sriracha based on your taste. - Once the Brussels sprouts are roasted, take them out of the oven. Drizzle the honey Sriracha glaze over them and mix well. - Put them back in the oven for 5-7 minutes. This step makes the glaze sticky and delicious. - Let the sprouts cool slightly before serving. - For a final touch, sprinkle sesame seeds and green onions on top. This adds a nice crunch and fresh flavor. To roast Brussels sprouts well, heat your oven to 400°F (200°C). This high heat helps them get crispy. Cut the Brussels sprouts in half. This gives them more surface area to brown. Toss them with olive oil and spices in a bowl. Make sure every sprout is coated. To achieve perfect crispiness, spread the sprouts out in one layer on a lined baking sheet. Avoid crowding them. Stir them halfway through roasting to help them brown evenly. Look for a golden brown color and a crispy texture. For extra flavor, try adding garlic or onion powder. You can also use smoked paprika for a nice smoky taste. Fresh herbs like thyme or rosemary can add great depth too. If you want more heat, increase the amount of Sriracha in the glaze. For more sweetness, add a bit more honey. You can balance the flavors to suit your taste. To plate the Brussels sprouts, use a large shallow bowl or a rustic platter. This makes them look nice and inviting. Garnish with extra sesame seeds and sliced green onions. The green adds a fresh touch and bright color. You can serve these sprouts as a side dish or a main event. Try pairing them with grilled chicken or fish for a complete meal. Enjoy the mix of sweet, spicy, and crunchy in every bite! {{image_4}} You can switch the honey and Sriracha for other flavors. Try maple syrup instead of honey. It gives a sweet touch. For a different heat level, use chili garlic sauce. This sauce has a unique taste that pairs well with Brussels sprouts. You can even try a soy sauce mixture. Mix soy sauce with a bit of brown sugar for a savory twist. Experimenting with these alternatives lets you create new flavor profiles. Adding proteins can make this dish more filling. Cooked chicken or shrimp works well with Brussels sprouts. You can toss them in while roasting. If you want more veggies, try adding bell peppers or carrots. They add color and crunch. For seasonal variations, use squash in the fall or asparagus in the spring. These changes keep the dish fresh and exciting. You can make these Brussels sprouts in an air fryer. Preheat it to 375°F (190°C) and cook them for about 15 minutes. Shake the basket halfway through for even cooking. For grilling, toss the sprouts in oil and spices, then skewer them. Grill on medium heat for 10-15 minutes. This gives a nice smoky flavor that adds depth to the dish. After you enjoy your Honey Sriracha Brussels sprouts, store any leftovers in the fridge. Use an airtight container to keep them fresh. They can last for about 3 to 5 days. Make sure they cool down first to prevent condensation. You can reheat Brussels sprouts in two ways: the microwave or the oven. If you use the microwave, place them in a bowl and heat them for 30 seconds at a time. Stir them between heating bursts. This will keep them warm but might make them a bit soft. For a crispy texture, use the oven. Preheat it to 350°F (175°C) and spread the sprouts on a baking sheet. Heat them for about 10-15 minutes. This keeps the flavors and texture intact. Yes, you can freeze cooked Brussels sprouts! To do this, let them cool completely first. Then, place them in a freezer-safe bag. Squeeze out the air and seal the bag. They can stay in the freezer for up to 3 months. When you’re ready to eat them, thaw the sprouts in the fridge overnight. For best results, reheat them in the oven to keep them crispy. Brussels sprouts are small, round green veggies. They belong to the cabbage family. They are rich in vitamins C and K. These sprouts provide fiber and antioxidants. Eating Brussels sprouts can boost your health. They have a slightly bitter yet nutty flavor when cooked. Their texture becomes tender when roasted, which makes them a tasty side dish. Yes, you can make this recipe vegan. Replace honey with maple syrup or agave nectar. Both of these options add sweetness without using animal products. The other ingredients in the recipe are already vegan-friendly. You can enjoy this dish without compromising your diet. The spice level depends on how much Sriracha you use. If you prefer more heat, add extra Sriracha. For less spice, use less sauce. You can taste the glaze before adding it to the sprouts. This way, you can find the right balance for your taste. One common mistake is overcrowding the baking sheet. If the sprouts are too close, they will steam instead of roast. Another error is not tossing them halfway through cooking. This ensures even cooking and crispiness. Lastly, be careful not to burn the glaze. Keep an eye on the sprouts during the final roasting. Look for sprouts that are firm and compact. The outer leaves should be bright green. Avoid any that are yellow or wilted. Fresh Brussels sprouts should feel heavy for their size. If you can, smell them; they should have a fresh, earthy scent. We covered a tasty honey Sriracha recipe for Brussels sprouts. You learned how to roast, glaze, and garnish them perfectly. I shared tips for enhancing flavor, using alternatives, and storing leftovers. In the end, these sprouts are versatile and fun to make. You can customize them to fit your taste. So get creative in the kitchen and enjoy a delicious dish that's both healthy and satisfying!

Looking for a dish that’s crispy, flavorful, and easy to make? You’ll love these Honey Sriracha Brussels Sprouts! This recipe combines sweet honey with spicy Sriracha for a tasty twist …

Read more

Categories Appetizers Tags NO-ING-IMG

Satisfying Slow Cooker Buffalo Chicken Lettuce Wraps

January 14, 2026October 15, 2025 by Chef Tavio
- 1.5 lbs boneless, skinless chicken breasts - 1 cup buffalo sauce (store-bought or homemade) - 1/2 cup low-sodium chicken broth - 1 tablespoon olive oil - 1 teaspoon garlic powder - 1 teaspoon onion powder - 1/2 teaspoon smoked paprika - Salt and freshly ground black pepper, to taste - 1 head of butter lettuce or romaine, leaves separated - 1/2 cup shredded carrots - 1/4 cup chopped green onions - 1/2 cup crumbled blue cheese (optional) - Fresh cilantro leaves (optional) You can change things up with extra toppings. Try adding sliced jalapeños for heat or diced tomatoes for freshness. If you want a creamier taste, add ranch dressing instead of blue cheese. For a fun twist, switch the chicken for shredded pork or beef. To make this recipe easier, here are the tools I suggest: - Slow cooker for cooking the chicken - Mixing bowl for the marinade - Tongs for handling the chicken - Cutting board for shredding - Forks for shredding the chicken - Platter for serving the wraps This setup makes cooking simple and fun, ensuring you enjoy every step! Start by placing the 1.5 lbs of boneless, skinless chicken breasts in your slow cooker. Spread them out so they cook evenly. In a medium bowl, mix 1 cup of buffalo sauce with 1/2 cup of low-sodium chicken broth. Add 1 tablespoon of olive oil, 1 teaspoon of garlic powder, 1 teaspoon of onion powder, and 1/2 teaspoon of smoked paprika. Season with a pinch of salt and pepper. Whisk until it blends well. Pour this marinade over the chicken, covering it fully. Cover your slow cooker with the lid. Cook the chicken on low heat for 6 to 8 hours. When it's done, the chicken should be tender and easy to shred. You can check this by inserting a fork. If it pulls apart easily, it's ready. Once the chicken cooks, use tongs to take it out of the slow cooker. Place it on a cutting board. Use two forks to shred the chicken into bite-sized pieces. Return the shredded chicken back to the slow cooker. Stir it with the remaining sauce to soak in all the flavors. For the wraps, take a clean lettuce leaf and add a generous scoop of the spicy buffalo chicken. Top with shredded carrots, green onions, and crumbled blue cheese if you like. You can also add fresh cilantro leaves for extra flavor. Enjoy your tasty wraps! To shred chicken easily, let it cool for a few minutes. Use two forks to pull apart the meat. This method helps keep the chicken tender and juicy. If you have tough spots, just keep shredding until it’s all even. A good marinade makes all the difference. I like to mix buffalo sauce with low-sodium chicken broth. Olive oil adds richness, while garlic and onion powders give it depth. Smoked paprika adds a hint of smokiness. Adjust salt and pepper to taste. You can also try adding a splash of lime juice for a refreshing kick. For the best presentation, use a large platter. Neatly arrange the lettuce wraps to show off all their colors. You can set out toppings like shredded carrots, green onions, and blue cheese in small bowls. This way, guests can customize their wraps. A side dish of extra buffalo sauce is a great touch for spice lovers! {{image_4}} You can make this dish lighter without losing flavor. Use chicken thighs instead of breasts for more moisture and taste. Swap out the buffalo sauce for a homemade version using less salt. Use Greek yogurt in place of blue cheese for a creamy texture. You can also try whole grain wraps instead of lettuce for added fiber. If you want a meat-free meal, try using jackfruit. It shreds like chicken and soaks up flavors well. You can also use tofu or tempeh. Marinate them in the same buffalo sauce. For a nutty flavor, try chickpeas. Roast them with spices before adding to your wraps. You can control the heat in this dish easily. For milder wraps, use less buffalo sauce or mix it with ranch dressing. If you like it hot, add cayenne pepper or use a spicier sauce. You can also serve extra buffalo sauce on the side for those who want more kick. Taste as you go, and adjust to your liking! To store leftover chicken wraps, first let them cool completely. Place the wraps in an airtight container. If you have extra filling, keep it separate. This helps maintain the lettuce's crunch. Store the container in the fridge. Use the wraps within three days for best taste. When you're ready to enjoy leftovers, reheat the chicken filling. You can use a microwave or a skillet. If using a microwave, place the filling in a bowl. Heat it for about 1-2 minutes. Stir halfway through for even heating. If using a skillet, warm it over medium heat. Stir until the chicken is hot. Avoid reheating the lettuce; serve it fresh when you assemble the wraps. You can freeze the chicken filling for later use. Let it cool completely before packing it. Use a freezer-safe bag or container. Remove as much air as possible. The filling can last up to three months in the freezer. When ready to use, thaw it in the fridge overnight. Reheat and serve in fresh lettuce leaves. This way, you always have a quick meal ready! Yes, you can use frozen chicken breasts. Just add a bit more cooking time. Cook them on low for about 8 to 10 hours. Make sure the chicken reaches 165°F for safety. Thawing is not required. This makes it easy to plan meals. Several side dishes work well with these wraps. Here are some great options: - Vegetable sticks: Carrots and celery add crunch. - Fruit salad: A sweet side balances the spice. - Chips: Tortilla or veggie chips bring texture. - Coleslaw: A tangy slaw complements the flavors. These sides help create a fun meal. To boost the heat, try these tips: - Add more buffalo sauce: Increase the amount in the marinade. - Include hot sauce: Mix your favorite hot sauce with the buffalo sauce. - Add jalapeños: Chop fresh or pickled jalapeños for a kick. - Use spicy cheese: Choose pepper jack cheese instead of blue cheese. These changes will turn up the heat and spice up your meal! We explored the tasty world of slow cooker Buffalo chicken lettuce wraps. You learned about the key ingredients and how to cook them perfectly. I shared tips for shredding and enhancing flavors. You discovered variations for health-conscious eaters and vegetarians. Finally, we covered storage and reheating methods. These wraps are easy, fun, and great for any meal. Now you can enjoy them anytime!

Looking for a tasty meal that’s easy to make? These Slow Cooker Buffalo Chicken Lettuce Wraps are just what you need! Packed with flavor, they’re perfect for lunch or dinner. …

Read more

Categories Appetizers Tags NO-ING-IMG
Older posts
Newer posts
← Previous Page1 … Page6 Page7 Page8 … Page73 Next →

TASTED NEST

Where Flavor Finds a Home 🍳🏡 — warm, simple, and crave-worthy recipes made for real life, from stovetop mornings to backyard dinners.

PAGES

Home About Contact Privacy Policy Terms & Conditions Cookie Policy GDPR Policy Copyright Policy Disclaimer

CATEGORIES

Appetizers Desserts Salads Breakfast Dinner
Copyright © 2026 Tasted Nest. All rights reserved.