Skip to content
  • GDPR Privacy Policy
  • Copyright Policy
  • Disclaimer
  • Terms & Conditions
Tasted Nest
  • Home
  • Appetizers
  • Desserts
  • Salads
  • Breakfast
  • Dinner
  • Privacy Policy
  • Contact
  • About

NO-ING-IMG

30-Minute One Pan Caprese Chicken Quick and Easy Meal
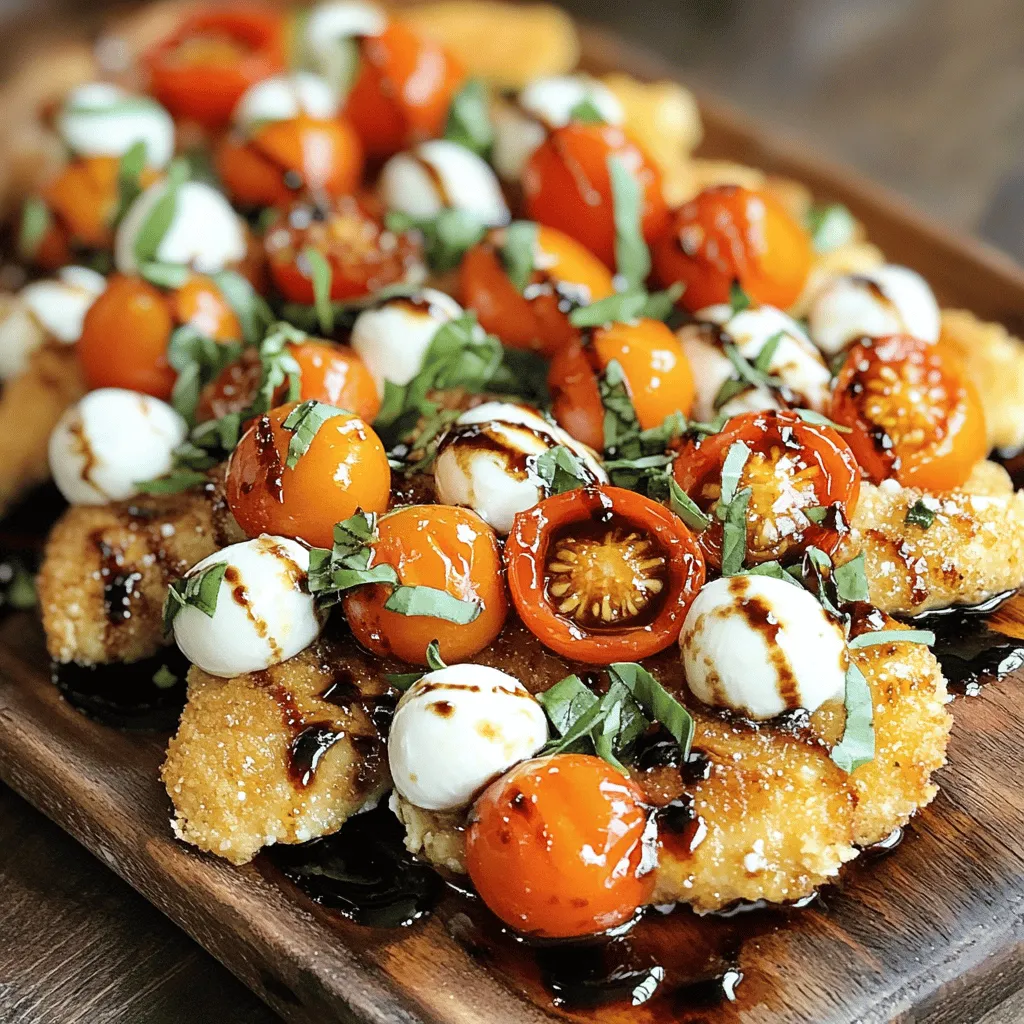
January 14, 2026July 16, 2025 by Chef Tavio
- 4 boneless, skinless chicken breasts - 2 cups cherry tomatoes, halved - 1 cup fresh mozzarella balls, drained - 1 teaspoon garlic powder - 1 tablespoon olive oil - 2 tablespoons balsamic glaze - 1 cup fresh basil leaves, chopped - Salt and pepper to taste In this recipe, you only need a few fresh ingredients. The boneless chicken breasts are the stars. They cook fast and soak up flavor well. Cherry tomatoes add sweetness and color. I love using fresh mozzarella. It melts beautifully and adds creaminess. For seasoning, garlic powder brings a nice depth. Olive oil helps cook the chicken and keeps it moist. Balsamic glaze adds a tangy touch that ties everything together. Garnishing with fresh basil is a must. It gives a bright taste and looks lovely on the plate. Don’t forget to season with salt and pepper to make all the flavors pop. This dish is simple but feels special, perfect for a busy weeknight. Check out the Full Recipe for more details on how to make this mouthwatering meal! First, season the chicken breasts. Use salt, pepper, and garlic powder. This adds great flavor. Heat olive oil in a large skillet over medium-high heat. Once hot, add the chicken. Cook each side for about 4-5 minutes. You want them golden brown and fully cooked. After that, remove the chicken and set it aside on a plate. Next, it’s time to cook the tomatoes. In the same skillet, add your halved cherry tomatoes. Sauté them for about 2-3 minutes. Watch them soften and release their juices. This will deglaze the skillet, mixing in the tasty bits left from the chicken. Now, return the chicken to the skillet. Nestle it among the softened tomatoes. Top each piece of chicken with fresh mozzarella balls. Sprinkle chopped basil over the top. Cover the skillet with a lid. This helps the mozzarella melt beautifully. Cook for another 2-3 minutes. To finish, drizzle balsamic glaze over the chicken and tomatoes. This adds a sweet tang to your dish. Right before serving, garnish with more fresh basil leaves. This adds a lovely touch and flavor. For the full recipe, check the previous section. To get that perfect sear on your chicken, heat control is key. Start with medium-high heat. This helps the chicken brown well without burning. Use a heavy skillet, like cast iron or stainless steel, for better heat retention. Avoid overcrowding the pan. If you add too many chicken breasts, they will steam instead of sear. This means less flavor and a soggy texture. Cook in batches if needed. You can get creative with this recipe. Adding vegetables boosts flavor and nutrition. Try bell peppers, zucchini, or spinach. They blend well with the other fresh ingredients. If you want to change things up, substitute the chicken. Use turkey or even a plant-based protein. You can also try different cheeses. Goat cheese or feta add a unique twist to the classic Caprese taste. For side dishes, fresh salad works great. A light arugula salad with lemon dressing pairs nicely. Garlic bread also complements the meal well, soaking up the delicious juices. For wine, a crisp white wine is perfect. A Sauvignon Blanc or Pinot Grigio enhances the flavors. If you prefer red, a light Merlot will also do the trick. Enjoy your meal! For the complete recipe, check out the [Full Recipe]. {{image_4}} For a classic Caprese touch, try using heirloom tomatoes. They bring rich flavors and vibrant colors. You can also experiment with different types of mozzarella. Burrata adds creaminess, while smoked mozzarella gives a unique taste. Each choice adds a new layer to the dish. Add a Mediterranean flair by including olives or artichokes. Both add briny notes that pair well with the chicken. You can also incorporate lemon zest for a fresh kick. This twist brightens the dish and balances the rich flavors of the cheese. For a lighter meal, use chicken thighs instead of breasts. They stay moist and flavorful. You can also opt for lower-calorie cheese options, like part-skim mozzarella. These small changes keep the dish tasty while cutting calories. These variations allow you to enjoy the 30-Minute One Pan Caprese Chicken in new ways. Each option makes the dish your own. To store leftovers, let the chicken cool first. Place it in an airtight container. This helps keep it fresh. Use a glass or plastic container with a tight lid. You can store it in the fridge for 3 to 4 days. Make sure to label the container with the date. For freezing Caprese chicken, wrap it tightly in plastic wrap. Then, place it in a freezer-safe bag. Remove as much air as possible to avoid freezer burn. This dish can last up to 3 months in the freezer. To thaw, move it to the fridge overnight. You can also use the microwave on the defrost setting for quicker results. When reheating, the oven is the best choice. Preheat it to 350°F (175°C). Place the chicken in a baking dish and cover it with foil. Bake for about 15-20 minutes or until heated through. If you use a microwave, heat it in short bursts. This method helps keep the chicken juicy. Avoid overcooking to maintain the texture and flavor. Enjoy your delicious meal! This dish lasts about 3 to 4 days in the fridge. Store it in an airtight container. Check for signs of spoilage like a sour smell or change in color. If the chicken feels slimy, it’s best to toss it. Yes, you can prepare this dish ahead of time. Season and cook the chicken, then store it in the fridge. The best storage method is to keep it in a sealed container. You can also chop the tomatoes and basil ahead of time. You can use turkey breasts instead of chicken. For a vegetarian option, try tofu or portobello mushrooms. Both options keep the dish flavorful and satisfying. If you want a lighter option, consider chickpeas or lentils for a healthy twist. This blog post covered a delicious 30-Minute One Pan Caprese Chicken recipe. We explored main ingredients, seasoning tips, and variations to enhance flavor. I shared essential storage info and reheating tips to keep your dish fresh. Remember, you can customize this recipe based on your taste or dietary needs. It's a fast and easy way to enjoy a healthy meal. Try it out, and let the fresh flavors uplight your dinner table!

Looking for a quick and tasty meal? This 30-Minute One Pan Caprese Chicken is the answer! With juicy chicken breasts, sweet cherry tomatoes, and creamy mozzarella, you’ll enjoy every bite. …
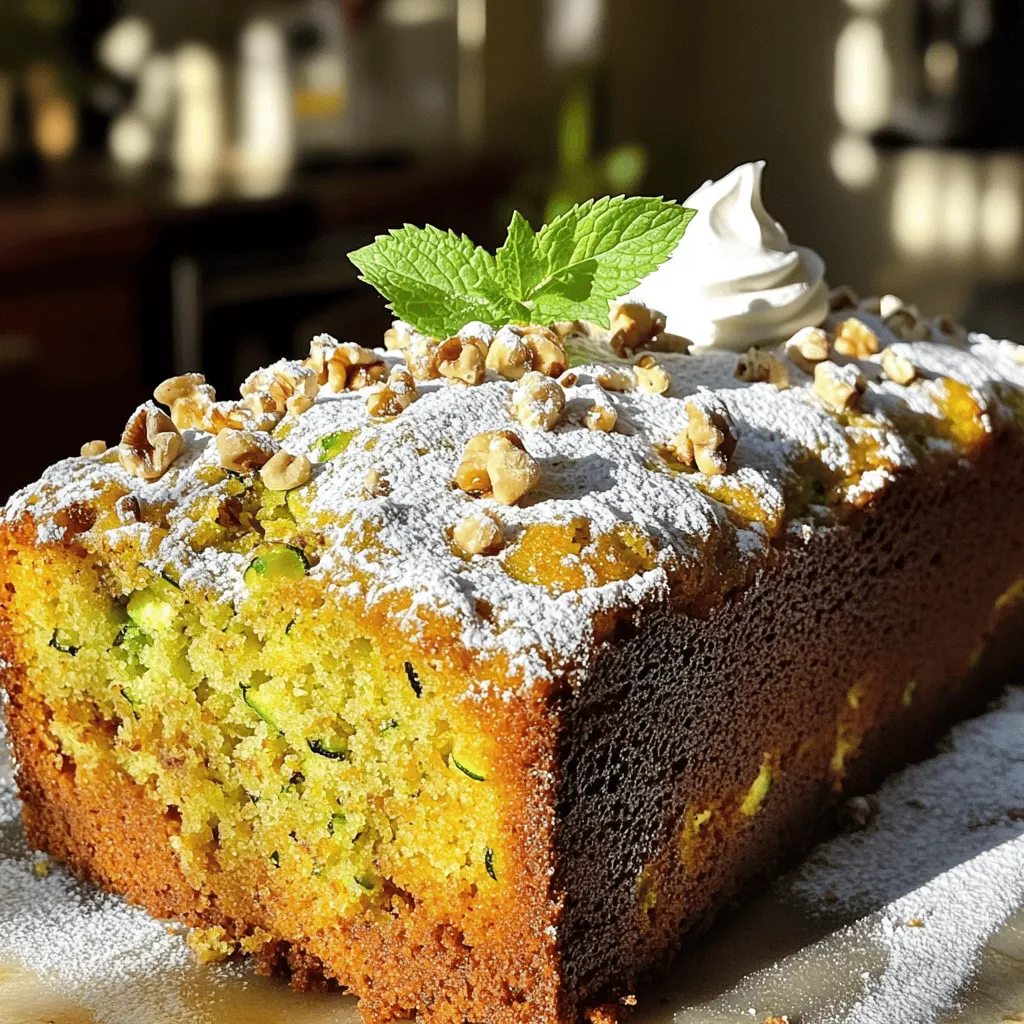
Read more

Categories Dinner Tags NO-ING-IMG

Neapolitan Layer Cake Delightful and Easy Recipe

January 14, 2026July 16, 2025 by Chef Tavio
To make a Neapolitan layer cake, you need the following ingredients: - 2 cups all-purpose flour - 1 ½ cups granulated sugar - ½ cup unsweetened cocoa powder - 1 cup unsalted butter, softened - 4 large eggs - 1 cup whole milk - 1 tablespoon baking powder - 1 teaspoon vanilla extract - ½ teaspoon salt - 1 cup strawberry puree (fresh or frozen) - 1 cup whipped cream (for frosting) - Fresh strawberries and grated chocolate for garnish These ingredients come together to create rich layers. The chocolate, vanilla, and strawberry flavors make this cake special. You can add extra flavors or textures to your cake. Consider these options: - Nuts (like chopped almonds or walnuts) for crunch - Different fruit purees (like raspberry or mango) for unique flavors - Food coloring to enhance the strawberry layer's pink hue - Flavored extracts (like almond or lemon) for added depth Feel free to mix and match these ingredients to make the cake your own! Not all ingredients may be on hand. Here are some substitutes: - For all-purpose flour, use cake flour for a lighter texture. - Use brown sugar instead of granulated sugar for a deeper flavor. - If you lack unsweetened cocoa powder, try Dutch-processed cocoa. - Substitute butter with vegetable oil for a lighter cake. - Use almond milk instead of whole milk for a dairy-free option. These swaps can help you create a delicious cake, no matter what you have in your pantry. You can find the full recipe online for more details. Before you start, gather your ingredients. You will need flour, sugar, cocoa, butter, eggs, milk, baking powder, vanilla, salt, strawberry puree, and whipped cream. 1. Preheat your oven to 350°F (175°C). 2. Grease three 8-inch round cake pans. Dust them with flour. This helps the cakes come out easily. 1. In a bowl, sift the flour, cocoa powder, baking powder, and salt. Set it aside. 2. In a large bowl, cream the softened butter and sugar with an electric mixer. Mix until light and fluffy. 3. Add the eggs, one at a time. Mix well after each egg. Then add the vanilla and mix until all is combined. 4. Slowly add the dry mix to the wet mix. Alternate with the milk. Start and end with the dry mix. Mix until no flour shows. 5. Divide the batter into three bowls. Mix cocoa into one bowl for chocolate. Leave one bowl plain for vanilla. 6. In the last bowl, fold in the strawberry puree gently. Don’t over-mix. 1. Pour the chocolate batter into one pan. Pour the vanilla batter into the second pan. Lastly, pour the strawberry batter into the third pan. 2. Bake the layers for 25-30 minutes. Check with a toothpick to see if they are done. 3. Let the cakes cool in the pans for 10 minutes. Then, move them to a wire rack to cool completely. 4. Once cool, place the chocolate layer first. Add the vanilla layer next, then the strawberry layer. 5. Spread whipped cream between each layer. Cover the top and sides with more whipped cream. 6. For a nice touch, add fresh strawberries and grated chocolate on top. Follow this process for a delightful Neapolitan Layer Cake. For the full recipe, check the sections above. To get moist layers, use room temperature ingredients. Cold eggs and butter can make your batter dense. Mix until just blended; overmixing will lead to dry cake. When you bake, check for doneness with a toothpick. If it comes out clean, your cake is ready. Also, let the cakes cool completely before you frost them. This helps the frosting to stick better. For a smooth frosting, use cold whipped cream straight from the fridge. Start by spreading a thin layer of frosting between the layers. This is called a crumb coat. It keeps crumbs from messing up the final layer. After that, add more frosting to cover the top and sides. Use a spatula or a knife to create a clean edge. You can also swirl the frosting for a fun look. Make your cake pop with fresh strawberries on top. They add color and flavor. You can also sprinkle grated chocolate for a fancy touch. For extra flair, consider adding fun sprinkles or edible flowers. Each slice will look like art! If you want, you could even write a message on the cake with melted chocolate. It adds a personal touch for celebrations. For the full recipe, check out the details above. Enjoy your baking adventure! {{image_4}} You can make a vegan version of this cake easily. Replace the eggs with applesauce or flaxseed meal. Use plant-based butter and almond milk in place of regular butter and milk. This way, you keep the cake moist and tasty. It’s a great option for those who avoid animal products. To make a gluten-free Neapolitan layer cake, swap out the all-purpose flour for gluten-free flour. Look for a blend that works well in baking. You may also want to add a bit of xanthan gum to help with texture. This variation keeps the cake light and fluffy without the gluten. Get creative with flavors! You can add coffee to the chocolate layer for a richer taste. Just mix in 1-2 tablespoons of instant coffee granules. For a citrus twist, add lemon zest to the vanilla layer. These small changes can give your cake a fresh spin. You can even try different fruit purees for unique flavors! For the full recipe, check out the detailed instructions above. To store leftover Neapolitan layer cake, wrap it tightly in plastic wrap. This keeps the cake moist. You can also use a cake dome for added protection. Store it in the fridge if you have whipped cream on the cake. The cold helps keep the frosting fresh. If you want to freeze the cake, slice it first. Place the slices in an airtight container or wrap them in plastic wrap. Then, put them in a freezer bag. This keeps the cake fresh for up to three months. When you're ready to eat it, let the cake thaw in the fridge overnight. To keep your cake fresh, avoid placing it in direct sunlight. Heat can dry it out. Also, do not cut into the cake until you are ready to serve. This helps keep the other layers intact. Always use a clean knife to slice, as this prevents crumbs from mixing into the frosting. Check your storage regularly to ensure it remains tasty and appealing. Yes, you can make this cake ahead of time. It’s best to bake the layers a day before you want to serve. Allow the layers to cool completely. Then, wrap each layer in plastic wrap. This keeps them fresh. You can frost the cake the next day. This saves time and lets the flavors blend well. Neapolitan Layer Cake lasts about 3 to 5 days if stored properly. Keep it in an airtight container in the fridge. The layers stay moist this way. If you want to keep it longer, consider freezing it. Just wrap it well in plastic wrap and foil. It can last up to three months in the freezer. You can find Neapolitan Layer Cake at many bakeries. Local shops often make this cake fresh. Some grocery stores also carry it. If you want something special, consider ordering from a bakery online. They may offer delivery right to your door. Check for options near you for the best choices. For a fun experience, you can also try to make it at home using the Full Recipe. You’ve learned about the key ingredients and methods for making Neapolitan Layer Cake. From prepping the batter to layering and decorating, these steps guide you to success. Remember, customization is key—use different flavors or substitutes to fit your needs. Store your cake properly to keep it fresh longer. With these tips, you can impress anyone with your baking skills. Enjoy creating your own delicious cake and share the joy with others. Happy baking!

Ready to dive into the delicious world of Neapolitan Layer Cake? This classic dessert offers three delightful flavors in every bite: chocolate, strawberry, and vanilla. I’ll guide you through each …

Read more

Categories Desserts Tags NO-ING-IMG

Crunchy Asian Slaw Fresh and Flavorful Side Dish

January 14, 2026July 16, 2025 by Chef Tavio
- 2 cups green cabbage, finely shredded - 1 cup red cabbage, finely shredded - 1 cup carrots, julienned - 1 bell pepper (red or yellow), thinly sliced - 1 cup snow peas, trimmed and halved - 1/4 cup green onions, sliced - 1/4 cup fresh cilantro, chopped - 1/4 cup sesame seeds, toasted The main ingredients for Crunchy Asian Slaw bring freshness and color. Green and red cabbage are key for crunch. Carrots add sweetness and bright orange color. Bell peppers give a nice crunch and flavor. Snow peas add a unique snap that feels great. Green onions and cilantro finish the slaw with herbaceous notes. Toasted sesame seeds add a nutty finish. - 3 tablespoons rice vinegar - 2 tablespoons soy sauce (or tamari for gluten-free) - 1 tablespoon honey or maple syrup - 1 tablespoon sesame oil - 1 clove garlic, minced - 1 teaspoon freshly grated ginger - Freshly ground black pepper to taste The dressing is simple yet flavorful. Rice vinegar provides a tangy base. Soy sauce adds depth and saltiness. You can choose honey or maple syrup for sweetness. Sesame oil brings a rich flavor. Garlic and ginger boost the aroma and zest. Black pepper adds just enough heat. This combination makes the slaw sing. For the full recipe, check out the detailed steps. To start, you need to prep the veggies. First, take your green and red cabbage. Shred them finely. Use a sharp knife or a mandoline for this task. Next, julienne the carrots into thin strips. This adds color and crunch. Now for the bell pepper. Slice it thinly; you can use either red or yellow. Then, grab the snow peas. Trim the ends and cut them in half. Lastly, slice the green onions for a fresh taste. Combine all the vegetables in a large mixing bowl. Now, let's make the dressing. In a small bowl, whisk together rice vinegar and soy sauce. You can use tamari for a gluten-free option. Add honey or maple syrup for sweetness. Next, pour in sesame oil for that nutty flavor. Add minced garlic and freshly grated ginger. Don’t forget to add freshly ground black pepper. Whisk until you achieve a smooth mixture. If it feels too thick, add a splash of water to thin it out. Time to combine everything. Drizzle the dressing over the slaw mix in your large bowl. Use tongs or salad forks to toss everything well. Ensure each vegetable gets a nice coat of dressing. This helps blend the flavors. Finally, let’s add some garnish. Sprinkle toasted sesame seeds and chopped cilantro over the slaw. Toss gently to mix them in without breaking the veggies. For the best taste, chill the slaw for 15-20 minutes. This allows the flavors to meld and enhances the dish. Enjoy your Crunchy Asian Slaw! For the full recipe, check out the complete instructions above. Using the right tools makes a big difference. A sharp chef's knife helps you cut easily. A cutting board provides a stable surface. I recommend using a mandoline for even slices. It saves time and gives you great results. To julienne veggies like a pro, start by cutting your vegetables into manageable pieces. For carrots, cut off the ends, and slice them into long strips. Then, stack a few strips and cut them into thin matchsticks. This method works for bell peppers, too. Make sure your slices are uniform; this ensures even cooking and a nice presentation. To kick up the flavor, you can add spices like red pepper flakes or sesame seeds. These spices bring a nice warmth and crunch. You can also try adding a bit of lime zest for a fresh twist. Balancing flavors in the dressing is key. You want a mix of sweet, salty, and tangy. If the dressing is too sweet, add more vinegar. If it’s too salty, a little honey can help. Taste as you go to find the right balance. Serving ideas can make your slaw shine. Use a large bowl to show off those vibrant colors. You can also serve in clear glass bowls. This way, guests can see the beautiful layers of veggies. To showcase colors, sprinkle extra sesame seeds on top. Fresh cilantro adds a bright green touch. A colorful dish always looks more inviting, so don’t be shy with your garnishes. Enjoy your Crunchy Asian Slaw as a fresh and tasty side dish! For the complete recipe, check out the Full Recipe. {{image_4}} You can change up the dressing for your Crunchy Asian Slaw. Try a sesame vinaigrette for a nutty twist. You can also use a creamy dressing if you prefer a richer taste. A yogurt-based dressing can add creaminess without too much fat. Each dressing gives the slaw a new flavor, keeping it exciting. To make your slaw a full meal, add some protein. Grilled chicken is a great choice. It adds a nice flavor and pairs well with the slaw. Tofu works well too, especially if you want a vegetarian option. Shrimp is another tasty addition. Just cook it quickly and toss it in with the slaw. This way, you can enjoy a balanced meal in one bowl. Feel free to swap in seasonal vegetables for freshness. In summer, add cucumbers or radishes for a crisp bite. In fall, use shredded Brussels sprouts or kale. This makes your slaw unique and ties it to the seasons. Always look for local produce to get the best flavor. Using what's in season can make your slaw even more special. Store your crunchy Asian slaw in an airtight container. Glass containers work well for this. They keep the slaw fresh and help prevent any strong odors from mixing. To maintain the crunchiness, do not add dressing until you are ready to serve. If you have leftover dressing, store it separately. This way, you keep the veggies crisp and fresh. You can freeze the slaw, but it may change. First, pack it tightly in a freezer-safe bag. Remove as much air as possible to avoid freezer burn. When you are ready to eat, thaw it in the fridge overnight. The texture will soften, and some flavors may fade. For the best taste, it's better to enjoy it fresh. The slaw lasts about three to five days in the refrigerator. Keep it in an airtight container for the best results. Watch for signs of spoilage like a sour smell, sliminess, or discoloration. If you notice any of these signs, it's best to toss it out. Enjoying it fresh ensures the best taste and crunch! If you lack rice vinegar, you have options. You can use apple cider vinegar, white wine vinegar, or lemon juice. Each will add a tangy flavor to your slaw. Apple cider vinegar gives a fruity note, while lemon juice adds brightness. White wine vinegar is milder and works well too. These substitutes keep your slaw tasty and fresh. Yes, you can prepare this slaw ahead of time! To do this, chop all your veggies and mix them in a bowl. Keep the dressing separate until serving. This helps prevent the slaw from getting soggy. You can store the slaw in the fridge for up to a day. Just toss in the dressing right before you serve it. Yes, this recipe can be gluten-free. To make it gluten-free, replace soy sauce with tamari. Tamari is a great soy sauce alternative made without wheat. Always check labels to ensure all ingredients suit your needs. This way, everyone can enjoy your delicious Crunchy Asian Slaw! This crunchy Asian slaw recipe combines fresh veggies and simple dressing. You learned how to prepare ingredients, mix flavors, and create variations. I shared tips for storing leftovers and making it a complete meal with proteins. By using seasonal veggies and adjusting flavors, you can enjoy this slaw year-round. Remember, presentation matters! Serve it well for a colorful dish. Try this slaw at your next meal. You’ll love how easy and tasty it is!

If you’re looking for a fresh and crunchy side dish, look no further than Crunchy Asian Slaw. Packed with colorful veggies and a zingy dressing, this slaw is not only …

Read more

Categories Salads Tags NO-ING-IMG

Homemade Pineapple Baked Beans Flavorful and Easy Dish

January 14, 2026July 16, 2025 by Chef Tavio
- 2 cups cooked navy beans (or canned beans, rinsed and drained) - 1 cup fresh pineapple chunks (or canned pineapple, drained) - 1 medium onion, finely diced - 1 green bell pepper, finely diced - 2 cloves garlic, minced - 1/4 cup brown sugar - 1/4 cup ketchup - 2 tablespoons soy sauce - 1 teaspoon mustard (yellow or Dijon) - 1 teaspoon smoked paprika - 1/2 teaspoon freshly ground black pepper - 1 tablespoon olive oil - Salt to taste - Other beans or legumes (variation options) - Different types of mustard (for flavor enhancement) - Baking dish (9x13-inch recommended) - Large skillet - Mixing bowl - Aluminum foil When I make homemade pineapple baked beans, I love to keep my ingredients fresh. The sweet pineapple pairs well with savory beans. You can use canned beans if you want to save time. Just remember to rinse them well. The onion and green bell pepper add a nice crunch. They give the dish depth and flavor. Always dice them finely for even cooking. Garlic brings an amazing aroma, so don't skip it! For the sauce, brown sugar adds sweetness, while ketchup gives it a rich taste. The soy sauce gives a nice umami kick. I usually use yellow mustard, but Dijon works too. A hint of smoked paprika adds a warm, smoky flavor. Don't forget the black pepper for a little heat! You can switch up the beans if you want. Kidney beans or black beans also work great. Different mustards can change the taste too. Try spicy mustard for a bold twist. To prepare, you need a few tools. A good baking dish helps the beans cook evenly. A large skillet is necessary for sautéing the veggies. A mixing bowl makes combining all the ingredients easy. Aluminum foil helps keep the dish moist while it bakes. Check out the full recipe for more details on how to bring this dish to life! 1. Preheat your oven to 350°F (175°C). This step is critical. A hot oven cooks your beans evenly and helps them develop flavor. 2. Sauté the vegetables. In a large skillet, add one tablespoon of olive oil and heat over medium. Once hot, add 1 medium onion and 1 green bell pepper, both finely diced. Cook for about 5-7 minutes. Stir them often. You want them soft and a bit see-through. 3. Add garlic. Once the veggies are ready, stir in 2 cloves of minced garlic. Sauté for another minute. The garlic should smell great, but don't let it burn. 1. Combine all the ingredients. In a large mixing bowl, add 2 cups of cooked navy beans. If you use canned beans, rinse and drain them first. Then, add your sautéed vegetables and 1 cup of fresh pineapple chunks. 2. Mix in the sauces. Add 1/4 cup of brown sugar, 1/4 cup of ketchup, 2 tablespoons of soy sauce, 1 teaspoon of mustard, 1 teaspoon of smoked paprika, and 1/2 teaspoon of black pepper. Don’t forget to add salt to taste. Mix everything well until fully combined. 1. Transfer the mixture. Carefully pour the mixed ingredients into a greased 9x13-inch baking dish. Spread it out evenly. This helps all parts cook at the same time. 2. Cover and bake. Take aluminum foil and cover the dish tightly. Place it in your preheated oven. Bake for 30 minutes. This allows the flavors to meld nicely. 3. Final baking. After 30 minutes, remove the foil. Let it bake for another 15-20 minutes. This step gets the top nice and caramelized, adding a sweet touch to your dish. These steps create a delicious homemade pineapple baked beans dish that brings a tropical twist to your table. For the full recipe, don’t forget to check out the detailed instructions! To get the best flavor balance in your pineapple baked beans, use fresh ingredients. Fresh pineapple adds a bright taste. Pair it with sweet and savory flavors like brown sugar and soy sauce. This mix keeps your dish exciting. Sautéing vegetables before baking is key. It brings out their natural sweetness. Start by heating olive oil in a skillet. Add diced onion and green bell pepper. Cook them until they are soft and clear. This step makes a big difference in flavor. For a beautiful presentation, serve baked beans in individual bowls. Add fresh pineapple wedges on top. Sprinkle chopped cilantro or parsley for color. This adds a tropical vibe to your dish. When pairing drinks, try iced tea or a light beer. They complement the sweetness of the baked beans. Serve with grilled meats or a fresh salad for a complete meal. One common mistake is overcooking or undercooking beans. If you use dried beans, soak them well. Cook them until tender but not mushy. Canned beans should be rinsed and drained for the best taste. Another mistake is skipping the preheating step. Preheating your oven allows even cooking. It helps the flavors mix well during baking. Always remember to set your oven to the right temperature before you start. {{image_4}} You can make this dish even more exciting with different fruit. Try adding mango or peach. These fruits add a sweet twist to the beans. You can also spice things up! Adding red pepper flakes gives a nice kick. Just a pinch can change the whole dish. Experiment and find what flavors you love. If you want a vegan version, it's easy to swap out a few ingredients. Use maple syrup instead of brown sugar for sweetness. You can use tamari instead of soy sauce for a gluten-free option. These changes keep the taste great while fitting your diet. Don’t worry if you don’t have navy beans. You can use black beans or pinto beans instead. Each gives a unique flavor and texture. For sweetener, try honey or agave syrup. Both work well in this recipe. These simple swaps can help you make this dish your own. Feel free to check out the Full Recipe for more tips! After you make your homemade pineapple baked beans, let them cool. This helps keep their taste and texture. Once cooled, place the beans in an airtight container. Store them in the fridge. They can last about 3 to 5 days. For longer storage, freezing is a great option. First, let the beans cool completely. Then, transfer them to a freezer-safe container. Leave some space at the top, as the beans will expand when frozen. You can freeze them for up to 3 months. To reheat, first thaw the beans in the fridge overnight. Then, heat them in a pot over medium heat. Stir often until warm. If they seem dry, add a splash of water or broth. You can also reheat them in the microwave. Refrigerated baked beans stay good for about 3 to 5 days. If frozen, they will keep their best flavor for about 3 months. After that, they may lose some taste but are still safe to eat. Enjoy your homemade pineapple baked beans while they are fresh! To make Homemade Pineapple Baked Beans, follow these key steps: 1. Preheat your oven to 350°F (175°C). 2. In a skillet, heat olive oil. Sauté diced onion and green bell pepper until soft. 3. Add minced garlic and cook for one more minute. 4. In a bowl, mix cooked navy beans, sautéed veggies, pineapple, brown sugar, ketchup, soy sauce, mustard, smoked paprika, and black pepper. Add salt to taste. 5. Transfer to a greased baking dish. Cover with foil and bake for 30 minutes. 6. Remove the foil and bake for another 15-20 minutes to caramelize the top. This method gives you rich flavors and a sweet twist. For the full recipe, check the earlier section. Yes, you can use canned beans. They save time and are easy to use. - Rinse and drain the canned beans before mixing them in the recipe. - Canned beans are soft, which means no need to cook them beforehand. - They help speed up the process, making this dish quick and simple. Using canned beans also means you can enjoy this dish anytime. Pineapple Baked Beans pair well with many dishes. Here are some ideas: - Serve them with grilled chicken or pork for a tasty meal. - Pair with cornbread for a southern twist. - Enjoy with a fresh salad for a light side. - Serve as a side dish at BBQs or potlucks. These beans add a sweet and savory touch to any meal. Storing leftovers is easy to keep them fresh: - Let the beans cool completely before storing. - Place them in an airtight container and refrigerate. - They can last up to 4 days in the fridge. For long-term storage: - Freeze them in a freezer-safe container. - They can stay good for up to 3 months. - Thaw in the fridge overnight before reheating. This way, you can enjoy your delicious beans later! This recipe for pineapple baked beans offers a tasty mix of flavors and easy steps. You learned about the ingredients, how to prepare, and tips to perfect your dish. Making tasty desserts and avoiding common mistakes is key. Remember, feel free to try different fruits or spices for fun! Store any leftovers properly to keep them fresh. Enjoy your cooking adventure, and impress your friends and family with this delicious dish!

Looking for a dish that’s both tasty and simple? You’ve found it! Homemade Pineapple Baked Beans blend sweet and savory flavors to create a meal everyone will love. This recipe …

Read more

Categories Dinner Tags NO-ING-IMG

Fudgy Dark Chocolate Zucchini Brownies Recipe Delight

January 14, 2026July 15, 2025 by Chef Tavio
Using finely shredded zucchini is key in this recipe. It adds moisture and richness. When you shred the zucchini, make sure to squeeze out excess water. This prevents the brownies from being too wet. I use about one medium zucchini, which gives around one cup of shreds. The zucchini helps keep the brownies fudgy and soft. Choose high-quality unsweetened cocoa powder for a deep chocolate flavor. This type gives the brownies a rich taste. Look for a cocoa powder that is dark and has a bold flavor. You can use Dutch-processed cocoa if you want a smoother taste. This will enhance the chocolate flavor in each bite. I use both granulated and brown sugar in this recipe. Granulated sugar adds sweetness, while brown sugar adds moisture and a caramel note. The mix of these sugars creates the perfect balance. You can adjust the ratios if you prefer one over the other. For this recipe, I recommend one cup of granulated and half a cup of packed brown sugar. This combination gives the brownies a sweet, fudgy bite. For the full recipe, please refer to the [Full Recipe]. Start by preheating your oven to 350°F (175°C). This step ensures even baking. While the oven warms up, prepare an 8x8-inch baking pan. You can grease it lightly with butter or line it with parchment paper. Lining the pan makes it easy to lift out the brownies later. In a medium bowl, combine the dry ingredients. Add 1/2 cup of unsweetened cocoa powder, 1 cup of all-purpose flour, 1/2 teaspoon of baking powder, 1/2 teaspoon of baking soda, and 1/4 teaspoon of salt. Whisk these together until evenly mixed. This step helps avoid clumps in your batter. Set the bowl aside once done. In a large bowl, mix the sugars and vegetable oil. Use 1 cup of granulated sugar and 1/2 cup of brown sugar with 1/3 cup of vegetable oil. Blend these until smooth. Next, crack in 2 large eggs, one at a time. Stir well after each egg. Then, add 1 teaspoon of vanilla extract and mix again. Finally, gently fold in the finely shredded zucchini. If it seems too wet, squeeze some moisture out with a towel. Now, combine the dry mixture with the wet mixture. Stir gently until just mixed. Avoid overmixing to keep the brownies fudgy. Fold in 1/2 cup of semi-sweet chocolate chips and 1/4 cup of chopped walnuts if you like. Pour the batter into your prepared pan, spreading it evenly. Bake for 25-30 minutes. To check, insert a toothpick into the center. It should come out mostly clean, with a few moist crumbs. Let the brownies cool for at least 10 minutes in the pan before moving them to a wire rack. Enjoy your fudgy dark chocolate zucchini brownies! For a full recipe, refer to the earlier section. To keep your brownies fudgy, avoid overbaking. Check them at 25 minutes. If a toothpick comes out with a few moist crumbs, they are done. Also, stick to the recipe amounts. Too much flour can dry them out. Zucchini holds water. To control moisture, squeeze it before adding it to the batter. Use a clean kitchen towel to wring out excess liquid. This step is key for a fudgy texture. You can make these brownies dairy-free by using plant-based milk and dairy-free chocolate chips. For gluten-free brownies, swap all-purpose flour with a gluten-free blend. Both options keep your dessert delicious and satisfying. For the full recipe, check out the section above. {{image_4}} I love adding nuts to my brownies. Walnuts or pecans give a nice crunch. You can mix in about 1/4 cup of chopped nuts. They add texture and flavor. Walnuts have a rich taste that pairs well with chocolate. Pecans offer a sweeter, buttery flavor. Choose your favorite and enjoy the added bite! Want to boost the flavor? Try adding spices! A dash of cinnamon can warm up the brownies. It gives a cozy taste that blends well with chocolate. If you like coffee, add a teaspoon of espresso powder. This will enhance the chocolate flavor without making it taste like coffee. Just mix it with the dry ingredients for a tasty twist. Looking for a healthier option? Swap out some oil with applesauce. This keeps your brownies moist and cuts down on fat. You can use 1/3 cup of unsweetened applesauce instead of vegetable oil. For a nutty flavor, try using nut butter. Almond or peanut butter works great! Just replace the oil with the nut butter in the recipe. It's a fun way to add more nutrition. For the full recipe, check out the Fudgy Dark Chocolate Zucchini Brownies. Enjoy experimenting with these variations! To store your fudgy dark chocolate zucchini brownies, keep them in an airtight container. This helps the brownies stay fresh and moist. If you leave them at room temperature, they will last about three days. For longer storage, put them in the refrigerator. The cold air will keep them tasty for up to a week. If you want to store brownies for even longer, freezing is a great option. First, let the brownies cool completely. Then, cut them into squares. Wrap each square in plastic wrap. Place the wrapped brownies in a freezer bag or container. They can stay in the freezer for three months. When you’re ready to enjoy them, take out a square. Leave it at room temperature for about an hour to defrost. You can also warm them in the microwave for a few seconds. These brownies are best enjoyed fresh, but they have a good shelf life. At room temperature, they last around three days. In the fridge, they can stay fresh for a week. If you freeze them, they can last up to three months. This means you can enjoy a sweet treat anytime you like! Remember to check for any signs of spoilage before eating. No, you cannot taste the zucchini in these brownies. The chocolate flavor is strong, which masks the zucchini. Zucchini adds moisture and makes the brownies fudgy. It also packs in some nutrients without changing the taste. If your brownies turn out dry, you can fix them easily. Try adding a bit of melted butter or vegetable oil on top. You can also serve them with a scoop of ice cream for extra moisture. Another option is to warm them briefly in the microwave. This will help restore some of the softness. Yes, these brownies can be a healthier dessert choice. They use zucchini, which adds fiber and vitamins. The recipe has less fat than many traditional brownie recipes. You can even swap some sugar for applesauce to cut down on calories. You can serve these brownies with a scoop of vanilla ice cream. A drizzle of chocolate sauce adds extra flavor. Fresh berries or whipped cream make great toppings too. For a fun twist, try pairing them with a glass of cold milk or coffee. Yes, you can make these brownies ahead of time. They store well for several days in an airtight container. If you want to keep them longer, you can freeze them. Just make sure to wrap them tightly in plastic wrap before putting them in the freezer. For the full recipe, check out the details above. You learned how to make fudgy dark chocolate zucchini brownies. Freshly shredded zucchini keeps them moist. Choosing the right cocoa powder adds deep flavor. We covered mixing, baking, and ensuring they stay fudgy. You can even adapt the recipe with nuts or healthier swaps. Store them right for the best taste, and enjoy them longer. These brownies are a treat you can feel good about. Happy baking!

Indulging in rich, fudgy brownies can be guilt-free! My Fudgy Dark Chocolate Zucchini Brownies are a game changer. Packed with moist zucchini and deep cocoa flavor, these brownies are a …

Read more

Categories Desserts Tags NO-ING-IMG

Beet Salad with Arugula Fresh and Flavorful Delight

January 14, 2026July 15, 2025 by Chef Tavio
- 2 medium beets, roasted and diced - 4 cups fresh arugula, thoroughly washed and dried - 1/2 cup goat cheese, crumbled - 1/4 cup walnuts, lightly toasted and roughly chopped - 1/4 cup pomegranate seeds - 2 tablespoons balsamic vinegar - 2 tablespoons extra virgin olive oil - 1 teaspoon honey - Salt and freshly ground black pepper, to taste This beet salad shines because of its colorful and fresh ingredients. The beets bring a sweet, earthy taste. Roasting them makes their flavor richer. You can roast the beets ahead of time. Just let them cool, peel, and dice them. The arugula adds a peppery bite. It pairs well with the creamy goat cheese. The cheese gives the salad a nice creaminess. Walnuts add a crunchy texture, while pomegranate seeds offer a burst of sweetness. The dressing ties everything together. It’s simple yet full of flavor. Combine balsamic vinegar, olive oil, honey, salt, and pepper in a bowl. Whisk until it’s smooth. This dressing balances the sweet beets and tangy cheese perfectly. Remember, you can find the Full Recipe above for more detailed steps. Enjoy making this vibrant salad! Preheating the oven First, turn your oven to 400°F (200°C). This hot oven will help the beets roast to perfection. Roasting and cooling the beets Take the medium beets and wrap each one in aluminum foil. Place them on a baking sheet. Roast for about 45 to 60 minutes. You know they are done when you can easily pierce them with a fork. Once they are cooked, let the beets cool down. Peeling and dicing beets When the beets are cool enough to handle, peel off the skin. It should come off easily. Then, cut the beets into small, bite-sized cubes. Set them aside for later. Combining ingredients in a bowl In a small mixing bowl, add balsamic vinegar, extra virgin olive oil, honey, salt, and black pepper. Use a whisk to blend these ingredients well until the dressing is smooth and mixed. Adjusting seasoning and taste Taste the dressing and see if it needs more salt or pepper. You can tweak it to match your taste. The right balance will make your salad shine. Mixing roasted beets and arugula In a large bowl, combine the roasted and diced beets with the fresh arugula. This mix brings together earthy and peppery flavors. Adding dressing and tossing Drizzle the dressing over the beet and arugula mix. Use your hands or a salad fork to gently toss everything. Make sure the beets and arugula are evenly coated in the dressing. Feel free to explore the Full Recipe for more details and tips! To make your beets shine, roasting is key. Wrap each beet in foil and bake them. Set your oven to 400°F (200°C). Roast for about 45 to 60 minutes. Check with a fork; it should pierce through easily. Once done, cool the beets, peel, and dice them into cubes. Now, let’s talk dressing. Use a small bowl for mixing. Combine balsamic vinegar, olive oil, honey, salt, and pepper. Whisk until smooth. Taste it! Adjust the seasoning to fit your preference. This dressing brings the salad to life! Want to add more depth? Consider including sliced avocado or some fresh herbs like basil or mint. These ingredients create an exciting twist on the classic salad. You can even try adding thinly sliced red onions for a sharp bite. Balancing sweetness and acidity is crucial in this salad. The beets offer sweetness, while balsamic vinegar brings acidity. If you feel it’s too sweet, add a splash of lemon juice. It brightens the dish and keeps the flavors in check. Enjoy creating your own version of this vibrant salad! {{image_4}} You can change this beet salad with arugula by adding other greens. Try spinach or kale for a different taste. Mixing in seasonal greens keeps the salad fresh and exciting. You can also add herbs like mint or basil for an extra burst of flavor. Fruits and nuts can also give your salad a fun twist. Add sliced apples or pears for sweetness. You could swap walnuts with pecans or almonds for a crunch. These small changes can make the dish unique every time you serve it. Vinaigrettes can change the whole vibe of your salad. You can use lemon juice or apple cider vinegar instead of balsamic. A honey mustard dressing adds a nice zing too. Mix in some herbs or garlic for more flavor options. If you prefer a creamy dressing, yogurt works great. Greek yogurt adds a nice tang and creaminess. You can mix yogurt with herbs for a fresh take. Creamy dressings elevate the dish while keeping it light. Try these variations to make your beet salad with arugula even more enjoyable. You can find the full recipe above to start creating your own version today! To keep your beet salad fresh, store it in an airtight container. Place it in the refrigerator within two hours after serving. This helps prevent spoilage. The salad stays good for about three days. However, the arugula may wilt over time. - Refrigeration Guidelines: Always cover the salad. Use a lid or plastic wrap. This keeps moisture in and air out. - Best Practices for Maintaining Freshness: Keep components separate if possible. Store beets, cheese, and nuts in different containers. This helps maintain texture and flavor. This salad is best served cold. You can enjoy it straight from the fridge. If you prefer a room temperature salad, let it sit out for 15 minutes before serving. - Tips for Serving Chilled or at Room Temperature: Gently toss the salad before serving. This evenly spreads the flavors. - Combining Flavors After Storage: If the flavors seem muted after storage, add a splash of balsamic vinegar. This brightens up the dish. You can also sprinkle fresh herbs for added zest. For a full recipe of this delicious dish, refer to the Full Recipe section. Yes, you can make this salad ahead of time. I recommend preparing the beets and dressing first. Keep the beets in the fridge for up to three days. You can store the dressing in a jar. Just shake it before using. When you're ready to serve, toss the arugula, beets, and dressing together. Add the cheese and nuts last to keep them fresh and crunchy. This salad is not just tasty; it's also good for you! Here are some nutritional highlights: - Beets: They are rich in fiber and can help lower blood pressure. - Arugula: This leafy green is full of vitamins A, C, and K. - Goat cheese: It provides protein and calcium without being too heavy. - Walnuts: These are great for your heart and have healthy fats. - Pomegranate seeds: They are packed with antioxidants and add a sweet crunch. Absolutely! Pre-cooked beets save time and make this salad easier. You can find them in most grocery stores. Just chop them into small pieces before adding to your salad. This way, you skip the roasting step and get straight to enjoying your meal. If you want more flavor, consider adding a splash of balsamic vinegar to the pre-cooked beets. This beet salad blends simple, fresh ingredients for a delicious meal. Roasted beets, arugula, and tangy goat cheese come together for a tasty dish. You learned about making the perfect dressing and enhancing flavors with tips. Consider seasonal variations to keep it interesting. Remember, proper storage keeps leftovers fresh. You can enjoy this salad anytime. Try it for a healthy boost to your meals. Your taste buds will thank you.

Are you ready to try a salad that bursts with color and flavor? My Beet Salad with Arugula features tender roasted beets and fresh arugula, topped with creamy goat cheese. …

Read more

Categories Salads Tags NO-ING-IMG

Green Beans with Lemon and Pine Nuts Flavorful Dish

January 14, 2026July 15, 2025 by Chef Tavio
- Fresh green beans - Extra virgin olive oil - Lemon zest and juice - Pine nuts - Garlic - Sea salt and black pepper - Fresh parsley - Large pot - Ice bath setup - Slotted spoon - Large skillet - Dry skillet When I cook green beans with lemon and pine nuts, I always choose the freshest ingredients. Fresh green beans are bright and crunchy. They add a nice color to the dish. I use extra virgin olive oil for a rich flavor. Zest and juice from a fresh lemon bring a wonderful zing. I add pine nuts for a nutty crunch. Garlic gives a fragrant note that complements the beans. I finish with sea salt and black pepper to enhance all the flavors. Lastly, I sprinkle fresh parsley for a bit of color and freshness. For tools, I start with a large pot to blanch the beans. An ice bath setup cools them quickly. A slotted spoon helps lift the beans out of the hot water. I also use a large skillet for sautéing and a dry skillet to toast the pine nuts. This simple list of ingredients and tools makes the cooking process smooth. You can find the full recipe for these green beans with lemon and pine nuts in the complete article. To start, we need to blanch the green beans. Fill a large pot with salted water. Bring it to a boil. Once boiling, add 1 pound of trimmed green beans. Cook them for 3-4 minutes. They should be bright green and tender yet still crisp. This step keeps them fresh and vibrant. Next, we cool the beans. Prepare an ice bath by filling a bowl with ice and water. Using a slotted spoon, transfer the beans to this ice bath. This stops the cooking process. Let them cool for 2-3 minutes, then drain them well. Set the green beans aside for later. Now, let’s sauté the garlic. In a large skillet, pour in 2 tablespoons of extra virgin olive oil. Heat the oil over medium heat. When it shimmers but does not smoke, add 2 cloves of minced garlic. Sauté for about 1 minute. You want it fragrant and soft, not browned. Next, toss the blanched green beans into the skillet. Gently mix them with the garlic oil. Sauté for another 2-3 minutes. This warms them through and combines the flavors beautifully. It’s time to add some zing! Grate the zest of 1 large lemon over the green beans. The zest brings a bright flavor. Then, halve the lemon and squeeze its juice into the skillet. Stir well to mix everything together. Season with sea salt and freshly cracked black pepper to taste. Adjust the seasoning as needed. Now, let’s toast the pine nuts for extra crunch. In a separate dry skillet, add 1/4 cup of pine nuts. Set the heat to medium. Toast the nuts for about 3-4 minutes. Stir them frequently. Keep a close eye to prevent burning. You want them golden brown and nutty. Once the pine nuts are toasted, remove them from heat. Combine the green beans and the toasted pine nuts in a serving dish. Toss gently to mix. For a fresh touch, sprinkle finely chopped parsley on top. This adds color and flavor. For a great presentation, use a vibrant dish. It highlights the dish's bright colors. You can even add extra parsley leaves for garnish. Enjoy your green beans with lemon and pine nuts warm for the best taste. For the full recipe, refer to the earlier section. - How to choose fresh green beans: Look for bright green pods with firm texture. Avoid beans that are limp, dull, or have brown spots. Fresh beans snap easily when bent. A good batch feels crisp and has a vibrant color. - Storing lemons for maximum flavor: Keep lemons in the fridge for longer freshness. Store them in a sealed bag to hold moisture. If you want to use lemon juice, roll the lemon on the counter before cutting. This helps release more juice. - How to achieve the perfect crunch: Blanch the green beans first. This method locks in color and crunch. After boiling, cool them quickly in an ice bath. This stops the cooking and keeps them crispy. - Tips for avoiding burnt garlic: Sauté garlic over medium heat. Stir often and watch closely. If it begins to brown, remove it from the heat right away. Burnt garlic tastes bitter and can ruin your dish. - Serving styles for gatherings: Use a colorful serving dish to make the green beans pop. Arrange the beans in a fan shape for a beautiful display. This catches the eye and invites guests to dig in. - Adding color with extra garnishes: Fresh parsley adds a nice green touch. You can also sprinkle extra pine nuts on top for a nutty crunch. Consider adding lemon wedges on the side for a fresh splash of color. {{image_4}} You can easily give green beans a twist. Adding fresh herbs like thyme or basil can uplift the flavor. These herbs blend well with the lemon and pine nuts. You might enjoy the fresh taste they bring. Another option is cheese. Adding feta or parmesan gives a rich and creamy touch. This extra layer of flavor can make the dish more satisfying. Don't hesitate to swap out ingredients. If you want a different crunch, try using almonds or walnuts instead of pine nuts. Each nut adds its unique flavor and texture. You can also mix in other vegetables. Carrots or bell peppers can pair well with green beans. This makes the dish colorful and increases its health benefits. If you want to make this dish vegan-friendly, skip the cheese and use a plant-based alternative. You can also replace butter with olive oil for cooking. For those who need a gluten-free option, this recipe is already safe! Just ensure any added ingredients are gluten-free too. These simple changes can help everyone enjoy this tasty dish. Once you make green beans with lemon and pine nuts, they stay fresh in the fridge for about 3 to 5 days. To store them well, place the beans in an airtight container. This helps keep their flavor and texture intact. If you can, wait to add the pine nuts until you serve. This keeps them crunchy and tasty. Yes, you can freeze green beans with lemon and pine nuts! However, for best results, freeze the green beans alone. After blanching, let them cool and pack them in freezer bags. Remove as much air as possible before sealing. They last for up to 3 months in the freezer. To reheat, take the frozen green beans out and let them thaw in the fridge overnight. Then, sauté them in a skillet with a splash of olive oil. This warms them up nicely and keeps the flavors bright. Add the lemon juice and toasted pine nuts just before serving for the best taste! Yes, you can use frozen green beans. They are quick and easy. Here are some pros and cons: - Pros: Frozen beans are pre-washed and trimmed. They save time and are often cheaper. They can have a good flavor and texture when cooked right. - Cons: Frozen beans may lack the fresh taste and crunch of fresh beans. They can become mushy if overcooked. If you choose frozen, cook them for a shorter time. Start with 2-3 minutes in boiling water. You can prepare green beans with lemon and pine nuts in advance. Here’s how: 1. Blanch the beans: Follow the recipe to blanch and cool the beans. 2. Store: Keep them in an airtight container in the fridge for up to 3 days. 3. Reheat: When ready, warm them in a skillet over medium heat. Add olive oil and garlic, then toss in the beans until heated through. Finish with lemon juice and pine nuts right before serving. This dish pairs well with many foods. Here are some tasty ideas: - Grilled chicken or fish for protein - Quinoa or rice for a hearty side - A fresh salad to add crunch and color - Roasted potatoes for a comforting touch These pairings create a balanced meal and highlight the bright flavors of the green beans. Yes, this recipe is great for meal prep. Here are some tips: - Batch cook: Make a larger amount of green beans and store them in portions. - Mix and match: Pair the beans with different proteins and grains throughout the week. - Freshen up: Add fresh lemon juice and pine nuts just before eating to keep flavors bright and fresh. This recipe fits well into a busy week, making delicious meals easy to enjoy. For the full recipe, check the earlier section. This blog post covered everything you need to make delicious green beans with lemon and pine nuts. We explored the essential ingredients, tools, and step-by-step instructions. Tips for freshness and cooking techniques help ensure your dish shines. I also shared variations and storage advice for convenience. Remember, this dish is versatile, so feel free to experiment. Enjoy the process of cooking and savoring these bright, flavorful green beans. Your kitchen will burst with fresh tastes, making meals enjoyable. Happy cooking!

Green beans with lemon and pine nuts is a dish bursting with flavor! You’ll discover how to whip it up quickly with fresh ingredients like green beans, lemon, and crunchy …

Read more

Categories Salads Tags NO-ING-IMG

Easy Zucchini Cake Simple and Delicious Recipe

January 14, 2026July 15, 2025 by Chef Tavio
- 2 cups grated zucchini - 1 ½ cups all-purpose flour - 1 cup granulated sugar - ½ cup vegetable oil - 3 large eggs - 1 teaspoon vanilla extract - 1 teaspoon baking soda - 1 teaspoon baking powder - ½ teaspoon salt - 2 teaspoons ground cinnamon - ½ cup chopped walnuts (optional) - Zest and juice of 1 lemon To make a great zucchini cake, you need a few key ingredients. First, the grated zucchini is important. It adds moisture and flavor to the cake. Grate about two medium zucchinis for two cups. Next, you will need all-purpose flour, which helps the cake hold its shape. Granulated sugar sweetens the cake and balances the zucchini's slight bitterness. Vegetable oil keeps the cake moist. Three large eggs add structure and richness. Vanilla extract gives a lovely aroma and taste. Baking soda and baking powder are your leavening agents, making the cake light and fluffy. Salt enhances all the flavors, and ground cinnamon adds warmth and spice. If you like, add chopped walnuts for crunch. Finally, the zest and juice of one lemon brighten the cake, giving it a fresh taste. You can swap some ingredients if needed. For a healthier option, try whole wheat flour instead of all-purpose flour. If you want to replace vegetable oil, coconut oil works well and adds a hint of flavor. For those who prefer dairy-free or vegan options, you can use flax eggs instead of regular eggs. Mix one tablespoon of flaxseed meal with three tablespoons of water for each egg. You can also replace granulated sugar with coconut sugar to make it less processed. These swaps can help you enjoy the cake while meeting your dietary needs. For the full recipe, check out the detailed steps to bake your own delicious zucchini cake! First, preheat your oven to 350°F (175°C). This helps the cake bake evenly. Next, grab a 9x5-inch loaf pan. Grease it lightly with oil, or use parchment paper for easy removal. Now, let's mix the wet ingredients. In a big bowl, combine 2 cups of grated zucchini, 1 cup of granulated sugar, and ½ cup of vegetable oil. Use a whisk or spatula to mix well. Make sure everything blends nicely. Next, add 3 large eggs, 1 teaspoon of vanilla extract, the zest of 1 lemon, and 1 tablespoon of lemon juice to the zucchini mix. Whisk this together until it is smooth. In another bowl, take 1 ½ cups of all-purpose flour, 1 teaspoon of baking soda, 1 teaspoon of baking powder, ½ teaspoon of salt, and 2 teaspoons of ground cinnamon. Whisk these dry ingredients together so they mix well. Now, gradually add the dry mix to the wet ingredients. Stir gently with your spatula until just combined. This helps keep the cake light. If you want, fold in ½ cup of chopped walnuts for some crunch. Pour your batter into the prepared loaf pan. Use a spatula to spread it evenly. This helps the cake rise nicely. Bake your cake for 50 to 60 minutes. Check if it's done by inserting a toothpick into the center. If it comes out clean, your cake is ready. Let the cake cool in the pan for 10 minutes. Then, transfer it to a wire rack to cool completely. Enjoy your delicious creation! For the full recipe, check the recipe section. To get the best texture in your zucchini cake, avoid overmixing. When you mix too much, your cake can turn out tough. Gently combine the wet and dry ingredients until just mixed. This keeps your cake fluffy and soft. Handling zucchinis correctly is key. Start by washing them well. Then, grate them finely. You want to remove excess water. Place the grated zucchini in a clean towel and squeeze gently. This step helps your cake stay light, not soggy. Adding spices can make your zucchini cake shine. I recommend using cinnamon and nutmeg for a warm flavor. You might also try ginger for a kick. A touch of vanilla extract adds depth too. Toppings can take your cake to the next level. Dusting with powdered sugar makes it pretty. You can also drizzle a lemon glaze for a zesty twist. Adding chopped nuts gives a nice crunch and flavor boost. For a rich finish, serve with whipped cream or vanilla ice cream. For the full recipe, check out the complete guide. {{image_4}} You can make the easy zucchini cake even more fun with flavor add-ins. One popular choice is chocolate. Add cocoa powder and chocolate chips to the batter for a rich twist. This chocolate zucchini cake will surprise everyone with its taste. Another idea is to add fruits. Pineapple brings natural sweetness and moisture. Diced cranberries add a tart flavor that contrasts nicely with the cake. Both options can make your cake unique and delicious. If you need a gluten-free version, use almond flour or a gluten-free flour blend. This swap keeps the cake light and moist. You can still enjoy all the flavors without gluten. You can also adjust sweetness for dietary needs. If you prefer less sugar, try using honey or maple syrup. These natural sweeteners can make the cake healthier and just as tasty. This way, you can customize the cake to fit your diet. For the full recipe, check out the Full Recipe link in the article! How long does zucchini cake last at room temperature? Zucchini cake can last about 2-3 days at room temperature. Keep it covered to prevent drying out. Store it in a cake dome or an airtight container. If your kitchen is warm, it's best to refrigerate it. Steps for freezing leftovers To freeze your zucchini cake, first let it cool completely. Wrap the cake tightly in plastic wrap. Then, place it in a freezer-safe bag or container. Label it with the date. Your cake can stay fresh for up to three months in the freezer. Proper ways to thaw the cake To thaw a frozen zucchini cake, take it out of the freezer. Leave it in the fridge overnight to thaw slowly. If you're short on time, you can let it sit at room temperature for a few hours. Avoid microwaving it, as it can make the cake soggy. Enjoy your delicious cake later with the same great taste as fresh! For the complete recipe, check out the Full Recipe. Yes, you can use yellow squash in place of zucchini. Both have a mild flavor and soft texture. However, yellow squash might be slightly sweeter. This sweetness can change the taste of your cake a bit. The texture is similar, so it works well in baked goods. Just make sure to grate it like you would zucchini for the best results. To keep your leftover zucchini cake fresh, wrap it tightly in plastic wrap or foil. This will help prevent it from drying out. You can also store it in an airtight container. Keep it at room temperature for up to three days. If you want to keep it longer, store it in the fridge for up to a week. Yes, you can make this zucchini cake ahead of time. Bake the cake and let it cool completely. Wrap it well and store it in the fridge for up to a week. You can also freeze it for up to three months. Just slice it before freezing for easy servings later. If your zucchini cake is too dense, you may have overmixed the batter. Mixing too much can make the cake tough. Another reason could be too much zucchini. Make sure to measure it correctly. Lastly, check your leavening agents. They need to be fresh to help the cake rise properly. You learned how to make a tasty zucchini cake with simple steps and ingredients. We covered key elements like substitutions and detailed baking instructions. Also, we shared tips for the best texture and flavor. Remember, it’s easy to adjust recipes to fit your needs. Enjoy experimenting with different flavors and variations. Your zucchini cake can delight everyone and leave them asking for more!

Looking for a sweet treat that’s simple to make? This Easy Zucchini Cake is a delightful way to use fresh zucchini while creating a moist and flavorful dessert. With just …

Read more

Categories Desserts Tags NO-ING-IMG

Crispy Chicken Caprese Delight in Every Bite

January 14, 2026July 15, 2025 by Chef Tavio
For this dish, you will need fresh and tasty ingredients. Here is what you should gather: - 2 boneless, skinless chicken breasts - 1 cup breadcrumbs (preferably Panko for extra crunch) - 1/2 cup grated Parmesan cheese - 1 cup fresh mozzarella balls (bocconcini), halved - 1 cup cherry tomatoes, halved - 1/4 cup fresh basil leaves, finely chopped The right seasonings make this dish shine. You will need: - 1 teaspoon Italian seasoning blend - 1/2 teaspoon garlic powder - Salt and freshly cracked black pepper to taste - 2 tablespoons extra virgin olive oil These seasonings add flavor and depth to the chicken. Make your meal even more special with these optional extras: - 2 tablespoons balsamic glaze - Extra basil leaves for garnish These toppings bring fresh flavors and a beautiful look to your dish. For the full recipe, be sure to check out the cooking steps that follow! 1. First, preheat your oven to 425°F (220°C). This helps the chicken cook evenly. 2. Line a baking sheet with parchment paper. This makes cleanup easy and prevents sticking. 3. In a shallow dish, mix the breadcrumbs, Parmesan cheese, Italian seasoning, garlic powder, salt, and pepper. Stir well to combine. 4. Pat each chicken breast dry with paper towels. This step is key for a crispy coating. 5. Season both sides of the chicken with salt and pepper for extra flavor. 6. Dredge each chicken breast in the breadcrumb mixture. Press firmly to ensure it sticks well. 1. Place the coated chicken breasts on the lined baking sheet. 2. Drizzle the tops with olive oil for extra crunch. 3. Bake the chicken for 20-25 minutes. It should turn golden brown. 4. To check if it's done, use a meat thermometer. The internal temperature should be 165°F (74°C). 5. While the chicken bakes, mix the mozzarella balls, cherry tomatoes, and basil in a bowl. Toss gently. 6. Once the chicken is ready, let it rest for a few minutes. This keeps the juices inside. 1. Top each crispy chicken breast with the fresh tomato and mozzarella mix. 2. Drizzle balsamic glaze over the top for a sweet kick. 3. Serve the dish hot, and enjoy the blend of flavors! 4. For a lovely touch, present on a wooden board or a white plate. 5. Garnish with extra basil for a pop of color. This recipe brings crispy chicken caprese to life. Follow these steps for delicious results. Enjoy every bite! For the complete process, check the Full Recipe. To make your chicken extra crispy, use Panko breadcrumbs. They provide a great crunch. Before coating, dry the chicken well with paper towels. This step helps the coating stick better. After coating, drizzle a little olive oil on top. This oil helps create a golden crust. Bake the chicken at 425°F (220°C) for the best results. It cooks fast and gets nice and crispy. You can grill the chicken for a smoky flavor. Simply marinate it with olive oil, garlic, and herbs before grilling. If you want a lighter version, consider baking the chicken without breadcrumbs. For a twist, try adding different herbs like oregano or thyme to the breading. This will give your chicken a unique taste. Crispy Chicken Caprese pairs well with a fresh salad. A simple arugula salad with lemon dressing works great. You can also serve it with roasted vegetables. Try zucchini or bell peppers for color and flavor. For a comforting touch, serve with creamy mashed potatoes or garlic bread. These sides will make your meal even more satisfying. For the full recipe, check out the steps above. {{image_4}} If you want a lighter dish, try using grilled chicken instead of baked. Grilling gives the chicken a nice smoky flavor. You can marinate the chicken in olive oil, lemon juice, and herbs for added taste. This keeps it juicy while cutting down on calories. For those who need gluten-free options, use gluten-free breadcrumbs. They work just as well in creating that crispy crust. You can also skip the breadcrumbs entirely and coat the chicken with crushed nuts or seeds for a different crunch. Want to amp up the flavors? Add pesto to your salad mix for a fresh twist. Roasted vegetables like zucchini and bell peppers can also enhance the dish. Toss them in olive oil and roast alongside the chicken for more depth in flavor. These variations keep the dish exciting and cater to different dietary needs. They also ensure that you enjoy every bite of your crispy chicken caprese! For the full recipe, check out the complete guide. After enjoying your meal, store leftovers in an airtight container. This keeps the chicken fresh and moist. I recommend refrigerating them within two hours. Leftovers will stay good for up to three days. If you want to enjoy them later, consider freezing. To reheat, place the chicken on a baking sheet. Preheat your oven to 375°F (190°C). Bake for about 10-15 minutes. This method helps regain the crispy texture. If using a microwave, the chicken may get soggy. Try using the oven whenever possible. For freezing, wrap each chicken breast tightly in plastic wrap. Then, place them in a freezer-safe bag. Write the date on the bag for easy tracking. The chicken can last up to three months in the freezer. When ready to use, thaw it in the fridge overnight before reheating. Enjoy the Crispy Chicken Caprese with fresh ingredients! You can use crushed crackers or cornflakes instead of breadcrumbs. They add great crunch. Ground nuts, like almonds or walnuts, work well too. If you want a gluten-free option, try almond flour or gluten-free breadcrumbs. Each choice brings its own unique flavor and texture. Yes, you can prepare the chicken ahead. After coating, cover and chill it for a few hours. When ready, bake it right from the fridge. This keeps the flavors fresh. You can also make the salad and sauce in advance. Just wait to mix until serving time for the best taste. Baking the chicken takes about 20-25 minutes at 425°F (220°C). Make sure the chicken reaches an internal temperature of 165°F (74°C). This ensures it is safe to eat and perfectly cooked. The outside should be golden brown and crispy, while the inside stays juicy. For more details, check out the Full Recipe. Crispy Chicken Caprese is a delightful dish packed with flavor. We covered the key ingredients and how to prepare them. The step-by-step guide made cooking easy and fun. Tips for extra crispiness help your chicken shine. We also explored variations to fit different diets and tastes. For storage, I shared how to keep leftovers fresh. This dish is versatile and sure to please everyone. Enjoy making your Crispy Chicken Caprese on your next kitchen adventure!

Are you ready to enjoy Crispy Chicken Caprese? In this post, I’ll guide you through every step to make this tasty dish. You’ll learn about the best ingredients, easy cooking …

Read more

Categories Dinner Tags NO-ING-IMG

Chocolate Zucchini Cake Rich and Decadent Treat

January 14, 2026July 15, 2025 by Chef Tavio
- 1 ½ cups all-purpose flour - 1 cup granulated sugar - ½ cup unsweetened cocoa powder - 1 teaspoon baking powder - 1 teaspoon baking soda - ½ teaspoon salt - 2 large eggs - 1 cup finely grated zucchini - ½ cup vegetable oil - 1 teaspoon pure vanilla extract - ½ cup semi-sweet chocolate chips - Optional: powdered sugar for dusting To make this cake, gather your ingredients first. You need basic items like flour and sugar. Grated zucchini adds moisture and makes the cake soft. The cocoa powder gives it a rich chocolate taste. Using eggs helps bind everything together. Vegetable oil keeps the cake moist. Don’t forget the vanilla; it enhances the flavor. Lastly, chocolate chips make every bite extra special! When you combine these ingredients, you create a delicious treat. This Chocolate Zucchini Cake is sure to please everyone. If you need the full recipe, check out the details above. - Preheat the oven to 350°F (175°C). - Grease or line a 9-inch round cake pan. Start by heating your oven. This step is key for a good bake. Next, prepare your pan. Greasing or lining it stops the cake from sticking. It makes serving easier, too. - Combine flour, sugar, cocoa powder, baking powder, baking soda, and salt. In a large bowl, mix the dry ingredients. Use a whisk to combine flour, sugar, cocoa powder, baking powder, baking soda, and salt. This step helps your cake rise and gives it a rich taste. Make sure there are no lumps. - Whisk eggs and incorporate zucchini, oil, and vanilla. In another bowl, whisk the eggs. Then add finely grated zucchini, vegetable oil, and vanilla extract. Mix these until smooth. This mixture adds moisture and flavor to the cake. The zucchini may surprise you, but it makes the cake extra soft. - Gradually mix wet and dry components. Now, pour the wet mixture into the bowl with the dry ingredients. Use a spatula or wooden spoon to mix gently. Do not overmix! Overmixing can lead to a tough cake. You want a nice, thick batter. - Fold in chocolate chips and transfer to the pan. - Bake for 30-35 minutes, checking for doneness. Gently fold in the semi-sweet chocolate chips. This adds little pockets of chocolate goodness. Pour the batter into your prepared cake pan. Smooth the top with a spatula. Place it in the oven. Set your timer for 30-35 minutes. To check if the cake is done, insert a toothpick into the center. If it comes out clean, your cake is ready. After it bakes, let it cool for about 10 minutes in the pan. Then, transfer it to a wire rack to cool completely. Enjoy making this rich and decadent treat! For the complete recipe, check [Full Recipe]. To make your chocolate zucchini cake moist, don't overmix the batter. When you mix the dry and wet ingredients, just stir until combined. Overmixing can make the cake tough. Cooling the cake is also key. After baking, let it cool in the pan for about 10 minutes. This helps the cake set up nicely. Then, move it to a wire rack to cool completely. This step improves both the texture and flavor. For a lovely finish, dust your cooled cake with powdered sugar. Use a small sieve for an even layer. This simple step adds a touch of elegance. Garnishing can make your dessert pop. Try adding fresh mint leaves on top. A drizzle of chocolate sauce can also enhance the cake's rich taste. Both options look great and add flavor. {{image_4}} You can make this chocolate zucchini cake a bit healthier. First, consider substituting sugar with alternatives like honey or maple syrup. These natural sweeteners add a unique flavor. They also provide a touch of moisture that keeps the cake tender. You can use about ¾ cup of honey instead of 1 cup of sugar. This change lowers refined sugar content while adding extra nutrients. Next, think about using whole wheat flour instead of all-purpose flour. Whole wheat flour gives the cake a nuttier taste and boosts fiber content. It also makes the cake denser, which can be very satisfying. Simply swap the 1 ½ cups of all-purpose flour with the same amount of whole wheat flour. This small change can create a healthier, yet still delicious, dessert. To add even more flavor, try mixing in nuts or dried fruits. Chopped walnuts or pecans can add a nice crunch. Dried cherries or cranberries bring a sweet-tart contrast that pairs well with chocolate. You can add about ½ cup of nuts or fruit to the batter. This simple step transforms the cake into a more complex treat. Another fun option is to incorporate different types of chocolate. You can use dark chocolate chips for a richer taste or white chocolate for a sweeter flavor. Each choice changes the cake's character. For instance, if you use dark chocolate, you might want to add a pinch of sea salt to enhance the flavors. Using various chocolate types keeps the cake exciting and unique every time you bake it. For the full recipe, check out the detailed instructions above and enjoy making this delightful cake! To keep your chocolate zucchini cake fresh, store it correctly. If you plan to eat it within a few days, you can keep it at room temperature. Place it in an airtight container to avoid drying out. If the weather is hot or humid, it’s best to refrigerate the cake. This will help it last longer, but it might change the texture slightly. Wrap the cake tightly in plastic wrap before placing it in a container. This keeps it moist and fresh. If you have cut pieces, use parchment paper between layers to prevent them from sticking together. Freezing chocolate zucchini cake is easy and a great way to save some for later. First, let the cake cool completely. Then, wrap it in plastic wrap. Make sure it is tightly sealed to avoid freezer burn. After that, place it in a freezer-safe bag or container. You can freeze the cake for up to three months. When you’re ready to eat it, move the cake to the fridge to thaw overnight. If you need it faster, let it sit at room temperature for a couple of hours. Once thawed, enjoy it as you would fresh. For the full recipe, check out my detailed guide. Yes, you can use frozen zucchini. Thaw it first and drain excess water. Frozen zucchini works well, but fresh zucchini adds a bit more texture. The moisture from zucchini keeps the cake moist and rich. To check if the cake is done, insert a toothpick into the center. If it comes out clean or with a few crumbs, the cake is ready. This usually takes about 30 to 35 minutes of baking. Keep an eye on it near the end to avoid overbaking. This recipe uses all-purpose flour, which is not gluten-free. To make it gluten-free, use a gluten-free flour blend. Make sure the blend contains xanthan gum for best results. This will help maintain the cake's texture while keeping it gluten-free. Absolutely! You can bake the cake a day in advance. Just store it in an airtight container at room temperature. This allows the flavors to meld beautifully. You can also freeze it for up to three months if you want to save it for later. Serve this cake with a scoop of vanilla ice cream for a classic touch. You can also pair it with fresh berries for a fruity contrast. A dollop of whipped cream adds a creamy element. For a chocolate lover’s dream, drizzle some chocolate sauce on top. If you want to impress, add a light dusting of powdered sugar as a finish. - 1 ½ cups all-purpose flour - 1 cup granulated sugar - ½ cup unsweetened cocoa powder - 1 teaspoon baking powder - 1 teaspoon baking soda - ½ teaspoon salt - 2 large eggs - 1 cup finely grated zucchini (about 1 medium zucchini) - ½ cup vegetable oil - 1 teaspoon pure vanilla extract - ½ cup semi-sweet chocolate chips - Optional: powdered sugar for a decorative dusting 1. Preheat your oven to 350°F (175°C). Grease or line a 9-inch round cake pan. 2. In a large bowl, sift together the flour, sugar, cocoa powder, baking powder, baking soda, and salt. Mix well until no lumps remain. 3. In another bowl, crack the eggs and whisk them. Add the grated zucchini, oil, and vanilla extract. Mix until smooth. 4. Slowly pour the wet mixture into the dry ingredients. Stir gently to combine, but don’t overmix. 5. Fold in the chocolate chips evenly throughout the batter. 6. Pour the batter into your prepared cake pan. Smooth the top with a spatula. 7. Bake in the oven for 30-35 minutes. Check with a toothpick; it should come out clean. 8. After baking, cool the cake in the pan for 10 minutes. Then, move it to a wire rack to cool completely. 9. When cool, dust with powdered sugar before slicing and serving. - Prep Time: 15 minutes - Total Time: 50 minutes - Servings: 8 This cake is rich and moist, thanks to the zucchini. You'll love how the chocolate flavor shines through, making it a perfect treat for any occasion. Enjoy each slice! This chocolate zucchini cake recipe combines simple ingredients and easy steps. We explored how to mix dry and wet items, ensuring a rich and moist texture. Remember to avoid overmixing for the best result. You can also make healthier swaps, enhancing the flavor with nuts or different chocolates. Store and serve it well for maximum enjoyment. Overall, this cake is a delightful treat that surprises with its unique taste. You’re ready to impress your friends and family with this delicious dessert!

Looking for a delicious twist on dessert? Try this Chocolate Zucchini Cake! It’s rich, moist, and hides healthy veggies in each slice. You won’t even taste the zucchini! In this …

Read more

Categories Desserts Tags NO-ING-IMG
Older posts
Newer posts
← Previous Page1 … Page69 Page70 Page71 … Page73 Next →

TASTED NEST

Where Flavor Finds a Home 🍳🏡 — warm, simple, and crave-worthy recipes made for real life, from stovetop mornings to backyard dinners.

PAGES

Home About Contact Privacy Policy Terms & Conditions Cookie Policy GDPR Policy Copyright Policy Disclaimer

CATEGORIES

Appetizers Desserts Salads Breakfast Dinner
Copyright © 2026 Tasted Nest. All rights reserved.