Skip to content
  • GDPR Privacy Policy
  • Copyright Policy
  • Disclaimer
  • Terms & Conditions
Tasted Nest
  • Home
  • Appetizers
  • Desserts
  • Salads
  • Breakfast
  • Dinner
  • Privacy Policy
  • Contact
  • About

NO-ING-IMG

Easy Family Dinner – One Pan Balsamic Chicken Recipe

January 14, 2026July 13, 2025 by Chef Tavio
To make One Pan Balsamic Chicken, you need these simple ingredients: - 4 boneless, skinless chicken thighs - 1 cup cherry tomatoes, halved - 1 bell pepper (any color), sliced into strips - 1 medium red onion, thinly sliced - 3 cloves garlic, minced - 1/4 cup balsamic vinegar - 2 tablespoons honey - 3 tablespoons olive oil - Salt and freshly ground black pepper, to taste - Fresh basil leaves, for garnish These ingredients create a colorful dish full of flavor. The chicken thighs stay juicy while the veggies roast perfectly. The balsamic vinegar and honey blend well, offering a sweet and tangy taste. This recipe is easy and fun to make, perfect for family dinners. You can find the full recipe for more details on preparation. Set your oven to 400°F (200°C). Preheating helps cook the chicken evenly. In a bowl, mix together balsamic vinegar, honey, 3 tablespoons of olive oil, minced garlic, salt, and pepper. This mixture adds great flavor to the chicken. Take the chicken thighs and coat them in half of the marinade. Let them sit for at least 15 minutes. This step helps the chicken soak up the flavors. In a large oven-safe pan, toss the sliced bell pepper, red onion, and halved cherry tomatoes with the remaining 1 tablespoon of olive oil, salt, and pepper. Mix them well to coat. Push the veggies to the sides of the pan. Place the marinated chicken thighs in the middle. This way, the chicken cooks next to the veggies. Drizzle the rest of the marinade over the chicken and veggies. Bake everything for 30-35 minutes. Check that the chicken is fully cooked; it should reach 165°F (75°C). Let the dish rest for about 5 minutes before serving. You can find the full recipe at the beginning of this article. To keep your chicken juicy, cook it for 30-35 minutes. This time allows the chicken to cook through without drying out. Use a meat thermometer to check for doneness; it should read 165°F (75°C). Remove the chicken from the oven after cooking. Let it rest for about 5 minutes before serving. This helps the juices settle back into the meat. You can boost flavors by adding herbs and spices. Try using rosemary or thyme to give a fresh taste. Oregano adds a nice depth too. A pinch of red pepper flakes gives a kick if your family likes spice. Lemon zest can brighten the dish. Feel free to mix and match according to your taste. For a great family meal, serve the chicken thighs on a big platter. Arrange the roasted veggies around the chicken. Drizzle any leftover juices from the pan over everything. This adds flavor and makes it look nice. Add fresh basil leaves on top for a pop of color. It will make the dish look festive and inviting. You can find the full recipe [here](#). {{image_4}} You can easily change the veggies. Try adding zucchini, asparagus, or broccoli. These options cook well and add color. Carrots or green beans also work nicely. Just remember to cut them into even pieces. This way, they cook at the same time as the chicken. If you want a change from chicken, use pork or turkey. Pork tenderloin cooks well and has great flavor. Turkey thighs are juicy and healthy. You can also try tofu for a vegetarian twist. Just make sure to adjust cooking times for different proteins. You can mix up the sauce too. Try adding mustard for a tangy taste. Or use orange juice instead of balsamic vinegar. This gives a sweet and fresh flavor. You could also add herbs like rosemary or thyme for a nice twist. The options are endless, so feel free to get creative! To keep your One Pan Balsamic Chicken fresh, let it cool first. Store leftovers in an airtight container. Place a piece of parchment paper between layers to prevent sticking. You can refrigerate it for up to three days. For longer storage, freeze the chicken and veggies in a freezer-safe bag. Remove as much air as possible from the bag to avoid freezer burn. To reheat, use the oven for the best results. Preheat your oven to 350°F (175°C). Place the chicken and veggies in a baking dish. Cover it with foil to keep moisture in. Heat for about 20 minutes or until warm. You can also use a microwave. Just place the food in a microwave-safe dish. Heat it in short bursts, stirring in between, until hot. In the fridge, your dish can last up to three days. If you freeze it, it stays good for about three months. After this time, the flavors may fade. Always check for any off smells or changes in texture before eating leftovers. Enjoy your meal safely! Yes, you can use chicken breasts. However, they cook faster than thighs. Chicken breasts need about 25-30 minutes in the oven. Always check for doneness. Use a meat thermometer to ensure they reach 165°F (75°C). Thighs stay juicier, so consider that. Yes, One Pan Balsamic Chicken is great for meal prep. You can make it ahead of time and store it. Cook the chicken and veggies, then cool them down. Place them in airtight containers. They will last about 3-4 days in the fridge. Just reheat when you are ready to eat. This dish pairs well with many sides. Here are some ideas: - Rice or quinoa for a hearty base - Steamed broccoli or green beans for a fresh touch - A simple salad with mixed greens and vinaigrette - Garlic bread to soak up the tasty juices To check if the chicken is done, use a meat thermometer. Insert it into the thickest part of the thigh. It should read 165°F (75°C). If you do not have a thermometer, cut into the chicken. The juices should run clear, not pink. For this recipe, use high-quality balsamic vinegar. Look for one that is thick and sweet. Traditional balsamic is great but can be pricey. A good-quality grocery store brand works well too. Avoid cheap, thin varieties as they lack flavor. This recipe makes a simple and tasty one-pan dish. You learned about key ingredients, like chicken thighs and vegetables. The step-by-step guide lets you cook with ease. I shared tips to keep your chicken juicy and added flavor options. You can also switch up ingredients based on what you have. Leftovers store well and reheat nicely too. This dish is fun to make and great for family meals. Enjoy your cooking adventure and impress your loved ones with this meal!

Looking for a quick and tasty dinner that the whole family will love? Try my One Pan Balsamic Chicken! This easy recipe combines juicy chicken thighs with sweet veggies all …

Read more

Categories Dinner Tags NO-ING-IMG

Creamy Dill Pickle Macaroni Salad Tasty and Simple Recipe

January 14, 2026July 13, 2025 by Chef Tavio
To make creamy dill pickle macaroni salad, you will need: - 2 cups elbow macaroni - 1 cup dill pickles, diced - 1/2 cup red onion, finely chopped - 1 cup celery, diced - 1/2 cup mayonnaise - 1/2 cup sour cream - 2 tablespoons fresh dill, finely chopped - 1 tablespoon Dijon mustard - 1 tablespoon pickle juice - Salt and freshly ground black pepper to taste - Optional: 1/4 cup shredded sharp cheddar cheese You can swap ingredients based on your taste or what you have. For example: - Use whole wheat or gluten-free pasta for a healthier option. - Greek yogurt can replace sour cream for a lighter dressing. - If you do not have dill pickles, try sweet pickles for a different flavor. - Fresh herbs like parsley can replace dill. - You can add olives or capers for extra tanginess. Choosing the right brands makes a difference. Here are some trusted options: - Pasta: Barilla or De Cecco for high-quality macaroni. - Mayonnaise: Hellmann's or Duke's for rich flavor. - Dill Pickles: Claussen or Vlasic for the best crunch. - Sour Cream: Daisy or Breakstone’s for a creamy texture. - Dijon Mustard: Grey Poupon for a classic taste. This creamy dill pickle macaroni salad is easy to make and full of flavor. You can find the full recipe above. 1. Cook the Macaroni: Start by boiling water in a large pot. Add salt for flavor. Once the water boils, add 2 cups of elbow macaroni. Cook according to the package instructions until it is al dente. This means it should be firm but not hard. Drain the macaroni in a colander and rinse it under cold water. This helps cool it down and stops the cooking. 2. Combine Vegetables: In a big mixing bowl, mix the cooled macaroni with 1 cup of diced dill pickles, 1/2 cup of finely chopped red onion, and 1 cup of diced celery. Stir gently so all the pieces mix well. 3. Prepare the Dressing: In another bowl, whisk together 1/2 cup of mayonnaise, 1/2 cup of sour cream, 2 tablespoons of chopped fresh dill, 1 tablespoon of Dijon mustard, and 1 tablespoon of pickle juice. Make sure it is smooth. Taste and add salt and pepper as you like. 4. Mix it All Together: Pour the dressing over the macaroni and veggies. Use a spatula to mix everything gently. Be careful not to break the macaroni. 5. Add Cheese (Optional): If you want, fold in 1/4 cup of shredded sharp cheddar cheese for extra taste. Taste the salad again and adjust the seasoning if you need more salt or pepper. 6. Chill the Salad: Cover the bowl with plastic wrap or a lid. Place it in the fridge for at least 1 hour. This time helps the flavors blend well. 7. Serve and Enjoy: After chilling, stir the salad gently. Serve it in bowls or a big dish. To get the best macaroni, always use plenty of water and salt. This way, the pasta cooks evenly. Rinsing the macaroni helps prevent it from sticking. It also cools it down fast, which is key for salads. If you want to see how to make this creamy dill pickle macaroni salad, check out the video linked here. Watching it can help you understand each step better. To boost the taste of your creamy dill pickle macaroni salad, consider these tips: - Use fresh dill for a vibrant flavor. Dried dill works, but fresh is best. - Add a splash of pickle juice for extra tang. It brightens the dish. - Mix in some garlic powder for a hint of warmth. Just a pinch can go a long way. - Try different mustards. If you don't have Dijon, yellow mustard can also add zing. - Incorporate a bit of sugar. A teaspoon can balance the tartness from the pickles. Here are some tips to avoid common pitfalls: - Do not overcook the pasta. It should be firm. Overcooked pasta will turn mushy. - Rinse the macaroni with cold water after cooking. This halts cooking and keeps it from clumping. - Don’t skip the chilling time. Refrigerating the salad allows flavors to blend nicely. - Taste as you go. Adjust salt and pepper before serving for the best flavor. - Avoid using too much dressing. Start with less, then add more if needed. If you have dietary needs, here are easy swaps: - For gluten-free: Use gluten-free elbow macaroni. Many brands offer good options. - For vegan: Substitute mayonnaise and sour cream with vegan versions. They taste great! - Add plant-based protein. Chickpeas or tofu can increase protein without meat. - Check pickle labels. Some pickles may contain animal products. Choose ones that fit your diet. - Use a dairy-free cheese if you want to add cheese. This keeps the dish creamy and tasty. If you're ready to give this recipe a try, check out the Full Recipe for a detailed guide! {{image_4}} You can make your creamy dill pickle macaroni salad unique by adding different flavors. For a kick, try making a spicy dill pickle version. Just add some chopped jalapeños or red pepper flakes to the dressing. This will give it a nice heat that pairs well with the creamy base. If you love Mediterranean flavors, swap out the dill pickles for olives and add some feta cheese. This twist will take your salad in a whole new direction. To make this salad more filling, consider adding protein. Diced chicken or canned tuna works well. Just mix it in with the macaroni and veggies. You can also use chickpeas or black beans for a vegetarian option. These proteins will add texture and make the salad a complete meal. Just be sure to adjust the dressing to balance the added ingredients. Seasonal veggies can brighten up your salad too. In the spring, add fresh peas for a sweet crunch. In summer, diced bell peppers bring color and a crisp bite. You can also mix in some corn for sweetness. These seasonal add-ins not only enhance the flavor but also make your salad more vibrant. Each variation brings a new experience to the classic creamy dill pickle macaroni salad. For the full recipe, check the top of this section. To store your creamy dill pickle macaroni salad, place it in an airtight container. This keeps the salad fresh. Make sure to seal the lid tightly. If you have a large portion, consider dividing it into smaller containers. This way, you can grab a quick serving later. Freezing this salad isn't the best choice. The creamy dressing may separate when thawed. If you still want to freeze it, leave out the dressing. Store the pasta and veggies together. When ready to eat, thaw it in the fridge overnight. Then, mix in fresh dressing before serving. To keep your macaroni salad fresh, store it in the fridge. It should stay good for three to five days. Be sure to use a clean utensil when serving. This helps avoid germs. If you notice any signs of spoilage, like an off smell, toss it out. Enjoy the salad while it’s at its best! For the full recipe, visit the [Full Recipe]. To prepare macaroni for salad, boil it in salted water. Cook it until it's al dente. This means it should be firm but not hard. Check the package for timing. Once it's ready, drain it in a colander. Rinse it under cold water to stop the cooking. This helps prevent the macaroni from sticking together. Yes, you can make this salad ahead of time. It tastes even better after the flavors mix. Prepare the salad and store it in the fridge. Aim to chill it for at least one hour before serving. You can also make it a day in advance. Just give it a good stir before serving. Creamy macaroni salad lasts about three to five days in the fridge. Keep it in an airtight container to stay fresh. Check for any off smells or changes in texture before eating. If it looks or smells strange, it’s best to toss it out. The macaroni salad is not gluten-free unless you use gluten-free pasta. Regular elbow macaroni contains gluten. Look for gluten-free elbow macaroni at your local store. You can find options made from rice, corn, or quinoa. These alternatives work well in the salad. For the full recipe, check the details above. In this post, we explored key ingredients, how to make the salad, and ways to customize it. We looked at tips to improve flavors and avoid mistakes. Finally, I shared storage tips to keep your salad fresh. Whether you stick to the classic or try a new twist, making macaroni salad is easy. Enjoy each bite and share your creations with friends!

Get ready to elevate your summer picnics with a creamy dill pickle macaroni salad! This easy recipe combines tangy dill pickles with creamy goodness for a dish everyone will love. …

Read more

Categories Salads Tags NO-ING-IMG

Oven Roasted Beets with Balsamic Glaze Delight

January 14, 2026July 13, 2025 by Chef Tavio
- 4 medium beets, thoroughly scrubbed and tops trimmed - 3 tablespoons extra virgin olive oil - Sea salt and freshly ground pepper, to taste - 1/4 cup balsamic vinegar - 2 tablespoons honey or pure maple syrup - 1 teaspoon Dijon mustard - Fresh thyme leaves for a delightful garnish When I roast beets, I love using fresh, firm beets. They should be unblemished for the best taste. I scrub them well to remove any dirt. This step is key for a clean flavor. Extra virgin olive oil brings a rich taste to the beets. I drizzle it gently over each beet before wrapping them. Sea salt and freshly ground pepper help enhance their natural sweetness. For the balsamic glaze, balsamic vinegar adds a tangy kick. I mix it with honey or maple syrup for a nice balance. The Dijon mustard gives it a little depth. This glaze transforms the beets into a sweet and tangy treat. Lastly, fresh thyme leaves make the dish shine. They add a lovely herbal note and a pop of color. This combination of ingredients creates a dish that is both simple and elegant. For the full recipe, refer to the details above. - Preheat the oven to 400°F (200°C). - Wrap each beet in aluminum foil. Drizzle olive oil, and season with salt and pepper. - Place the wrapped beets on a baking sheet. - Roast for 45 to 60 minutes. Check for doneness with a knife. - Combine balsamic vinegar, honey, and Dijon mustard in a saucepan. - Simmer over medium heat. Reduce until the glaze thickens slightly. - Carefully peel the roasted beets after they cool. - Slice the beets into wedges or rounds. Arrange them nicely in a serving dish. - Drizzle with balsamic glaze and toss gently to coat. - Add fresh thyme leaves for a pop of color and flavor. Follow the Full Recipe for more details on this delightful dish! When picking beets, focus on these tips: - Look for firm, unblemished beets. - Choose smaller beets for a sweeter flavor. Smaller beets tend to have a higher sugar content. They also roast faster. You can always mix sizes for a colorful plate! To roast beets perfectly, follow these steps: - Ensure even wrapping in foil for uniform cooking. - Check for tenderness with a knife. Wrapping the beets well helps them cook evenly. If one side is exposed, it may dry out. After 45 minutes, poke a beet with a knife. If it slides in easily, they are done! To make your beets extra special, try these ideas: - Experiment with different vinegars or sweeteners. - Add spices like garlic or rosemary for more depth. Switching up vinegars can change the taste. For a zesty kick, use apple cider vinegar. For a sweeter touch, try maple syrup instead of honey. Adding herbs gives a fresh lift to the dish. You can explore endless flavor combinations! {{image_4}} You can change the flavor of your roasted beets. Try using red wine vinegar instead of balsamic vinegar. This swap gives a deeper, richer taste. If you want something fresh, use citrus juice or zest. Lemon or orange adds a bright kick! Add more fun to your dish with extra ingredients. Nuts like walnuts or pecans give a nice crunch. They also add healthy fats. If you crave creaminess, mix in goat cheese or feta. These cheeses melt beautifully and enhance the flavor. How you serve your beets can impress your guests. Place the roasted beets on a bed of arugula or mixed greens. This adds color and freshness. For a pop of color, sprinkle pomegranate seeds on top. They look great and add a sweet burst. For the full recipe, check out the [Full Recipe]. Store leftover beets in an airtight container. This keeps them fresh and tasty. Consume within 3 to 5 days for best quality. You can enjoy them in salads or as a side dish. Wrap beets tightly in plastic wrap or foil. This helps prevent freezer burn. Freeze for long-term storage. When you want to eat them, thaw them in the fridge overnight. This makes reheating easier. Warm the beets gently in the oven or microwave. This keeps their flavor and texture. For an extra kick, add a splash of balsamic vinegar. It brings back the sweet and tangy taste you love. Enjoy your beets just like you did before! Yes, but ensure they are well-washed and seasoned. Roasting without foil means the beets will get a little crispy outside. This can add a nice texture. Just keep an eye on them to prevent drying out. They should be tender enough to pierce with a knife. Test them around the 45-minute mark. If the knife slides in easily, they are done. If not, give them more time. Great as a side dish, in salads, or as a topping for grain bowls. They add a sweet and earthy flavor. Pair them with goat cheese or walnuts for variety. Yes, maple syrup or agave nectar can be used as alternatives. Both options keep the glaze sweet. You can adjust the amount based on your taste. Pre-cooked beets can be used; just reduce roasting time and focus on glazing. They only need about 10-15 minutes in the oven to warm and soak up the glaze. This makes for a quick and easy dish when you're short on time. For the full recipe, check the section above. In this blog post, we explored how to prepare oven-roasted beets and their delightful balsamic glaze. You learned about key ingredients, step-by-step instructions, and helpful tips for perfect results. We also discussed variations to enhance flavors and different presentation ideas. Remember, roasting beets brings out their natural sweetness. Try new glazes or toppings for a fresh twist. Enjoy the process and savor every bite of this vibrant dish. Good food makes great memories!

Looking to elevate your meals with delicious, healthy flavors? Oven Roasted Beets with Balsamic Glaze Delight will transform your cooking routine. In this simple guide, I’ll show you how to …

Read more

Categories Salads Tags NO-ING-IMG

Moist & Chocolatey Zucchini Brownies Delightfully Simple

January 14, 2026July 13, 2025 by Chef Tavio
For these brownies, you need a few key items. Here’s what to gather: - 1 cup finely grated zucchini (about 1 medium zucchini) - 1 cup all-purpose flour - 1/2 cup unsweetened cocoa powder - 1/2 teaspoon baking soda - 1/2 teaspoon baking powder - 1/4 teaspoon salt - 1/2 cup granulated sugar - 1/2 cup packed brown sugar - 1/3 cup vegetable oil - 2 large eggs - 1 teaspoon pure vanilla extract - 1/2 cup semi-sweet chocolate chips (plus more for topping) These ingredients come together to create a rich and moist brownie. The zucchini adds moisture without changing the taste. When selecting zucchini, look for small to medium sizes. They have better flavor and texture. Choose zucchini that feels firm and has smooth skin. Avoid ones with soft spots or blemishes. Fresh zucchini will help your brownies stay moist and delicious. You can easily adjust this recipe for different diets. Here are some ideas: - Gluten-Free: Use a gluten-free flour blend instead of all-purpose flour. - Dairy-Free: Replace chocolate chips with dairy-free options. - Lower Sugar: Substitute some sugar with applesauce or a sugar alternative. These swaps help make the brownies fit your needs while keeping them tasty. For the full recipe, check here. Start by preheating your oven to 350°F (175°C). Grab an 8x8-inch baking pan. You can grease it with butter or oil. Alternatively, line it with parchment paper. Make sure the paper hangs over the edges. This will help you lift the brownies out later. In a medium bowl, sift the flour, cocoa powder, baking soda, baking powder, and salt. This helps to mix the dry ingredients well. Set this bowl aside for later. In a large bowl, mix the granulated sugar, brown sugar, and vegetable oil. Whisk until it is smooth. Add the eggs one at a time, mixing well after each. Finally, stir in the vanilla extract. Now, combine the dry mixture into the wet mixture. Stir gently until just mixed. Be careful not to overmix! This keeps the brownies soft. Next, fold in the grated zucchini and chocolate chips. Pour the batter into your baking pan. Smooth the top with a spatula. For a treat, sprinkle more chocolate chips on top. Bake for 25-30 minutes. Use a toothpick to check for doneness; it should have a few moist crumbs. Let the brownies cool in the pan for 15 minutes. Then, lift them out with the parchment paper and cut into squares. Enjoy these moist and chocolatey delights! For the full recipe, refer to the earlier section. To get that perfect brownie texture, focus on mixing. Overmixing can create tough brownies. Mix the wet and dry ingredients until just combined. The batter should be thick but smooth. You want a little air in the batter, but not too much. This keeps the brownies soft and moist. Store leftover brownies in an airtight container. Make sure they cool completely before you store them. If you want to keep them fresh for longer, you can layer parchment paper between the brownies. This keeps them from sticking together. They can last for up to a week at room temperature. Mix-ins can take your brownies to the next level. Try adding nuts, like walnuts or pecans, for crunch. You can also use different types of chocolate chips. A mix of dark and milk chocolate gives a great flavor. Dried fruits like cherries or cranberries add a nice twist. Get creative and make it your own! For the full recipe, check out the link. {{image_4}} You can easily make gluten-free zucchini brownies. Simply replace all-purpose flour with gluten-free flour. Almond flour or oat flour works well. Make sure the flour you choose is properly labeled gluten-free. This change keeps the brownies moist and rich without gluten. To make these brownies vegan, swap the eggs with flaxseed meal. Mix one tablespoon of flaxseed meal with three tablespoons of water. Let it sit for five minutes to thicken. Use a plant-based oil instead of vegetable oil. Coconut oil or olive oil are great choices for flavor. You can also use maple syrup instead of granulated sugar for added sweetness. Chocolate lovers can play with different types of chocolate in this recipe. Instead of semi-sweet chocolate chips, try dark chocolate chips for a richer taste. You can also fold in white chocolate chips or even peanut butter chips. Adding cocoa nibs gives an extra crunch and a deep chocolate flavor. This way, you can create your unique twist on these brownies. For the full recipe, check out the details above. To keep your brownies fresh, store them in an airtight container. Place a piece of parchment paper between layers to prevent sticking. This method keeps them moist for up to five days at room temperature. If you want to extend their life, you can refrigerate them. They will last up to a week in the fridge. Freezing brownies is simple and effective. Cut them into squares, then wrap each piece in plastic wrap. Place the wrapped squares in a freezer-safe bag or container. They can stay frozen for up to three months. When you’re ready to enjoy them, just take out the desired number of brownies. To reheat brownies, preheat your oven to 350°F (175°C). Place the brownies on a baking sheet. Cover them loosely with foil to prevent drying out. Bake for about 10-15 minutes or until warm. You can also microwave individual squares for about 15-20 seconds. Just be careful not to overheat them, or they may become tough. Enjoy your brownies fresh and warm! For the full recipe, check out the complete instructions. Yes, you can use frozen zucchini. Just make sure to thaw and drain it well. Frozen zucchini has a lot of water. If you don’t drain it, your brownies may turn out too wet. To reduce sweetness, cut back on the sugar. You can lower the granulated and brown sugar by a quarter cup. Another option is to use unsweetened applesauce. This will also keep the brownies moist. Yes, it is best to squeeze out some moisture. This helps your brownies stay firm. Too much moisture can make them soggy. Use a clean kitchen towel to wring out the zucchini before adding it to the batter. For the full recipe, check out the details above. In this post, I covered key ingredients and steps to create moist, chocolatey zucchini brownies. You learned how to choose the best zucchini, make useful substitutions, and follow clear instructions for mixing and baking. I shared tips for perfect texture and storing leftovers. We also explored gluten-free and vegan variations. Zucchini brownies are adaptable and delicious, suitable for many diets. Enjoy your baking adventure and share your results!

Are you ready to indulge in a treat that’s both delicious and healthy? These Moist & Chocolatey Zucchini Brownies are the perfect blend of rich chocolate flavor and hidden veggies. …

Read more

Categories Desserts Tags NO-ING-IMG

One-Pan Balsamic Chicken & Veggies Simple Meal

January 14, 2026July 13, 2025 by Chef Tavio
- 4 boneless, skinless chicken thighs - 2 cups cherry tomatoes, halved - 1 medium zucchini, sliced into half-moons - 1 bell pepper (any color), chopped into bite-sized pieces - 1 medium red onion, sliced into thin wedges - 3 cloves garlic, minced - 1/4 cup balsamic vinegar - 2 tablespoons extra virgin olive oil - 1 tablespoon honey - 1 teaspoon dried oregano - 1 teaspoon dried basil - Freshly ground salt and pepper to taste - Fresh basil leaves for garnish This recipe packs a punch with simple yet bold flavors. The chicken thighs stay juicy and tender. The cherry tomatoes burst with sweetness, while zucchini adds a nice crunch. This blend gives you a colorful plate that’s hard to resist. The balsamic vinegar brings a tangy depth, balanced by the honey's sweetness. For seasoning, I love using dried oregano and basil. They add warmth to the dish and make it feel cozy. The salt and pepper help to enhance all the flavors, bringing everything together. Don't skip the fresh basil leaves for garnish. They add a pop of color and a fresh aroma that makes the dish even more inviting. You can find the full recipe in the article to help you prepare this one-pan wonder. 1. Preheat your oven to 400°F (200°C). This step helps the dish cook evenly. 2. In a large bowl, mix the balsamic vinegar, olive oil, honey, oregano, basil, minced garlic, and salt and pepper. Whisk until smooth. 3. Add the chicken thighs to this bowl. Make sure they soak up all the marinade. Let them sit for at least 15 minutes. For more flavor, marinate for up to 2 hours in the fridge. 1. In a large, oven-safe skillet, lay out the marinated chicken thighs. Pour any leftover marinade over them. 2. Add the cherry tomatoes, zucchini, bell pepper, and onion around the chicken. Drizzle a little olive oil on the veggies. Sprinkle them with salt and pepper. 3. Place the skillet in the oven. Bake for 25-30 minutes. Check the chicken's temperature; it should reach 165°F (75°C) and the veggies should be soft. 1. Once done, take the skillet out of the oven. Let it rest for about 5 minutes. This helps the flavors blend. 2. Before serving, sprinkle torn fresh basil leaves on top. This adds color and a fresh taste. For the full recipe, refer back to the ingredients and instructions above. Enjoy your one-pan balsamic chicken and veggies! To make your chicken full of flavor, marinate it for at least 15 minutes. If you can, let it sit in the fridge for up to 2 hours. This extra time helps the chicken soak up all those tasty juices. Always use a meat thermometer to check the chicken's doneness. Your chicken should reach 165°F (75°C) to ensure it's safe to eat. This tool makes sure you cook it just right. Cut your veggies into similar sizes. This helps them cook evenly. For the best taste, use seasonal vegetables. They will be fresher and more flavorful. For example, try using asparagus in spring or butternut squash in fall. This keeps your meal exciting and vibrant. Presentation is key to a great meal. For a rustic look, serve the dish straight from the skillet. This shows off the colorful veggies and tender chicken. If you prefer, transfer everything to a serving platter. Make sure to drizzle any leftover marinade on top for extra flavor. This adds a glossy finish that will catch everyone's eye. {{image_4}} You can swap chicken for other proteins. Try using pork chops, tofu, or shrimp. Each option brings a different taste and texture. For veggies, feel free to mix and match. Broccoli, carrots, or asparagus work well. Use what you have on hand. This keeps the dish fresh and exciting. Spice up your chicken with herbs like thyme or rosemary. These add depth and warmth. You can also add a pinch of red pepper flakes for heat. Citrus flavors can brighten your meal. Squeeze lemon or lime juice over the dish before serving. This adds a nice zing that pairs well with balsamic. Pair your dish with a side salad. A fresh green salad balances the meal nicely. You can also serve it with rice or quinoa for added carbs. To make it a full meal, add grains directly to the pan. Couscous or farro can soak up all the tasty juices. This creates a hearty one-pan dinner. For the full recipe, check out the ingredients and steps above. Store any leftover One-Pan Balsamic Chicken & Veggies in the fridge. Place it in an airtight container. This keeps the chicken and veggies fresh. Use glass or plastic containers for best results. Make sure to seal them tightly to prevent leaks and odors. Consume leftovers within 3 to 4 days for the best flavor. To reheat, use the oven or microwave. If using the oven, set it to 350°F (175°C). Cover the dish with foil to keep moisture in. This will help the chicken and veggies stay juicy. In the microwave, heat in short bursts. Stir and check often to avoid drying out the food. If you want to save some for later, you can freeze this dish. Portion the leftovers into freezer-safe bags. Press out as much air as possible before sealing. This helps prevent freezer burn. When you're ready to eat, thaw in the fridge overnight. Reheat in the oven or microwave. Enjoy those great flavors again! How can I ensure the chicken is tender and juicy? To keep your chicken tender, try marinating it longer. A good rule is to let it sit for at least 15 minutes. If you can, marinate it for up to 2 hours in the fridge. The balsamic vinegar helps with tenderness. It adds flavor, too. Can I make this recipe ahead of time? Yes, you can prepare this dish ahead. Marinate the chicken and veggies a few hours before cooking. You can also cook it and store it in the fridge. Just heat it up when you are ready to eat. Is this recipe gluten-free? Yes, this recipe is gluten-free. All the ingredients, like chicken and veggies, are naturally gluten-free. Just check your balsamic vinegar to ensure it has no added gluten. How can I make it low-carb? To make this dish low-carb, focus on the veggies. Use non-starchy options like zucchini and bell peppers. You can skip the honey or use a sugar substitute if you prefer. What if I don’t have balsamic vinegar on hand? If you lack balsamic vinegar, use red wine vinegar or apple cider vinegar instead. Add a bit of sugar or honey to mimic the sweet flavor of balsamic. This will help keep the taste similar. Can I use frozen vegetables in this recipe? Yes, you can use frozen vegetables. Just make sure to thaw them first for even cooking. They may release more water, so adjust your cooking time to ensure they cook well with the chicken. This post covered a tasty dish that centers on chicken thighs and fresh veggies. You learned how to marinate, cook, and present the meal in simple steps. Remember to adjust ingredients and try new flavors for a unique twist. Leftovers can last and taste great if stored properly. Follow these tips, and you'll impress anyone at your table. Enjoy your cooking journey and make this dish your own!

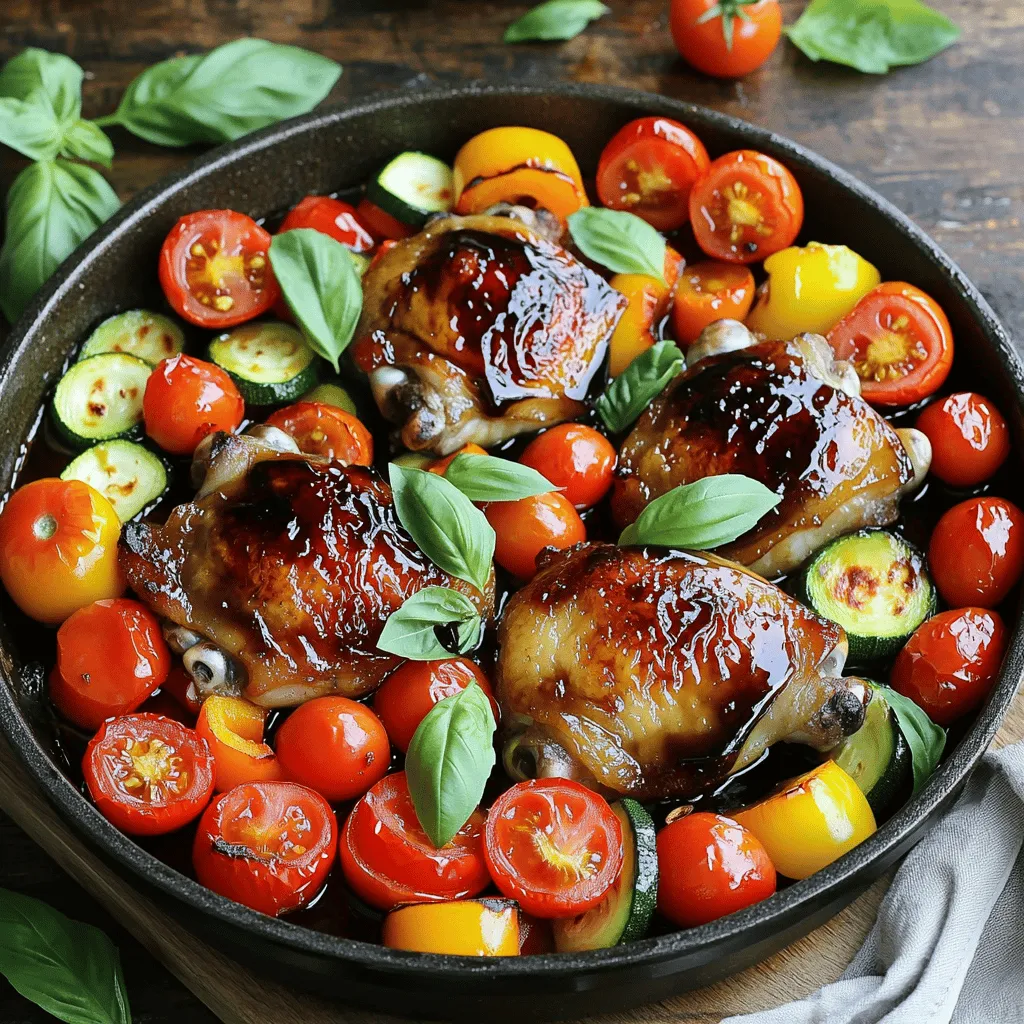
Looking for a quick, tasty dinner? You’ll love this One-Pan Balsamic Chicken & Veggies! It’s easy to make and perfect for busy evenings. Just throw all the ingredients together in …

Read more

Categories Dinner Tags NO-ING-IMG

Delicious One Pan Balsamic Chicken and Veggies Recipe

January 14, 2026July 12, 2025 by Chef Tavio
- Chicken and Vegetable Requirements - 4 boneless chicken thighs - 2 cups cherry tomatoes, halved - 1 medium zucchini, sliced into half-moons - 1 bell pepper (any color), chopped into bite-sized pieces - 1 red onion, cut into wedges These ingredients create a colorful and tasty dish. The chicken thighs are juicy and tender, while the veggies add flavor and nutrition. - Balsamic Marinade Components - 1/4 cup balsamic vinegar - 3 tablespoons extra virgin olive oil - 3 cloves garlic, finely minced - 1 teaspoon dried basil - 1 teaspoon dried oregano - Salt and freshly cracked black pepper to taste The balsamic vinegar brings a sweet and tangy flavor. Olive oil adds richness, while garlic and herbs give depth. This marinade is key to making the chicken and veggies sing. - Optional Garnishes - Fresh basil leaves, torn, for garnish Fresh basil adds a burst of color and flavor. It makes the dish look nice and taste even better. You can skip it, but I highly recommend using it for that extra touch. For the complete recipe, check the Full Recipe. - Preheat the Oven: Start by turning on your oven to 425°F (220°C). This heat will help cook the chicken and veggies just right. - Prepare the Marinade: In a small bowl, mix together the balsamic vinegar, olive oil, minced garlic, dried basil, dried oregano, salt, and black pepper. Stir until all the ingredients blend well. - Marinate the Chicken: Take your chicken thighs and place them in a large bowl. Pour half of the balsamic mixture over the chicken. Toss the thighs to coat them evenly. Let the chicken soak in those flavors for about 15 minutes. - Arrange the Vegetables: Grab a large oven-safe skillet. Evenly spread the halved cherry tomatoes, sliced zucchini, chopped bell pepper, and red onion wedges across the bottom. This colorful mix pairs perfectly with the chicken. - Combine Chicken and Veggies: After marinating, lay the chicken thighs on top of the veggies in the skillet. Drizzle the rest of the balsamic mixture over everything. This will add a nice flavor boost. - Bake the Dish: Carefully place the skillet in your preheated oven. Bake for 25-30 minutes. You want the chicken to reach 165°F (75°C) inside. The veggies should be tender and packed with flavor. - Rest Before Serving: When the baking time is up, take the skillet out of the oven. Let it rest for 5 minutes. This helps keep the chicken juicy and tender. - Garnish and Serve: Before you serve, sprinkle fresh basil leaves on top. This adds a lovely touch and great aroma. Serve right from the skillet for a charming look that will wow your guests. For the full recipe, check out the details above! Ensuring Perfectly Cooked Chicken To get juicy chicken, use boneless thighs. They stay moist and tender. Always marinate the chicken for at least 15 minutes. This helps the flavors soak in. Use a meat thermometer to check for doneness. Aim for 165°F (75°C) inside. Let the chicken rest for five minutes after cooking. This keeps it juicy. Optimal Vegetable Selection Choose fresh, colorful veggies for the best taste. Cherry tomatoes burst with flavor. Zucchini adds a nice crunch. Bell peppers give sweetness and color. Red onion brings a bit of sharpness. Cut veggies into similar sizes. This ensures they cook evenly. Feel free to mix in seasonal vegetables for variety. Additional Herbs and Spices Want to boost flavor? Try adding fresh herbs. Thyme or rosemary work well. They add an aromatic touch. You can also sprinkle some red pepper flakes for heat. This adds a nice kick to the dish. Alternative Marinade Options If you want a twist, change the marinade. Try lemon juice for brightness. Soy sauce adds umami. You could even mix honey for a sweet glaze. Just remember to balance the flavors. Keep it tasty and simple. For more ideas, check out the Full Recipe. {{image_4}} You can switch the chicken thighs to other proteins. Try chicken breasts, which are leaner. For a meatless option, use firm tofu or chickpeas. Both options absorb the balsamic flavor well. Feel free to change the veggies with what’s fresh. In spring, add asparagus or peas. In fall, try sweet potatoes or Brussels sprouts. Using seasonal veggies keeps the dish vibrant and tasty. For a stovetop version, heat a large skillet over medium heat. Add the marinated chicken and cook for about 6-7 minutes per side. Add the veggies after flipping the chicken. Cover the skillet for even cooking. To use a slow cooker, place the marinated chicken and veggies in the pot. Cook on low for 6-8 hours or high for 3-4 hours. This method makes the chicken very tender and flavorful. Check the Full Recipe for exact details. To keep your one pan balsamic chicken and veggies fresh, store leftovers in the fridge. Place the chicken and veggies in an airtight container. Make sure it is sealed tightly to prevent air from getting in. This helps keep it fresh for up to three days. If you have extra balsamic sauce, you can store that separately or pour it over the chicken and veggies. When it's time to eat your leftovers, here are the best ways to reheat them: - Oven: Preheat your oven to 350°F (175°C). Place the dish in an oven-safe pan. Cover it with foil to keep it moist. Heat for about 15-20 minutes or until warm. - Microwave: Use a microwave-safe dish. Cover it loosely with a lid or microwave-safe wrap. Heat for 2-3 minutes, stirring halfway through. This helps heat evenly. Reheating this dish properly keeps the flavors alive and makes sure the chicken stays juicy. Enjoy your meal! For the full recipe, check out the detailed instructions above. How do I know when the chicken is done? You can check if the chicken is done by using a meat thermometer. The chicken should reach an internal temperature of 165°F (75°C). You can also cut into the thickest part of the thigh. The meat should be white, with no pink remaining. Juices should run clear. Can I make this dish ahead of time? Yes, you can prepare this dish ahead of time. You can marinate the chicken and chop the veggies a day before. Store them in the fridge. When you're ready to cook, just combine them and bake. This saves time and helps flavors blend. Can I use frozen vegetables? You can use frozen vegetables, but they might release extra water. This can make the dish a bit soggy. If you choose frozen veggies, try to thaw and drain them first. This helps keep the right texture. What can I serve with balsamic chicken? Balsamic chicken pairs well with many sides. Here are some ideas: - Rice or quinoa for a hearty base - Garlic bread to soak up the sauce - A fresh salad for a light touch - Roasted potatoes for extra flavor For the Full Recipe, you can find the detailed steps and tips above. This blog post covered how to make a tasty balsamic chicken dish. We discussed the ingredients you need, including chicken and vegetables. I shared step-by-step instructions from cooking to the finishing touches. Tips helped ensure perfect chicken and flavorful results. You can also explore variations to suit your taste or use different cooking methods. Remember to store leftovers properly and reheat for the best taste. Enjoy creating this delicious meal that’s easy and fun!

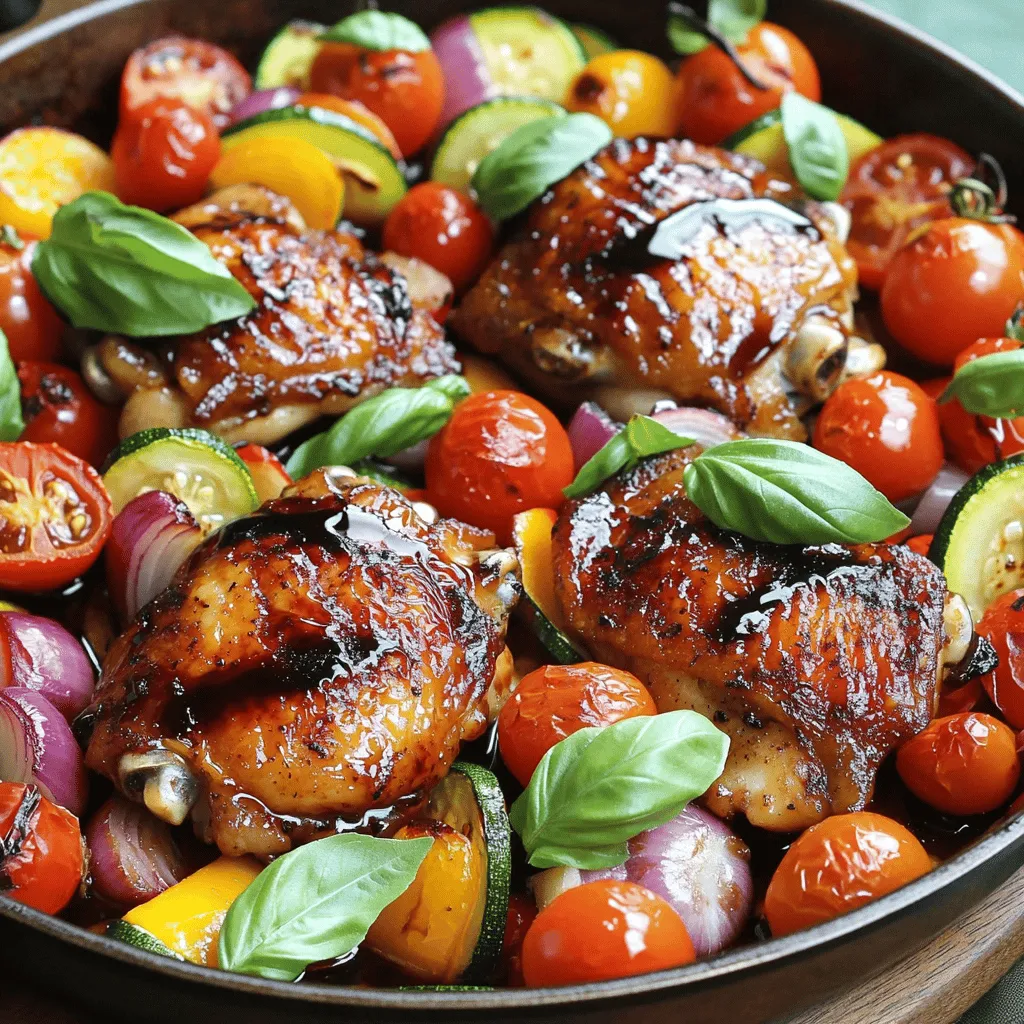
Looking for a simple, tasty weeknight meal? This Delicious One Pan Balsamic Chicken and Veggies recipe is your answer! With just one pan, you can prepare juicy chicken and vibrant …

Read more

Categories Dinner Tags NO-ING-IMG

Spicy Dilly Beans Savory Pickle Delight Recipe

January 14, 2026July 12, 2025 by Chef Tavio
- 1 pound fresh green beans, trimmed - 1 cup water - 1 cup distilled white vinegar - 2 tablespoons granulated sugar - 2 tablespoons kosher salt - 4 cloves garlic, peeled and smashed - 1 tablespoon dill seeds - 1 teaspoon red pepper flakes (adjust for your spice preference) - 1 teaspoon mustard seeds - 1 teaspoon whole black peppercorns - Optional: fresh dill sprigs for garnish In my kitchen, the key to great spicy dilly beans lies in the ingredients. Fresh green beans are a must. They should be firm and bright green. The vinegar gives them a tangy punch. Sugar and salt balance the flavors nicely. Garlic adds a savory depth. Dill seeds bring that classic pickle flavor. Red pepper flakes can turn up the heat as you like. Mustard seeds and black peppercorns add a bit of crunch and spice. If you want a pop of color, toss in some fresh dill sprigs. They look pretty and add extra flavor. This recipe is simple and very rewarding. You’ll love how good they taste! For the full recipe, check out the instructions provided. Happy pickling! - Blanch the green beans: Start by boiling a large pot of water. When it boils, add the trimmed green beans. Cook them for 3-4 minutes. They should become bright green and tender-crisp. - Ice bath preparation: After blanching, use a slotted spoon to transfer the beans to a bowl of ice water. This stops the cooking. Let them cool for about 5 minutes. Then, drain the beans and set them aside. - Combine water, vinegar, sugar, and salt: In a medium saucepan, mix the water, distilled white vinegar, granulated sugar, and kosher salt. Heat the mixture over medium-high heat. Stir until the sugar and salt dissolve completely. - Add flavoring spices and simmer: Once the mixture reaches a boil, add the smashed garlic, dill seeds, red pepper flakes, mustard seeds, and black peppercorns. Lower the heat and let it simmer for 5 minutes. This helps the flavors blend well. - Packing jars with blanched green beans: Prepare your sterilized jars. Tightly pack the blanched green beans upright in the jars. This makes them look nice and neat. - Pouring hot brine and adding fresh dill: Carefully pour the hot brine over the beans. Make sure they are fully submerged, leaving about ½ inch of space at the top. If you want, add fresh dill sprigs on top for extra flavor and a pretty look. For the full recipe, check [Full Recipe]. Enjoy the process of making these tasty spicy dilly beans! Adjusting spice levels is simple. You can add more or less red pepper flakes. Start with a half teaspoon if you prefer a milder kick. For a bolder taste, try a whole tablespoon. You can also mix in spices like coriander or cumin for fun flavors. Fresh herbs like thyme or oregano can also add depth to your dilly beans. To keep your dilly beans fresh, sterilize your jars first. Boil them in water for 10 minutes. This kills any germs. Let them dry on a clean cloth. After packing the beans, pour in the hot brine. Seal the jars tightly when they cool. Store them in the fridge. They are best after a week but can last up to a month. For serving, these spicy dilly beans shine as a colorful snack. They add crunch to any meal. Serve them on their own, or use them in salads. They look great on a charcuterie board. Mix them with cheese, meats, and other pickles for a tasty spread. Enjoy the vibrant colors and flavors they bring to your table! {{image_4}} You can change the taste of your spicy dilly beans by adding different spices. Try these options: - Cumin seeds: They add a warm, earthy flavor. - Coriander seeds: This gives a citrusy note. - Black mustard seeds: They add a nice crunch and flavor. You can also use other vegetables. Here are some ideas: - Carrots: Cut them into sticks for a sweet crunch. - Cauliflower florets: Their texture pairs well with the beans. - Radishes: They add a peppery bite. Do you want more heat? Increase the red pepper flakes. For less heat, reduce them or skip them entirely. You can also switch to milder peppers, like banana peppers. If you want a non-spicy version, try this recipe: Use the same ingredients but leave out the red pepper flakes. You can still enjoy the tangy flavor without the heat. These variations let you customize your spicy dilly beans to suit everyone's taste. Check out the Full Recipe for the base preparation, then have fun experimenting! To keep your spicy dilly beans fresh, place them in the fridge after you make them. Store them in airtight jars. This helps maintain their crispness and flavor. They taste best when they sit in their brine for at least 24 hours. However, waiting a week brings out even more flavor. Homemade pickled beans last about 2-3 months in the fridge. Just make sure to check for any signs of spoilage. If they smell off or look strange, it’s best to toss them. Canning is a great way to make your spicy dilly beans shelf-stable. Start by using clean, sterilized jars. Fill them with the blanched beans and pour the hot brine over them. Leave about half an inch at the top. Make sure to follow safe canning practices. This means sealing the jars tightly and processing them in a water bath for the right time. Canned dilly beans can last up to a year when stored in a cool, dark place. The main benefit of canning is that it gives you long-lasting snacks. You can enjoy your spicy dilly beans any time you want! Plus, they make great gifts for food lovers. For the full recipe, check out the earlier sections. How long does it take for spicy dilly beans to pickle? It takes at least 24 hours for spicy dilly beans to pickle. You can taste them after one day. However, for the best flavor, wait about a week. The spices and garlic will infuse more, making them tastier. Can I use frozen green beans for this recipe? Yes, you can use frozen green beans. However, fresh beans will give you a better crunch. If using frozen beans, blanch them for a shorter time. This will help keep their texture nice. What are the health benefits of pickled green beans? Pickled green beans are low in calories and high in fiber. They can aid digestion and may promote gut health. Plus, they are a fun way to eat vegetables! The vinegar also adds a tangy taste that many enjoy. How spicy are these dilly beans? The spice level is adjustable. The red pepper flakes add heat, but you can add more or less. If you like it mild, use just a pinch. For more heat, double the flakes. Find the right spice level that works for you! Best store-bought spicy dilly beans brands Some popular brands include Grillo's, Trader Joe's, and Mt. Olive. These brands offer tasty options, but check the ingredients for quality. Local markets may have homemade versions that are fresh and crunchy. Where to find high-quality ingredients for homemade recipes Visit local farmers' markets for fresh green beans. They often have the best quality. For spices and vinegar, look at specialty stores or online. Organic ingredients can add more flavor to your pickles. You learned how to make spicy dilly beans from fresh green beans. We covered the main ingredients, the steps to prepare and preserve, and tips to enhance the flavor. You can adjust spice levels to fit your taste. Remember to store your beans safely for the best flavor. Enjoy adding these tasty treats to meals and snacks. With simple ingredients and steps, you can create your own delicious pickled beans at home. Happy cooking and experimenting with flavors!

Are you ready to add some kick to your snacks? This Spicy Dilly Beans Savory Pickle Delight Recipe is not just your average pickle. It’s a zesty, crunchy treat perfect …

Read more

Categories Appetizers Tags NO-ING-IMG

Tender Chocolate Zucchini Cake Delicious and Easy Delight

January 14, 2026July 12, 2025 by Chef Tavio
To make the Tender Chocolate Zucchini Cake, you need a few simple ingredients. Each one plays a key role in making the cake moist and tasty. Here’s what you need: - Grated Zucchini: 1 cup - All-Purpose Flour: 1 cup - Unsweetened Cocoa Powder: 1/2 cup - Baking Soda: 1/2 teaspoon - Baking Powder: 1/2 teaspoon - Salt: 1/4 teaspoon - Granulated Sugar: 1/2 cup - Brown Sugar: 1/4 cup packed - Vegetable Oil: 1/2 cup - Eggs: 2 large - Vanilla Extract: 1 teaspoon - Optional: Chocolate Chips (1/2 cup) and Chopped Walnuts (1/4 cup) Grated zucchini adds moisture without a strong taste. The cocoa powder gives that rich chocolate flavor. The sugars help sweeten while the oils keep the cake soft. Eggs bind everything together, making the cake rise. You can use chocolate chips for an extra treat. Walnuts add a nice crunch, but they are optional. All these ingredients work together to make a delicious cake. Check the [Full Recipe] for all the details you need! - Preheat the oven to 350°F (175°C) - Prepare the cake pan (grease or line) Start by setting your oven to 350°F. This helps the cake cook evenly. While the oven heats, grab a 9-inch round cake pan. You can grease it with butter or oil. Dust it with flour to prevent sticking, or use parchment paper for easy removal. - Sift together flour, cocoa powder, baking soda, baking powder, and salt In a medium bowl, sift your dry ingredients. Combine one cup of all-purpose flour, half a cup of cocoa powder, half a teaspoon of baking soda, half a teaspoon of baking powder, and a quarter teaspoon of salt. Sifting helps mix them well and avoids clumps. - Mix sugars and oil, incorporate eggs and vanilla In a large bowl, mix together half a cup of granulated sugar, a quarter cup of brown sugar, and half a cup of vegetable oil. Stir this until smooth. Then, crack in two large eggs one at a time, mixing well after each. Add in one teaspoon of vanilla extract and stir until it’s all combined. - Gradually add dry ingredients to wet, fold in zucchini and chocolate chips Now, take the dry mix and slowly add it to the wet mix. Stir gently until just combined. Be careful not to mix too much! Next, fold in one cup of grated zucchini and half a cup of chocolate chips. You can add walnuts if you want some crunch. - Pour batter into the pan and bake for 30-35 minutes Pour your batter into the prepared pan. Smooth the top with a spatula. Place it in the oven and bake for 30 to 35 minutes. To check if it’s done, insert a toothpick into the center. It should come out clean or with a few moist crumbs. - Cool in the pan before transferring and serving After baking, let the cake cool in the pan for about 10 minutes. Then, carefully move it to a wire rack to cool completely. This keeps the cake tender. You can also dust it with powdered sugar before serving or enjoy a slice with ice cream. For the full recipe, check the earlier section. To get the best texture in your cake, avoid overmixing the batter. Mix just until the dry and wet ingredients come together. Overmixing can make the cake tough. Also, make sure to drain the grated zucchini well. If it has too much water, your cake may turn out soggy. Using high-quality cocoa powder makes a big difference. It adds richness and depth to your cake's taste. You can also experiment with different types of chocolate chips. Semi-sweet, dark, or even milk chocolate can change the flavor and sweetness. Once your cake cools, dust the top lightly with powdered sugar. This adds a nice touch and makes it look elegant. For extra decadence, serve each slice with a scoop of vanilla ice cream. This combination will delight everyone at your table. For the full recipe, make sure to check out the instructions above! {{image_4}} You can make this cake healthier with just a few swaps. - Whole Wheat Flour: Replace all-purpose flour with whole wheat flour. This adds fiber and nutrients. - Applesauce: Use unsweetened applesauce instead of vegetable oil. This cuts fat and adds moisture. These changes keep the cake tasty while making it better for you. Adding new flavors can make this cake even more fun. - Spices: Try adding spices like cinnamon or nutmeg. They bring warmth and depth to the cake. - Citrus Zest: Mix in orange or lemon zest for a fresh burst of flavor. The citrus notes brighten the chocolate. These twists can turn a classic recipe into something special. If you need vegan or gluten-free options, you can still enjoy this cake. - Egg Substitutes: Use plant-based egg substitutes like flaxseed meal or chia seeds. Mix one tablespoon with three tablespoons of water for each egg. - Gluten-Free Flour: Choose a gluten-free flour blend. This lets everyone enjoy the cake without worry. These alternatives ensure that everyone can savor this delicious treat. After baking your cake, let it cool completely. This step is key to keeping it moist. Once cool, store the cake in an airtight container or cover it tightly with plastic wrap. This helps to keep it fresh and tasty for longer. You can keep your cake at room temperature for about 2-3 days. If you want to store it longer, put it in the fridge. In the fridge, your cake will last up to a week. Just make sure it’s well covered to maintain its flavor. Want to save some for later? Wrap slices carefully in plastic wrap. You can freeze the cake for up to 2 months. When you’re ready to enjoy it, just let it thaw in the fridge overnight. It will taste fresh and delicious! For the full recipe, check out the details in the article. Yes, this cake stores well and can be made a day in advance. You can keep it covered at room temperature. This makes it a great option for parties or gatherings. You may try using finely grated carrots or apples for a different flavor. Both options add moisture and sweetness. Grated carrots will give it a nice crunch. Apples add a pleasant taste that blends well with chocolate. Check with a toothpick; it should come out clean or with a few moist crumbs. This test ensures the cake bakes evenly. If the toothpick has wet batter, give it a few more minutes in the oven. Absolutely! Cream cheese or chocolate frosting pairs wonderfully. A rich frosting can enhance the cake's taste. If you prefer a lighter touch, try a dusting of powdered sugar for a simple finish. For the full recipe, check the main section. This blog shared a simple, tasty recipe using zucchini to make a delicious cake. We covered the key ingredients, step-by-step instructions, and helpful tips. You learned about variations for healthier or vegan options and how to store the cake. Baking should be fun and rewarding. Enjoy experimenting with flavors and share your creations. This cake is sure to impress your friends and family!

If you love chocolate and want a tasty treat, this Tender Chocolate Zucchini Cake is for you! Packed with nutritious zucchini, this cake surprises everyone with its rich flavor and …

Read more

Categories Desserts Tags NO-ING-IMG

Best Zucchini Carrot Cake Delightfully Moist Recipe

January 14, 2026July 12, 2025 by Chef Tavio
To make the best zucchini carrot cake, you need a few key ingredients. Here’s what you will use: - 1 cup finely grated zucchini - 1 cup finely grated carrots - 1 ½ cups all-purpose flour - 1 cup granulated sugar - ½ cup packed brown sugar - ½ cup vegetable oil - 3 large eggs - 1 teaspoon vanilla extract - 1 teaspoon baking powder - 1 teaspoon baking soda - 1 teaspoon ground cinnamon - ½ teaspoon ground nutmeg - ½ teaspoon salt These ingredients blend together to create a moist and flavorful cake. The zucchini and carrots add moisture and sweetness, while the spices enhance the flavors. You can elevate your cake with some tasty add-ins. Consider these options: - ½ cup crushed walnuts - ½ cup raisins or currants Adding nuts gives a nice crunch. The dried fruits add sweetness and chewiness. You can mix and match as you like! Frosting can transform your cake from good to great. I recommend using cream cheese frosting for this recipe. It pairs well with the spices and adds a rich, creamy layer. You can also try: - Whipped cream - Chocolate frosting Choose your favorite to make your cake even more delightful! For the full recipe, check out the details above. First, preheat your oven to 350°F (175°C). This step is key for even baking. Next, grab a 9x13 inch baking pan. Grease it well and dust it lightly with flour. You can also line the bottom with parchment paper. This helps with easy removal after baking. In a large mixing bowl, combine the finely grated zucchini and carrots. If they seem too wet, use a clean kitchen towel. Squeeze out extra water gently. In a different bowl, mix granulated sugar, brown sugar, and vegetable oil. Whisk these ingredients until smooth. Add the eggs and vanilla extract. Whisk until everything blends nicely. Now, take another bowl and sift together all-purpose flour, baking powder, baking soda, ground cinnamon, ground nutmeg, and salt. Mix these dry ingredients well. Gradually add this dry mix to the wet ingredients. Stir just until combined. Be careful not to overmix. This keeps your cake light and fluffy. Gently fold the grated zucchini and carrots into the batter. Do this until they are well mixed in. If you want more texture, you can add crushed walnuts and raisins or currants. This will give your cake a nice crunch and added sweetness. Pour the batter into the prepared baking pan. Use a spatula to smooth the top. Place the cake in your preheated oven. Let it bake for 30-35 minutes. To test if it’s done, insert a toothpick in the center. It should come out clean when the cake is ready. Once baked, let the cake cool in the pan for about 10 minutes. Then, carefully transfer it to a wire rack. Let it cool completely. After it’s cooled, frost the top with cream cheese frosting. This makes it rich and delightful. For the full recipe, check out the details above. Grating zucchini and carrots right is key for this cake. Use a box grater or a food processor. For zucchini, first, wash it well. Then, cut off both ends before grating. For carrots, peel them first, then grate. Squeeze out extra water from the zucchini using a clean towel. This keeps the cake from being too wet. Measuring your ingredients accurately helps your cake turn out well. Use dry measuring cups for flour and sugar. Fill the cup, then level it off with a straight edge. For liquid ingredients, use a clear measuring cup with markings. Pour in until you reach the line. Always check for the right amount before mixing. Baking is a science, and small errors can spoil your cake. Do not overmix the batter; stop as soon as you see no dry flour. Make sure your oven is preheated to 350°F. If you bake at the wrong temperature, you may get a dry cake. Use a toothpick to check for doneness. If it comes out clean, the cake is ready. Serving your cake nicely makes it more inviting. Slice the cake into even squares. Use a sharp knife for clean cuts. Place the slices on decorative plates. For a special touch, sprinkle extra grated carrots on top or dust with cinnamon. This adds color and makes the cake look more appealing. Remember to check out the Full Recipe for all the steps to make this delightful treat! {{image_4}} You can easily make a vegan version of this cake. Replace eggs with flax eggs. To make one flax egg, mix one tablespoon of ground flaxseed with two and a half tablespoons of water. Let it sit for five minutes to thicken. You can also replace the vegetable oil with applesauce. This adds moisture and keeps the cake light. Use almond or coconut milk instead of regular milk for a creamy texture. Want to make this cake gluten-free? Swap all-purpose flour with a gluten-free blend. Make sure it contains xanthan gum. This helps with texture and fluffiness. You could also use almond flour, but this may change the cake's density. Be cautious with other gluten-free flours, as they can affect the taste and texture. Feel free to play with flavors in this cake! Add spices like ginger or cardamom for a warm kick. You can also mix in nuts like pecans or almonds for a crunchy bite. If you like dried fruit, try adding chopped dates or apricots. For chocolate lovers, add cocoa powder or chocolate chips for a rich twist. Each variation adds a unique touch to the cake while keeping it moist and tasty. Check out the Full Recipe for more details! To keep your zucchini carrot cake fresh, store it in an airtight container. Place it in a cool, dry place if you plan to eat it within a few days. If you plan to keep it longer, the fridge is best. It will stay moist and tasty for about a week. Just make sure to cover it to prevent it from drying out. Freezing the cake is easy! First, let it cool completely. Then, wrap it tightly in plastic wrap. After that, place the wrapped cake in a freezer-safe bag. This method keeps it fresh for up to three months. When you’re ready to eat it, simply move it to the fridge overnight to thaw. If your leftover cake seems a bit dry after storage, don’t worry! You can refresh it. Just drizzle a little milk or cream on top before serving. Another option is to warm up a slice in the microwave for a few seconds. This makes it soft and delicious again! For added flavor, you can also spread a little extra cream cheese frosting on top. This cake stands out for its moist texture and rich flavor. Fresh zucchini and carrots add moisture and sweetness. The mix of spices like cinnamon and nutmeg gives a warm taste. Plus, you can customize it with nuts or raisins. It’s a cake you can enjoy any time! Yes, you can use whole wheat flour or almond flour. Whole wheat will add a nutty taste and more fiber. Almond flour makes it gluten-free and keeps it moist. Just remember, different flours may change the texture a bit. Adjust the liquid if needed. To reduce the sweetness, cut down on the sugar. You can also swap some granulated sugar for unsweetened applesauce. This keeps the cake moist while lowering sugar. Just be sure to balance the flavors with spices and toppings. Cream cheese frosting is a classic choice, adding richness. You can also serve it with vanilla ice cream for a treat. Fresh fruit like berries or a dollop of yogurt pairs nicely, too. These add a fresh taste that complements the cake well. Check the cake at about 30 minutes. Insert a toothpick into the center. If it comes out clean, the cake is done. If there’s batter on the toothpick, bake for a few more minutes. Keep checking until it’s ready. You’ve learned how to make a fantastic zucchini carrot cake. We covered essential ingredients and tasty add-ins. I shared step-by-step instructions for perfect baking. Plus, I offered helpful tips to avoid mistakes. You can try different variations to suit your tastes. Now you’re ready to bake your own version. Enjoy every bite of your delicious creation!

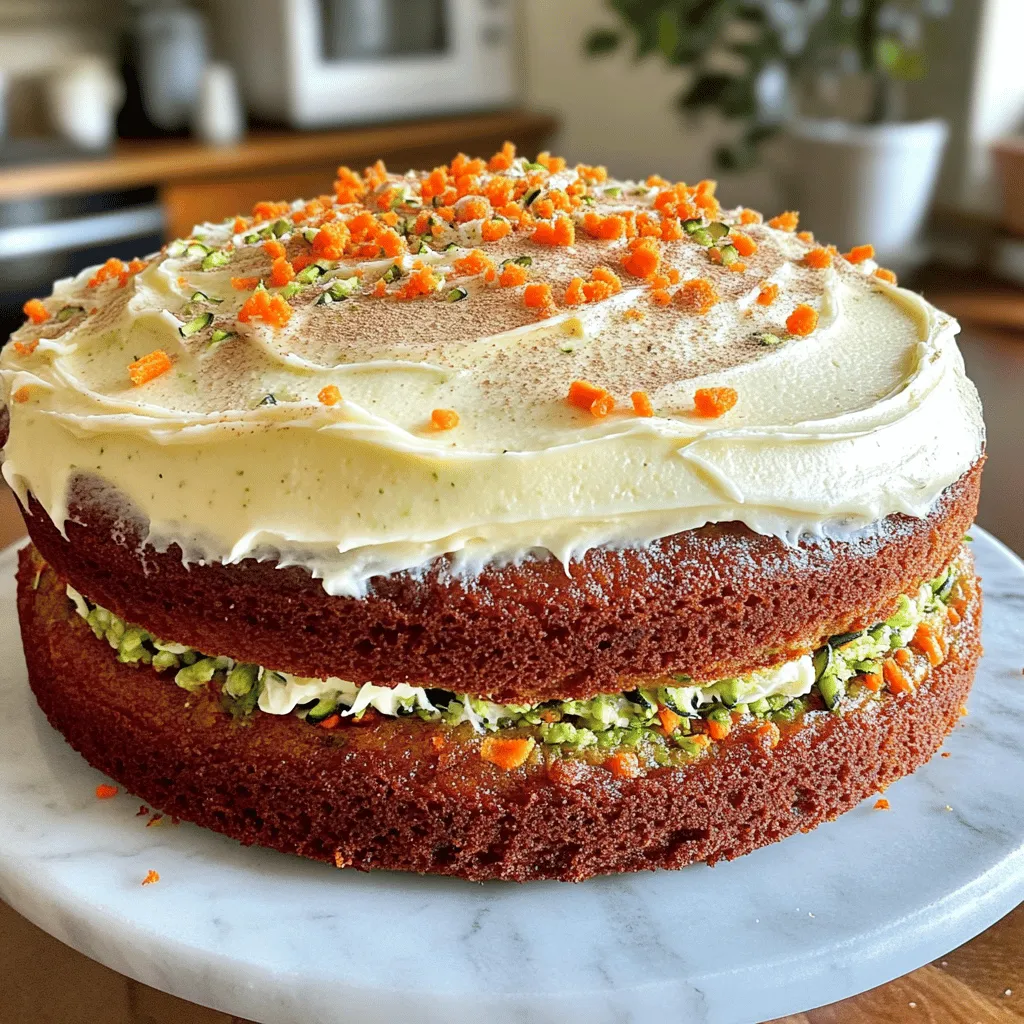
Are you ready to bake the best zucchini carrot cake you’ve ever tasted? This delightfully moist recipe combines fresh zucchini and sweet carrots for a scrumptious treat. With simple ingredients …

Read more

Categories Desserts Tags NO-ING-IMG

Moist Brown Sugar Zucchini Cake Delicious and Easy Recipe

January 14, 2026July 12, 2025 by Chef Tavio
Here are the simple ingredients you need for the moist brown sugar zucchini cake. Gather them all before you start. - 2 cups grated zucchini - 1 cup brown sugar - 1/2 cup granulated sugar - 1/2 cup vegetable oil - 1/4 cup unsweetened applesauce - 3 large eggs - 1 teaspoon vanilla extract - 2 cups all-purpose flour - 1 teaspoon baking powder - 1 teaspoon baking soda - 1 teaspoon ground cinnamon - 1/2 teaspoon ground nutmeg - 1/2 teaspoon salt - 1 cup chopped walnuts (optional) - 1/2 cup chocolate chips (optional) The zucchini gives the cake moisture. The brown sugar adds a rich flavor. The applesauce keeps it light and fluffy. If you like nuts or chocolate, feel free to add those too. When measuring your ingredients, make sure you are precise. This helps the cake turn out just right. You can find the full recipe for step-by-step instructions to make this delightful cake. Enjoy the process and the smells of fresh baking! - Preheat the oven to 350°F (175°C). - Grease and prepare the baking dish. I prefer using a 9x13-inch dish. You can use butter or cooking spray and dust it with flour. Or, line it with parchment paper for easy removal. - Combine the grated zucchini with both sugars in a large bowl. Let it sit for about 5 minutes. This draws out moisture and keeps the cake moist. - In the same bowl, add vegetable oil, applesauce, eggs, and vanilla extract. Whisk these together until smooth. - In a separate bowl, sift the flour, baking powder, baking soda, cinnamon, nutmeg, and salt. Sifting helps to aerate the flour and prevents lumps. - Gradually add the dry mixture to the wet one. Stir gently with a spatula until no flour streaks remain. Be careful not to overmix, as it can make the cake dense. - If you want, fold in walnuts and chocolate chips. This adds great flavor and texture. - Pour the batter into your greased baking dish. Spread it evenly with a spatula. - Bake in the preheated oven for 30-35 minutes. Check with a toothpick in the center. If it comes out clean, your cake is ready! You can find the full recipe above for more details. To keep your cake moist, start by resting the zucchini-sugar mixture. After you mix the grated zucchini with the sugars, let it sit for about five minutes. This resting time helps pull moisture from the zucchini. The result? A cake that is soft and tender. Correct ingredient measurements are also key. Use packed brown sugar for better sweetness and moisture. Always measure accurately to avoid dry spots or too much liquid in your batter. Overmixing can lead to a dense cake. To prevent this, use gentle folding methods. When adding the dry ingredients to the wet ones, stir slowly with a spatula. Mix just until you no longer see any flour. This keeps your cake light and airy. Using fresh spices can greatly improve your cake's taste. Ground cinnamon and nutmeg add warmth and depth. If you want to go further, consider optional add-ins. Chopped walnuts add a nice crunch, while chocolate chips bring sweetness. Both options can elevate your cake to a new level. For the full recipe, refer to the main article. Enjoy the process and have fun with your baking! {{image_4}} You can make this cake gluten-free! Just swap out all-purpose flour with gluten-free flour. Use a blend with a 1:1 ratio for the best results. Many brands offer great mixes that mimic the texture of regular flour. This change lets everyone enjoy a slice. Want to kick up the flavor? Consider adding some citrus zest. Lemon or orange zest brightens the cake. It adds a fresh twist to the sweet zucchini. You can also think about using different nuts. Pecans or hazelnuts work nicely alongside walnuts. They add crunch and a rich flavor to each bite. If you want a healthier cake, try reducing the sugar. Cut back on the brown sugar by a half cup or more. You'll still get a tasty cake, and it will be less sweet. Another option is to use applesauce as a substitute for oil. Replace half of the oil with applesauce. This change adds moisture and cuts down on fat. Your cake will still taste great and stay moist. For the full recipe, check out the Moist Brown Sugar Zucchini Cake. Store leftover zucchini cake in an airtight container. This keeps it fresh longer. You can also wrap it in plastic wrap. The cake will stay good for about 4 to 5 days at room temperature. If you want it to last longer, consider refrigerating it. In the fridge, it can last up to a week. To freeze the cake, wait until it cools completely. Cut it into pieces for easy thawing. Wrap each piece tightly in plastic wrap. Then, place the wrapped pieces in a freezer bag. Make sure to remove as much air as possible. The cake will freeze well for up to 3 months. When you’re ready to eat it, take it out of the freezer and let it thaw in the fridge overnight. To reheat the cake, preheat the oven to 350°F (175°C). Place the cake on a baking sheet. Cover it loosely with aluminum foil to keep it moist. Heat for about 10 to 15 minutes. If you prefer the microwave, warm a piece for 15 to 20 seconds. This keeps the cake soft and tasty. Enjoy your delicious Moist Brown Sugar Zucchini Cake! Yes, you can use white sugar instead of brown sugar. However, the cake will taste different. Brown sugar brings a rich, deep flavor. It also adds moisture, making the cake softer. If you choose white sugar, the cake may not be as moist. It might lack that warm, caramel note that brown sugar gives. To check if your cake is ready, use a toothpick. Insert it into the center of the cake. If it comes out clean, the cake is done. If you see batter on the toothpick, bake it a bit longer. This simple test makes sure your cake is perfectly baked and not soggy inside. Yes, you can use frozen zucchini in this recipe. Thaw it first and drain excess water. This keeps the cake from getting too wet. Frozen zucchini can work well, but fresh zucchini has a better texture. If using frozen, make sure it is well-drained for the best results. This blog post covered how to bake a delicious zucchini cake. You learned about the ingredients, step-by-step instructions, tips for best results, and variations to try. We discussed storage tips, too. In the end, you can create a tasty treat with simple steps. Whether you choose to add nuts or chocolate, this recipe offers flexibility. Enjoy baking and sharing this cake with friends and family!

Are you ready to bake a cake that’s not only moist but also packed with flavor? My Moist Brown Sugar Zucchini Cake is the perfect way to sneak some veggies …

Read more

Categories Desserts Tags NO-ING-IMG
Older posts
Newer posts
← Previous Page1 … Page71 Page72 Page73 Next →

TASTED NEST

Where Flavor Finds a Home 🍳🏡 — warm, simple, and crave-worthy recipes made for real life, from stovetop mornings to backyard dinners.

PAGES

Home About Contact Privacy Policy Terms & Conditions Cookie Policy GDPR Policy Copyright Policy Disclaimer

CATEGORIES

Appetizers Desserts Salads Breakfast Dinner
Copyright © 2026 Tasted Nest. All rights reserved.