Get ready to treat your taste buds with my No-Bake Lemon Blueberry Cheesecake Jars! This simple and delicious dessert is perfect for all skill levels. You’ll learn how to make a creamy filling and a crunchy crust without turning on the oven. Plus, I’ll share tips for the best toppings and perfect layers. Let’s dive into this easy dessert that is sure to impress your friends and family!
Ingredients
Key Ingredients for the Crust
For the crust, you need just two simple items:
– 1 cup graham cracker crumbs
– 4 tablespoons unsalted butter, melted
These two create a tasty base. The graham cracker crumbs add crunch and flavor. The melted butter helps bind them together.
Key Ingredients for the Cheesecake Filling
The cheesecake filling needs a few key ingredients:
– 16 oz cream cheese, softened to room temperature
– 1 cup powdered sugar
– 1/4 cup freshly squeezed lemon juice
– Zest of 1 lemon
– 1 teaspoon pure vanilla extract
– 1 cup heavy whipping cream, chilled
The cream cheese gives a rich taste. The lemon juice and zest bring a bright flavor. Powdered sugar adds sweetness. The whipped cream makes it light and fluffy.
Toppings and Garnishes
To finish your jars, gather these garnishes:
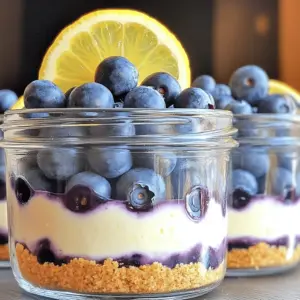
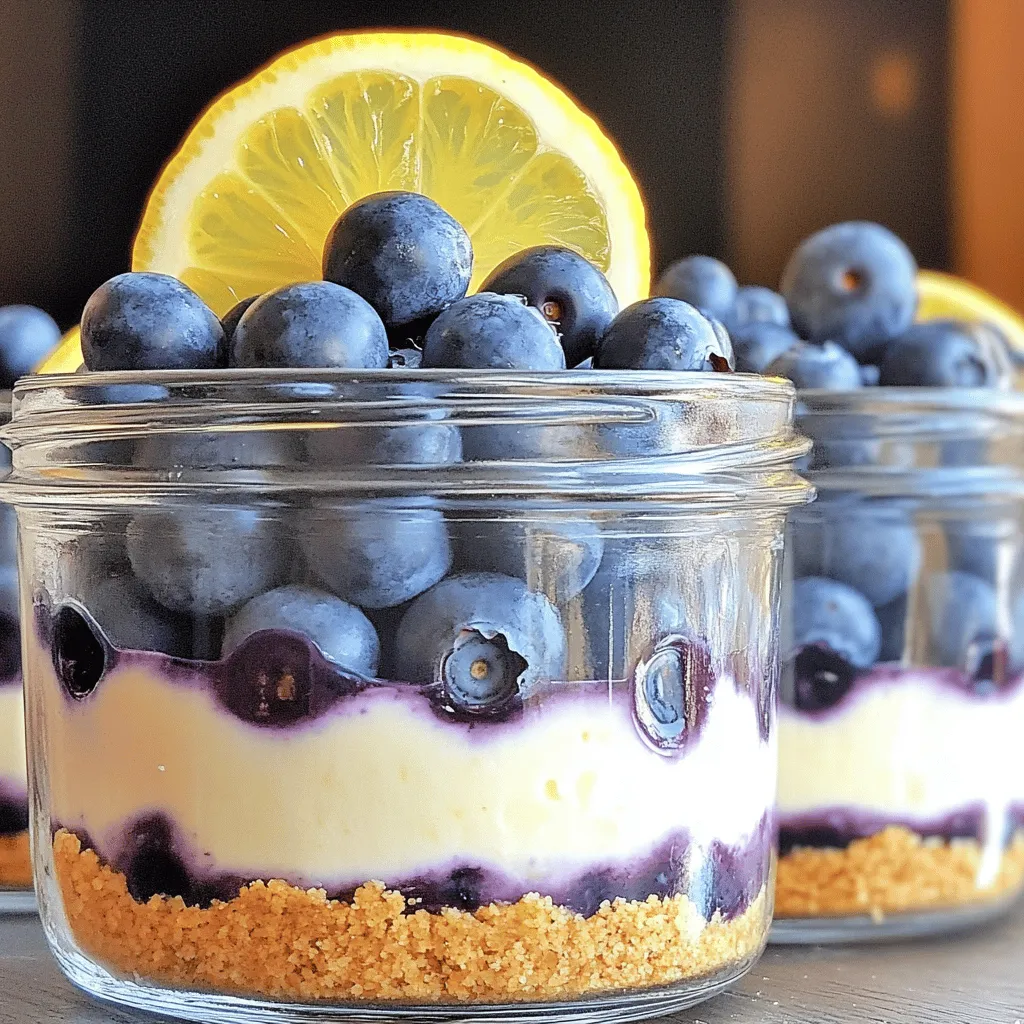
– 1 cup fresh blueberries, plus extra for garnish
– Lemon slices for garnish
Fresh blueberries add color and taste. Lemon slices give a nice touch on top. These simple toppings make your dessert look and taste amazing!
Step-by-Step Instructions
Prepare the Crust
To start, gather your graham cracker crumbs and melted butter. In a medium bowl, mix these two ingredients well. You want the crumbs to be fully moistened. Next, take your jars and divide this mixture among the bottoms. Press down firmly with a spoon or your fingers. This creates a solid crust layer that holds everything together.
Make the Cheesecake Filling
Now, move on to the cheesecake filling. In a large mixing bowl, beat the softened cream cheese and powdered sugar with an electric mixer. Mix until it’s smooth and creamy. Add in the fresh lemon juice, lemon zest, and vanilla extract. Keep mixing until everything is well combined and airy. This step is key for a light filling.
Whip the Cream
In a separate clean bowl, pour in the chilled heavy whipping cream. Use an electric mixer to whip the cream until stiff peaks form. This means that when you lift the beaters, the cream stays in shape. Carefully fold the whipped cream into the cream cheese mixture using a spatula. Go gently; you don’t want to deflate the whipped cream. This keeps your filling light and fluffy, perfect for your jars.
Layering and Chilling
Layer the Cheesecake Mixture
Start by layering the cheesecake mixture in your jars. I like to use a spoon or a piping bag for this. First, add a generous scoop of the creamy filling to each jar until it’s halfway full. Next, sprinkle a handful of fresh blueberries on top. This adds a burst of flavor and color. Repeat this process, adding more cheesecake filling and blueberries, until the jars are filled to the top.
Chill the Jars
Once you finish layering, it’s time to chill the jars. Cover each jar with its lid or plastic wrap. Place them in the fridge for at least four hours. This step is crucial because it allows the cheesecake to set properly. The chill time also helps the flavors blend. Trust me, the longer they chill, the better they taste.
Serving Suggestions
Serving these jars is simple and fun. When ready to serve, take the jars out of the fridge. To make them look extra special, add a few more fresh blueberries on top. A slice of lemon adds a nice touch too. For a fancy finish, arrange the jars on a decorative platter. You might even drizzle some honey or lemon sauce around them for extra flair. Enjoy every creamy, tangy bite!

Tips & Tricks
Achieving the Perfect Cream Cheese Mixture
To get the best cream cheese mixture, use softened cream cheese. This helps it blend smoothly. I recommend taking it out of the fridge at least an hour before use. Beat the cream cheese and powdered sugar until it is creamy and free of lumps. Adding lemon juice, lemon zest, and vanilla will enhance the flavor. Mix these ingredients well until the mixture is light and fluffy.
How to Prevent Soggy Crust
A soggy crust can ruin your cheesecake jars. To prevent this, make sure you use the right ratio of graham cracker crumbs to melted butter. Aim for a crumbly texture that holds together when pressed. After mixing, pack the crust tightly into the jars. If you want extra crunch, bake the crust for about 10 minutes at 350°F before adding the filling. This will help set the crust and keep it crisp.
Options for Whipping Cream
When whipping cream, use heavy whipping cream that is chilled. This ensures better volume and texture. You can whip it by hand or with an electric mixer. Beat until stiff peaks form. If you want a sweeter taste, add a little powdered sugar while whipping. You can also try adding vanilla for extra flavor. Folding the whipped cream into the cream cheese mixture gently is key to keeping it light and airy.
Variations
Alternative Fruit Toppings
You can switch up the blueberry topping for other fruits. Strawberries, raspberries, and blackberries all work well. Each fruit adds its own flavor and color. You can slice strawberries or mash raspberries for a fun twist. Just keep the amount the same as the blueberries. Layer them the same way as the blueberries for a nice look.
Flavor Enhancements
Want to make the cheesecake even better? Try adding different flavors! You can mix in a bit of almond extract for a nutty taste. Or, add a bit of cocoa powder for a chocolatey touch. You can also use different citrus fruits like lime for a zesty kick. When mixing, keep the amounts balanced to keep the texture right.
Gluten-Free Options
If you need a gluten-free dessert, it’s easy to adjust this recipe. Use gluten-free graham crackers for the crust. You can also crush gluten-free cookies instead. The filling stays the same, so no worries there. Enjoy the same creamy dessert without gluten! This way, everyone can join in on the fun.
FAQs
Can I make this dessert in advance?
Yes, you can make these jars ahead of time. I often prepare them the night before. This gives the flavors time to mix well. You want the cheesecake to set, so chilling for at least four hours is key. If you make them a day in advance, they will taste even better!
How long can I store the cheesecake jars?
You can store these jars in the fridge for up to five days. Just keep them covered. If you notice any liquid on top, it’s normal. It happens when the cheesecake sets. Just give it a gentle stir before serving.
Can I substitute any ingredients?
Absolutely! You can swap out the blueberries for other fruits. Strawberries or raspberries work great too. If you want a dairy-free version, use coconut cream instead of heavy cream. For a gluten-free crust, use gluten-free graham cracker crumbs. Adjust the lemon juice to your taste; some like it more tart!
This blog post shared key steps to make delicious cheesecake jars. We explored the crust, filling, and toppings. You learned how to layer and chill for the best results. Plus, I gave tips to avoid soggy crust and enhance flavors. Try out the variations for fun options.
In the end, making cheesecake jars is simple and fun. Enjoy sharing these treats with friends and family!