Go Back
- 1 cup creamy peanut butter - 1/2 cup honey or maple syrup (vegan option) - 1 cup rolled oats - 1 cup puffed rice cereal - 1/2 cup dark chocolate chips - 1/4 teaspoon salt - 1 teaspoon vanilla extract - Optional: 1/4 cup chopped nuts (almonds or walnuts) - Optional: 1/4 cup shredded coconut I love these ingredients because they come together to create a sweet and crunchy treat. The creamy peanut butter provides rich flavor, while honey or maple syrup adds sweetness. Rolled oats give the bars a hearty base, and puffed rice cereal adds a fun crunch. Dark chocolate chips melt beautifully on top. They add a layer of indulgence to every bite. The salt balances the sweetness and enhances the peanut butter flavor. Vanilla extract brings everything together with a lovely aroma. You can customize these bars too! Adding nuts gives extra crunch and protein. Shredded coconut adds a tropical twist and chewiness. Plus, these ingredients are simple and easy to find. They create a delicious snack that everyone will love. - Start by melting 1 cup of creamy peanut butter and 1/2 cup of honey in a medium saucepan. Use low heat and stir gently. You want the mixture smooth and warm, not boiling. - Once smooth, remove from heat. Add 1 teaspoon of vanilla extract and 1/4 teaspoon of salt. Mix well to blend all the flavors. - In a large bowl, mix 1 cup of rolled oats and 1 cup of puffed rice cereal. If you want, add optional ingredients like 1/4 cup of chopped nuts or 1/4 cup of shredded coconut for extra crunch and flavor. - Carefully pour the warm peanut butter mixture over the dry ingredients. Use a spatula to fold everything together. Make sure all the oats and rice are coated well. - Line an 8x8-inch baking dish with parchment paper, letting some paper hang over the edges. This helps lift the bars out later. - Transfer the mixture into the baking dish. Press it down firmly with a spatula or your hands to create an even layer. - Melt 1/2 cup of dark chocolate chips in a microwave-safe bowl. Heat in 20 to 30-second bursts, stirring in between. Once melted, pour it over the pressed mixture. Spread it evenly with a spatula. - Place the baking dish in the refrigerator. Chill for at least 1 hour until firm. - Once set, lift the bars out using the parchment paper. Cut into squares or rectangles. Enjoy your delicious, no-bake treat! To get the best taste, use fresh ingredients. Fresh peanut butter and honey make a big difference. You can also adjust the sweetness. Use honey for a rich flavor or maple syrup for a vegan option. Both sweeteners work well, so pick what you like. Make your bars look great by arranging them on a nice platter. For a pretty touch, sprinkle extra chocolate chips or chopped nuts on top. You can even add a dollop of extra peanut butter on the side. It makes for a fun dip! One mistake is not pressing the mixture firmly enough. If you do not press it well, the bars may fall apart. Another mistake is melting chocolate incorrectly. Always melt it slowly in short bursts. Stir often to avoid burning. This way, you get a smooth, shiny topping! {{image_4}} You can switch to natural sweeteners like agave nectar or coconut sugar. These options can lower the glycemic index. You can also try maple syrup for a vegan treat. For gluten-free options, use certified gluten-free oats and puffed rice. This way, everyone can enjoy these yummy bars. Adding spices can elevate the taste. A dash of cinnamon can create warmth. You might also add a pinch of nutmeg for a twist. If you want to change the chocolate, try milk or white chocolate chips. Each type brings a unique flavor profile to the bars. You can substitute puffed rice with other cereals. Try using corn flakes or granola for a new crunch. Adding dried fruits like cranberries or raisins can give a chewy texture. You might also mix in seeds like chia or flax for added nutrition. Each choice makes the bars even more delightful. To keep your Chocolate Peanut Butter Crunch Bars fresh, store them in the refrigerator. Wrap them tightly in plastic wrap or use an airtight container. This keeps moisture out and helps them last longer. You can also place parchment paper between layers to avoid sticking. If you want to store them for longer, freezing is a good choice. Cut the bars into pieces, then wrap each piece in plastic wrap. Place them in a freezer-safe bag. This way, you can enjoy them later. They will keep well for up to three months in the freezer. You should keep the bars in the fridge for about one week. After that, they may not taste as fresh. If you freeze them, they will last for about three months. Look for signs that the bars are bad. If you see any mold or a strange smell, it’s best to toss them. The chocolate may also become dull or dry out. This means it’s time to say goodbye to your tasty treats. Yes, you can use almond butter. It gives a different taste. Almond butter is creamier and less sweet. Adjust the sweetness if you want more flavor. The texture will stay nice, but the bars may be a bit softer. You can use maple syrup. It is a great choice for sweetness and keeps the bars moist. Agave syrup works too, but it is thinner. If you like, you can try coconut nectar for a unique flavor. Each option may change the taste a little, so choose what you enjoy most. To make them vegan, replace honey with maple syrup. Use dairy-free chocolate chips. Check labels to ensure all ingredients are vegan. You can also skip the optional nuts or coconut if not suitable. The bars will still taste great without these items. To cut the bars neatly, use a sharp knife. Start by warming the knife in hot water. Wipe it dry before slicing. This helps the knife glide through easily. Cut them into squares or rectangles. Wipe the knife between cuts for clean edges. These no-bake bars are easy to make and delicious. We covered the key ingredients, preparation steps, and storage tips. Using fresh, high-quality items will boost flavor and texture. Remember, you can customize the recipe with nuts, spices, or different cereals. Following these tips will help you avoid mistakes and create the perfect treat. Enjoy your homemade snacks anytime, and share them with friends!

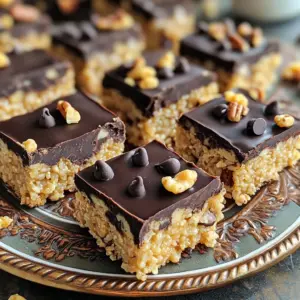
Chocolate Peanut Butter Crunch Bars No Bake

Indulge in the delightful taste of Chocolate Peanut Butter Crunch Bars! These no-bake treats combine creamy peanut butter, rich dark chocolate, and a satisfying crunch from oats and puffed rice. Perfect for a quick snack or dessert, these bars are easy to make and utterly delicious. Discover the full recipe and impress your friends and family with this sweet delight. Click through to explore these tasty bars today!

Ingredients
  

1 cup creamy peanut butter

1/2 cup honey (substitute with maple syrup for a vegan option)

1 cup rolled oats

1 cup puffed rice cereal

1/2 cup dark chocolate chips (use dairy-free if desired)

1/4 teaspoon salt

1 teaspoon vanilla extract

1/4 cup chopped nuts (such as almonds or walnuts, optional)

1/4 cup shredded coconut (optional)

Instructions
 

In a medium saucepan set over low heat, add the creamy peanut butter and honey. Stir gently and continuously until the mixture becomes smooth and well-combined, taking care not to let it bubble.

    Once the mixture is smooth, remove the saucepan from heat, then add the vanilla extract and salt. Stir well until both are completely incorporated into the peanut butter mixture.

      In a large mixing bowl, combine the rolled oats and puffed rice cereal. If you're using optional ingredients like chopped nuts or shredded coconut, add them now to this dry mixture.

        Carefully pour the warm peanut butter mixture over the combined oats and puffed rice. Use a spatula to gently fold everything together, ensuring that the dry ingredients are evenly coated with the peanut butter mixture.

          Line an 8x8-inch square baking dish with parchment paper, leaving some paper hanging over the edges; this will make it easier to lift the bars out later.

            Transfer the mixture to the prepared baking dish, and with the back of a spatula or your clean hands, press it down firmly to create an even layer across the bottom.

              Melt the dark chocolate chips in a microwave-safe bowl in 20-30 second intervals, stirring in between, or use a double boiler until the chocolate is completely smooth. Once melted, pour the chocolate over the pressed mixture and spread it evenly with a spatula.

                Place the baking dish in the refrigerator and allow the bars to chill for at least 1 hour or until they are firm to the touch.

                  Once set, lift the bars out of the dish using the overhanging parchment paper. Cut into squares or rectangles as desired.

                    Prep Time: 15 minutes | Total Time: 1 hour 15 minutes | Servings: 12 bars

                      - Presentation Tips: Arrange the bars on a decorative platter. For an appealing touch, sprinkle a few extra chocolate chips or a handful of chopped nuts on top. For an indulgent serving suggestion, consider placing a small dollop of extra peanut butter on the side for dipping.