Go Back
- 1 cup graham cracker crumbs - 2 tablespoons granulated sugar - 1/4 cup unsalted butter, melted - 16 ounces cream cheese, softened to room temperature - 1/2 cup granulated sugar - 1/4 cup sour cream - 2 large eggs, at room temperature - 1 teaspoon pure vanilla extract - Zest of 1 lemon (optional, for a fresh citrus note) - Selecting the best cream cheese: Always choose full-fat cream cheese. It gives the best flavor and texture. Check for a smooth and soft package. This helps your batter mix well. - Choosing the right granulated sugar: Use standard granulated sugar. It dissolves easily, which is key for smooth cheesecakes. Avoid brown sugar or alternatives, as they can change the taste. - Importance of using room temperature eggs: Eggs mix better when they are at room temperature. This helps create a creamy filling. Take them out of the fridge about 30 minutes before you bake. {{ingredient_image_2}} Preheating your oven is very important. A steady temperature helps bake the cheesecakes evenly. Set your oven to 325°F (163°C) before you start mixing. This way, when you place the mini cheesecakes in, they will bake perfectly. To make the crust, you need graham cracker crumbs, sugar, and butter. In a medium bowl, mix 1 cup of graham cracker crumbs and 2 tablespoons of granulated sugar. Then, pour in 1/4 cup of melted butter. Stir it well until all the crumbs are coated. This mixture should look like wet sand. For the filling, you want it creamy and smooth. Start with 16 ounces of softened cream cheese in a large bowl. Use an electric mixer to beat it until it’s smooth. Next, add 1/2 cup of granulated sugar slowly. Mix well after each addition. Then, blend in 1/4 cup of sour cream. Now, add 2 large eggs one at a time. Mix each egg in well before adding the next. Finally, add 1 teaspoon of pure vanilla extract and lemon zest if you like. This will give your filling a fresh taste. It’s time to bake! Carefully pour the cheesecake batter over the crust in each liner. Fill them about 3/4 full. Place the muffin tin in the oven and bake for 18-20 minutes. The edges should be set, but the centers can still jiggle a bit. This jiggle means they will be creamy. Cooling is very important for texture. After baking, let the mini cheesecakes cool in the tin for about 10 minutes. Then, transfer them to a wire rack to cool completely. Once they are cool, refrigerate them for at least 4 hours, or overnight if you can wait. This chilling time helps them set up perfectly. - Overmixing the batter: Mixing too much adds air, which can cause cracks. Mix until just smooth. - Not chilling properly: Skipping chill time means your cheesecakes may not set. Always chill for at least four hours. - Muffin tin: A non-stick muffin tin helps the cheesecakes release easily. - Cupcake liners: Use these to prevent sticking and make serving easier. - Electric mixer: This tool helps achieve a smooth filling without lumps. - Rubber spatula: Great for scraping down the sides of the bowl. - Wire rack: Perfect for cooling the cheesecakes evenly. - Room temperature ingredients: Make sure cream cheese and eggs are at room temperature. This helps mix them smoothly. - Gentle mixing: Mix eggs in one at a time. This avoids overmixing and keeps the batter smooth. - Bake until slightly jiggly: The centers should be soft but not liquid. This ensures they will set nicely when chilled. Pro Tips Choose the Right Cream Cheese: Make sure to use full-fat cream cheese for the best flavor and texture. Low-fat versions may not yield the same creamy results. Room Temperature Ingredients: Ensure that your cream cheese, eggs, and sour cream are at room temperature before mixing. This helps create a smoother batter and prevents lumps. Don’t Overmix: When adding the eggs, mix just until incorporated. Overmixing can introduce too much air, causing the cheesecakes to crack during baking. Perfect Cooling: Allow the cheesecakes to cool in the tin for 10 minutes before transferring them to a wire rack. This prevents them from breaking apart and ensures they set properly. {{image_4}} You can easily change the flavor of your mini cheesecakes. Here are a few ideas: - Chocolate: Add 1/2 cup of melted chocolate to the filling. This gives a rich and creamy chocolate taste. - Pumpkin: Mix in 1 cup of pumpkin puree and 1 teaspoon of pumpkin spice. This brings a warm, fall flavor. - Berry: Fold in 1 cup of fresh or frozen berries. Blueberries, strawberries, and raspberries all work well. Each flavor creates a unique treat that everyone will love. You can also mix flavors for even more fun! The crust adds a nice crunch. You can switch it up for different tastes: - Oreo Crust: Use crushed Oreo cookies instead of graham crackers for a chocolatey twist. - Gingersnap Crust: If you like a spicy kick, try gingersnap cookies. They add warmth and flavor. - Almond Flour Crust: For a gluten-free option, use almond flour mixed with melted butter. It’s nutty and delicious. Experimenting with crusts makes your cheesecakes even more special! Toppings can take your mini cheesecakes to the next level. Here are some fun ideas: - Whipped Cream: A dollop of whipped cream adds a light, airy touch. - Fresh Fruit: Top with sliced strawberries, blueberries, or raspberries for color and sweetness. - Fruit Sauce: Drizzle with raspberry or chocolate sauce for a sweet and pretty finish. These toppings make your mini cheesecakes look and taste amazing! To keep your mini cheesecakes fresh, place them in an airtight container. If you have extra room, cover them with plastic wrap. This step helps keep moisture in and prevents drying. For best results, store them in the fridge. These mini cheesecakes will last up to five days in the fridge. If you want to save them longer, freeze them. They can stay fresh for up to three months in the freezer. Just remember to wrap them well to avoid freezer burn. If you want to warm up your mini cheesecakes, do it slowly. Preheat your oven to 300°F (150°C). Place the cheesecakes on a baking sheet. Heat them for about 10 minutes. This method warms them gently without cooking them. Enjoy them warm or chilled! Yes, you can make mini cheesecakes ahead of time. This makes them convenient for parties. After baking, let them cool, and then chill them in the fridge. They taste even better the next day. I often prepare them a day or two in advance. Just cover them well to keep them fresh. New York cheesecake has a rich, creamy texture. It often uses cream cheese, which gives it a dense quality. This style has a smooth surface and a slight tang from sour cream. The graham cracker crust adds a sweet crunch, balancing the creamy filling. New York cheesecake is less airy than other types, making it truly special. Check the edges of your mini cheesecakes. They should be set, while the centers remain slightly jiggly. This is key for a soft texture. If they appear too firm, they may dry out. After baking, let them cool in the tin for ten minutes. This helps them firm up without losing moisture. In this blog post, we covered how to make delicious mini cheesecakes. We explored the key ingredients and shared helpful tips for each step. Remember to preheat your oven and use room-temperature eggs. Avoid common mistakes like overmixing to achieve the best texture. You can also try fun variations and creative toppings. Proper storage will help keep your cheesecakes fresh. Now, you have everything you need to impress with these tasty treats. Enjoy every bite of your mini cheesecakes!

Classic New York Mini Cheesecakes

Deliciously creamy mini cheesecakes with a buttery graham cracker crust.
Course Dessert
Cuisine American
Servings 12
Calories 200 kcal

Ingredients
  

  • 1 cup graham cracker crumbs
  • 2 tablespoons granulated sugar
  • 1 4 cup unsalted butter, melted
  • 16 ounces cream cheese, softened to room temperature
  • 1 2 cup granulated sugar
  • 1 4 cup sour cream
  • 2 large eggs, at room temperature
  • 1 teaspoon pure vanilla extract
  • 1 zest of 1 lemon (optional)

Instructions
 

  • Preheat your oven to 325°F (163°C) and prepare a muffin tin by lining it with cupcake liners to prevent the cheesecakes from sticking.
  • In a medium mixing bowl, combine the graham cracker crumbs, 2 tablespoons of granulated sugar, and the melted unsalted butter. Stir the mixture thoroughly until all the crumbs are evenly coated in butter.
  • Take about 1 tablespoon of the crust mixture and scoop it into each cupcake liner. Use the back of a spoon to press the crust mixture firmly and evenly into the bottom of each liner, ensuring a solid base for the cheesecakes.
  • In a large mixing bowl, use an electric mixer to beat the softened cream cheese until it’s smooth and creamy. Gradually add in 1/2 cup of granulated sugar, mixing well after each addition to ensure the mixture is smooth.
  • Next, blend in the sour cream until it’s fully incorporated. Then, one at a time, add the eggs, ensuring to mix thoroughly after each addition. Finally, add the pure vanilla extract and lemon zest (if using), mixing until your batter is silky smooth.
  • Carefully pour the cheesecake batter over the prepared crust in each muffin liner, filling each about 3/4 full to allow room for rising.
  • Place the muffin tin in the preheated oven and bake for 18-20 minutes, or until the edges are set but the centers remain slightly jiggly.
  • Once done baking, remove the cheesecakes from the oven and let them cool in the tin for approximately 10 minutes. Afterward, gently transfer them to a wire rack to cool completely.
  • Once cooled, refrigerate the mini cheesecakes for a minimum of 4 hours, or preferably overnight.
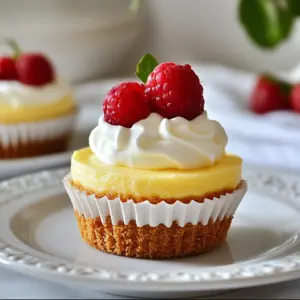
  • Before serving, elevate these delightful mini cheesecakes by topping them with a dollop of whipped cream, fresh berries, or drizzling your favorite fruit sauce over them for an irresistible finish.

Notes

Chill overnight for best results.
Keyword cheesecake, mini desserts, New York cheesecake