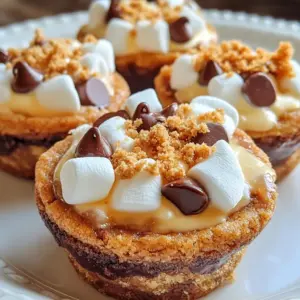
Go Back
To make s'mores cookie cups, gather these key items: - 1 cup all-purpose flour - 1/2 teaspoon baking soda - 1/4 teaspoon salt - 1/2 cup unsalted butter, softened - 1/2 cup granulated sugar - 1/2 cup brown sugar, packed - 1 large egg - 1 teaspoon pure vanilla extract - 1 cup graham cracker crumbs - 1 cup semi-sweet or milk chocolate chips - 1 cup mini marshmallows - Additional graham cracker crumbs for garnish You can swap some ingredients if needed. Here are some ideas: - Use coconut flour for a gluten-free option. - Substitute vegan butter for a dairy-free version. - Replace granulated sugar with coconut sugar for a healthier choice. - You can use egg replacers like flaxseed meal or applesauce if you need to avoid eggs. - For a different flavor, try white chocolate chips instead of semi-sweet. These swaps can fit many dietary needs while still keeping your cookie cups tasty! To make these treats, you’ll need a few basic tools: - Standard muffin tin - Mixing bowls (1 large and 1 small) - Electric mixer or whisk - Spatula for folding - Measuring cups and spoons - Baking sheet for cooling Having these items ready will help your baking go smoothly. {{ingredient_image_2}} Start by setting your oven to 350°F (175°C). This is the perfect temperature for baking. Next, take a standard muffin tin and lightly grease each cup. This step helps the cookie cups pop out easily once baked. In a large bowl, combine 1/2 cup of softened unsalted butter, 1/2 cup of granulated sugar, and 1/2 cup of brown sugar. Use an electric mixer to mix these on medium speed. Keep mixing until the mix looks light and fluffy. This usually takes about two minutes. Now, add 1 large egg and 1 teaspoon of pure vanilla extract. Beat these in well until the mix is smooth. In a small bowl, whisk together 1 cup of all-purpose flour, 1/2 teaspoon of baking soda, and 1/4 teaspoon of salt. Once mixed, slowly add this dry mix into the wet ingredients. Use low speed to combine them. Mix just until you see no dry flour. Next, gently fold in 1 cup of graham cracker crumbs and 1 cup of chocolate chips. Make sure they are well mixed. Scoop about a tablespoon of dough into each muffin tin cup. Press down lightly to form a base. Place the muffin tin in the oven and bake for about 10 minutes. You want the edges to turn lightly golden brown. After baking, take the muffin tin out of the oven. Immediately press a few mini marshmallows into the center of each cookie cup. They should sink slightly into the warm cookie. Put the tin back in the oven for another 3-4 minutes. Watch for the marshmallows to puff up and turn a nice golden brown. This step makes them gooey and delicious! To keep your cookie cups soft, avoid overmixing the dough. When you add dry ingredients, mix until you see no flour. Stop as soon as it comes together. Overmixing can make the cookie cups tough. Trust me, a gentle touch makes all the difference in texture. Baking time is key for the right texture. Bake for about 10 minutes first. Look for edges that are light brown. Then, add marshmallows and bake for another 3-4 minutes. You want them puffed and golden. Keep an eye on them, as ovens can vary. Timing can change the whole treat! Cooling is just as important as baking. Let the cookie cups cool in the pan for 10 minutes. This helps them set and prevents crumbling. After that, move them to a wire rack. This allows air to flow, which keeps them from getting soggy. Enjoy the perfect texture with these simple cooling tips! Pro Tips Chill the Dough: For a thicker cookie cup, chill the dough in the refrigerator for about 30 minutes before scooping it into the muffin tin. Use Fresh Marshmallows: For the best texture and flavor, use fresh mini marshmallows. Stale marshmallows can result in a chewy, less appealing finish. Experiment with Chocolate: Try using different types of chocolate chips, such as dark chocolate or white chocolate, to customize the flavor of your cookie cups. Presentation Matters: Consider garnishing with chocolate drizzle or extra graham cracker crumbs for an eye-catching presentation that enhances the s'mores theme. {{image_4}} You can easily switch the type of chocolate in your S’mores cookie cups. Try using dark chocolate for a richer taste. If you love milk chocolate, that works too! You can even use white chocolate for a fun twist. Each chocolate type gives a new flavor to the cups. You can mix and match to find your favorite. Adding flavors can make your cookie cups even better. Nutella adds a creamy, hazelnut taste. Just spoon a little into the center before baking. Peanut butter is another great choice. You can use it in the dough or add a dollop in the middle. Don't forget to try caramel for an extra sweet touch. Each addition brings a new layer of fun! You can change your cookie cups for holidays. In winter, add peppermint extract to the dough for a festive touch. Top with crushed candy canes for some crunch. In fall, mix in pumpkin spice for a cozy flavor. You can use different toppings for each season. This keeps your treats exciting all year round! To keep your S’mores cookie cups fresh, store them in an airtight container. Place parchment paper between layers to prevent sticking. These treats will last for about 3 to 5 days on the counter. If you want to keep them longer, consider refrigeration. This will help them stay soft and tasty. If your cookie cups lose their softness, you can easily bring them back to life. Just place them in the microwave for 10-15 seconds. This will warm them up and make them gooey again. Be careful not to overheat. You want them warm, not hot. To enjoy these cookie cups later, freezing is a great option. First, let them cool completely. Then, wrap each cookie cup in plastic wrap. After that, put them in a freezer-safe bag or container. They can last up to three months in the freezer. When you're ready to eat, just thaw them in the fridge or at room temperature. Reheat if you like them warm! Yes, you can make these cookie cups gluten-free. Use a gluten-free flour blend instead of all-purpose flour. The texture will still be nice and chewy. Just check that your other ingredients are also gluten-free. These cookie cups last about 3 to 4 days when stored in an airtight container. They taste best fresh but still hold up well for a few days. If you can’t find mini marshmallows, you can use regular marshmallows. Just cut them into smaller pieces. You can also try using marshmallow fluff for a different texture. Yes, you can prepare the dough in advance. Just wrap it tightly in plastic wrap and store it in the fridge for up to 2 days. When ready, scoop and bake as normal. To get the marshmallows perfectly toasted, watch them closely while baking. They should puff up and turn golden. Bake for 3 to 4 minutes after pressing them into the cups. In this post, we explored making delicious cookie cups. We covered essential ingredients, equipment, and step-by-step instructions. I shared tips to avoid mistakes and suggestions for tasty variations. After baking, I explained the best ways to store cookie cups for later enjoyment. Now, you can enjoy these treats anytime! Get creative with flavors and storage. Happy baking!

S’mores Cookie Cups

Delicious cookie cups filled with chocolate and marshmallows, reminiscent of classic s'mores.
Course Dessert
Cuisine American
Servings 12
Calories 150 kcal

Ingredients
  

  • 1 cup all-purpose flour
  • 1/2 teaspoon baking soda
  • 1/4 teaspoon salt
  • 1/2 cup unsalted butter, softened to room temperature
  • 1/2 cup granulated sugar
  • 1/2 cup brown sugar, packed firmly
  • 1 large egg
  • 1 teaspoon pure vanilla extract
  • 1 cup graham cracker crumbs
  • 1 cup semi-sweet or milk chocolate chips
  • 1 cup mini marshmallows
  • to taste additional graham cracker crumbs for garnishing

Instructions
 

  • Begin by preheating your oven to 350°F (175°C). Lightly grease a standard muffin tin to prevent sticking.
  • In a small mixing bowl, whisk together the all-purpose flour, baking soda, and salt until well combined. Set this mixture aside for later use.
  • In a larger mixing bowl, combine the softened butter, granulated sugar, and brown sugar. Using an electric mixer, cream these ingredients together on medium speed until the mixture is light, fluffy, and pale in color.
  • Add in the egg and vanilla extract, beating until fully combined and the mixture is smooth.
  • Slowly introduce the dry ingredient mixture into the wet ingredients, mixing on low speed until just combined—be careful not to overmix.
  • Gently fold in the graham cracker crumbs and chocolate chips using a spatula, ensuring an even distribution throughout the dough.
  • Using a tablespoon, scoop out the dough and place approximately one tablespoon into each muffin tin cup. Press down lightly with your fingers to form a base.
  • Place the muffin tin in the preheated oven and bake for about 10 minutes, or until the edges of the cookie cups are lightly golden brown.
  • Once baked, remove the pan from the oven and immediately press a few mini marshmallows into the center of each cookie cup, allowing them to sink slightly.
  • Return the muffin tin to the oven and bake for an additional 3-4 minutes, or until the marshmallows are puffed up and beautifully toasted.
  • Allow the cookie cups to cool in the pan for about 10 minutes, then carefully transfer them to a wire rack for further cooling.
  • Once the cookie cups are completely cooled, generously sprinkle additional graham cracker crumbs on top to enhance both texture and presentation.

Notes

Serve warm for a gooey experience. Drizzle melted chocolate for an extra touch.
Keyword cookies, dessert, s'mores