Go Back
For the best flavor, use ripe strawberries. You need 2 cups of fresh strawberries, hulled and sliced. Hulling means removing the green tops. Slicing them helps release their sweet juices. To enhance their taste, sprinkle 1/4 cup of granulated sugar over the strawberries. Mix them gently and let them sit for 15 minutes. This step, known as macerating, creates a lovely syrup. Next, we need the cream! Use 1 cup of heavy whipping cream for a fluffy texture. Add 1/4 cup of powdered sugar to sweeten it. Don’t forget 1 teaspoon of vanilla extract for flavor. Whip these ingredients until soft peaks form. Be careful not to over-mix. You want the cream light and airy. For the trifle base, use 1 pound of store-bought pound cake. Cut it into cubes to make layers easy. You also need 1 cup of Greek yogurt. This adds a nice tang and creaminess. Combine the Greek yogurt with half of the whipped cream. Gently fold them together until smooth. This mixture will bring a lightness to the layers. With these ingredients ready, you can create a beautiful trifle that will impress everyone! To start, you need fresh strawberries. Hull and slice them thinly. In a medium bowl, mix the strawberries with granulated sugar. Toss them gently to coat. Let them sit for 15 minutes. This helps the strawberries release their juices. The result is a sweet syrup that adds flavor to the trifle. While your strawberries are macerating, grab another bowl. Pour in 1 cup of heavy whipping cream. Add 1/4 cup of powdered sugar and 1 teaspoon of vanilla extract. Use an electric mixer to beat the mixture. Mix at medium speed until soft peaks form. Be careful not to over-mix. You want your cream to stay light and fluffy. Next, take a new bowl and combine 1 cup of Greek yogurt with half of your whipped cream. Use a spatula to fold the whipped cream into the yogurt. Do this gently until it's well mixed. This creates a light and airy cream that adds a nice texture to your trifle. Now it's time to assemble. Choose a large trifle bowl or individual glasses. Start with a layer of pound cake cubes at the bottom. Use about a third of the cake for this layer. This base helps soak up the juices from the strawberries. Next, add a layer of your macerated strawberries along with their juices. After that, spoon in a layer of the yogurt and whipped cream mixture. Repeat the layers. Alternate between pound cake, strawberries, and cream until all ingredients are used. The top layer should be the remaining whipped cream mixture for a pretty look. For a beautiful finish, decorate the top with more sliced strawberries. Arrange them nicely and sprinkle some fresh mint leaves on top. This adds color and a hint of freshness to your trifle. Cover the assembled trifle with plastic wrap and place it in the fridge. Let it chill for at least 1 hour before serving. This helps the flavors blend together nicely. Each bite will be a delicious treat! To whip cream well, start with cold tools. Use a cold mixing bowl and beaters. Cold cream whips faster and stays fluffy. Pour in 1 cup of heavy whipping cream, 1/4 cup powdered sugar, and 1 teaspoon vanilla extract. Mix on medium speed. Watch for soft peaks to form. Stop mixing when you see peaks hold their shape. Over-mixing makes the cream grainy. Layering makes the trifle appealing. Begin with a layer of pound cake cubes at the base. Use about one-third of the cake for this layer. Next, add a layer of macerated strawberries with their juices. Spoon the yogurt and whipped cream mixture on top. Repeat this process until all ingredients are used. Always finish with whipped cream. This creates a lovely top. Presentation matters when serving trifle. Use clear glass dishes. This shows off the layers of strawberries, cake, and cream. For a final touch, place sliced strawberries on top. Add fresh mint leaves for color and a fresh taste. These small details make your trifle look fancy and inviting. {{image_4}} You can swap strawberries for other fruits. Try using blueberries, raspberries, or peaches. Each fruit brings a unique taste. For example, raspberries add a tart flavor. Blueberries offer a sweet burst. Peaches bring a soft, juicy touch. Mix and match fruits for fun combinations. Your trifle will look colorful and taste fresh. You can make a gluten-free version easily. Use gluten-free pound cake instead of regular cake. Many stores sell this option now. You can also make your own from gluten-free flour. This way, everyone can enjoy the treat. Just check the labels to ensure all ingredients are gluten-free, including the whipped cream and yogurt. Want to add a twist? Consider stirring in a splash of almond extract into the cream. It adds a lovely nutty flavor. You can also mix in some lemon zest for a fresh citrus note. If you like chocolate, try adding cocoa powder to the cream. This will give a rich, chocolatey taste. You can also sprinkle nuts or granola between layers for crunch. Each addition makes your trifle unique and fun! To store your strawberry shortcake trifle, cover it well with plastic wrap. Place it in the fridge. The trifle will stay fresh for up to 3 days. Chilling helps the flavors mix, making each bite even better. Keep it away from strong-smelling foods to avoid flavor transfer. I do not recommend freezing the trifle. The whipped cream and yogurt may change texture. If you freeze it, the cake may become soggy when thawed. Instead, save leftovers in the fridge for the best taste and texture. If you have leftovers, serve them in small bowls. This way, everyone can enjoy a tasty treat. If the trifle has been in the fridge for more than 3 days, check it for freshness. Discard any trifle that looks or smells off. Enjoy your sweet creation while it lasts! Yes, you can make this trifle ahead of time. It’s best to assemble it a few hours before you serve. This gives the layers time to blend. The flavors will mix well, making it taste even better. Just remember to cover it tightly with plastic wrap. You can use different types of cake for your trifle. Angel food cake works well and adds a light touch. You can also try sponge cake for a softer bite. Even chocolate cake can create a fun twist. To make a dairy-free trifle, swap the heavy cream with coconut cream. Use dairy-free yogurt instead of Greek yogurt. You can also find dairy-free whipped cream at stores. This way, you keep all the creaminess without dairy. Yes, you can use frozen strawberries. Just make sure to thaw and drain them first. This will help prevent excess water in your trifle. Frozen strawberries may be softer, but they still taste great and add flavor. This blog shared how to make a tasty strawberry shortcake trifle. We discussed fresh strawberries, cream, and cake layers. You learned how to prepare, whip, and assemble ingredients step by step. I offered tips for perfect layers and fun variations. Remember to store your trifle properly to enjoy it longer. Now, you can impress your family and friends with this easy dessert. Enjoy your delicious creation!

Strawberry Shortcake Trifle

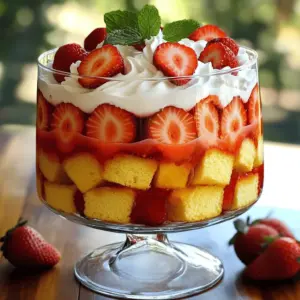
Indulge in a delightful Strawberry Shortcake Trifle that’s perfect for any occasion! This easy recipe combines fresh strawberries, fluffy whipped cream, Greek yogurt, and tender pound cake, creating a layered dessert that’s both beautiful and delicious. In just over an hour, you can impress your guests with this stunning treat. Click through to explore the full recipe and elevate your dessert game today!

Ingredients
  

2 cups fresh strawberries, hulled and sliced

1/4 cup granulated sugar

1 cup heavy whipping cream

1/4 cup powdered sugar

1 teaspoon vanilla extract

1 pound of store-bought pound cake, cut into cubes

1 cup Greek yogurt

Fresh mint leaves, for garnish

Instructions
 

Prepare the Strawberries: Start by hulling the fresh strawberries and slicing them into thin rounds. In a medium-sized mixing bowl, combine the sliced strawberries with the granulated sugar. Gently toss the strawberries in the sugar until they are evenly coated. Allow the mixture to sit for about 15 minutes; this process, known as macerating, will draw out the natural juices of the strawberries, creating a flavorful syrup.

    Whip the Cream: While the strawberries are macerating, take a separate mixing bowl and pour in the heavy whipping cream. Add the powdered sugar and vanilla extract. Using an electric mixer, beat the mixture on medium speed until soft peaks form. Be cautious not to over-mix, as you want the cream to remain light and airy.

      Combine the Cream and Yogurt: In another bowl, combine the Greek yogurt with half of the whipped cream mixture. Using a spatula, gently fold the whipped cream into the yogurt until the two are fully incorporated and you achieve a light, fluffy cream that retains some airiness.

        Assemble the Trifle: Choose a large glass trifle bowl or individual serving glasses for assembly. Start by adding a layer of pound cake cubes at the bottom of the bowl. Use about one-third of the cake for this layer.

          Layer the Ingredients: Next, spoon a layer of the macerated strawberries along with their juices over the pound cake. After that, add a layer of the yogurt and whipped cream mixture. Repeat the layering process, alternating between pound cake, strawberries, and cream mixture until all ingredients are used up. Ensure that the final layer is topped with the remaining whipped cream mixture to create a beautiful presentation.

            Decorate the Top: For an appealing finish, decorate the top layer of your trifle with additional sliced strawberries arranged artfully and scatter a few fresh mint leaves for color and a hint of freshness.

              Chill and Serve: Cover the assembled trifle with plastic wrap and place it in the refrigerator. Allow it to chill for at least 1 hour before serving. This resting period will help the flavors meld beautifully together, making each bite heavenly.

                Prep Time: 20 minutes | Total Time: 1 hour 20 minutes | Servings: 6

                  - Presentation Tips: Serve the trifle in clear glass dishes to beautifully showcase the vibrant layers of strawberries, creamy mixture, and cake. Top each individual serving with a mint leaf for an elegant finishing touch that enhances the dish's overall look and flavor.