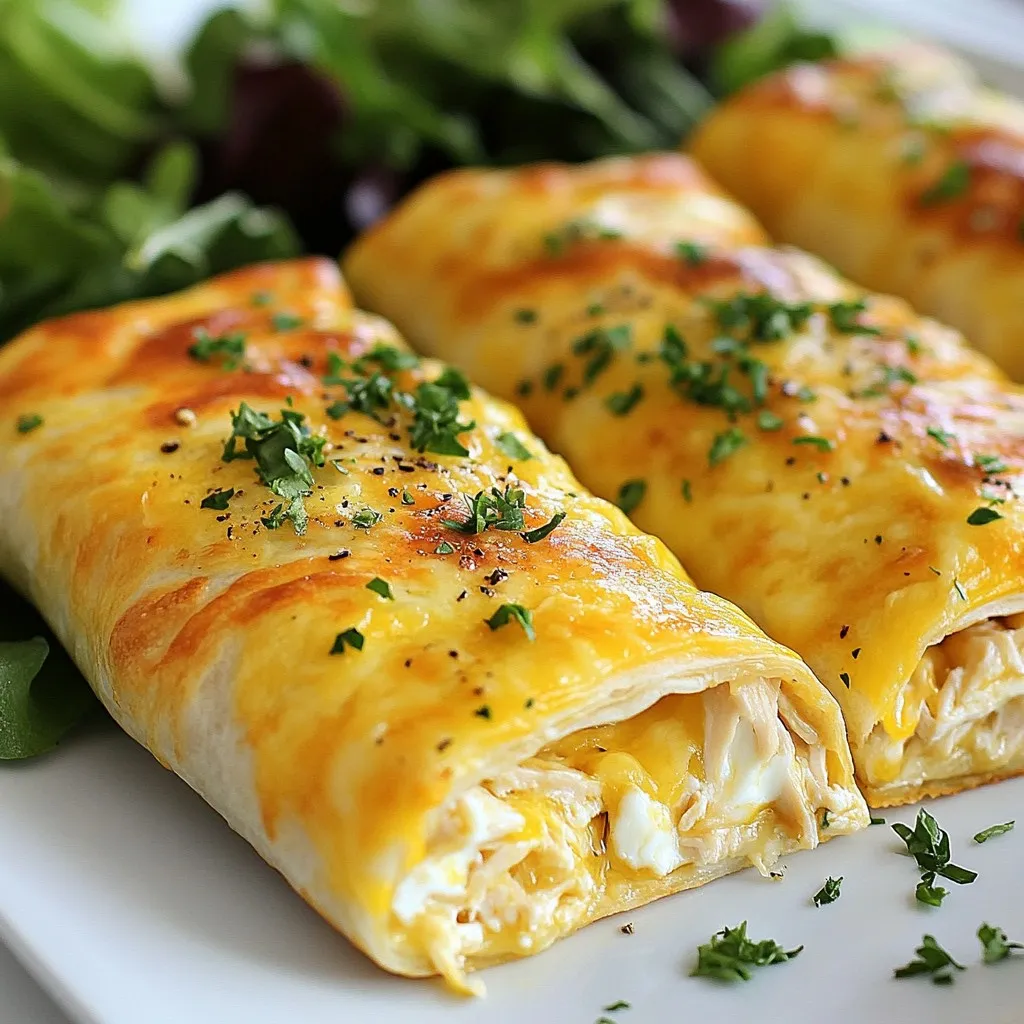
If you’re craving a quick, tasty meal, look no further than cheesy garlic chicken wraps. This easy recipe combines tender chicken, gooey cheese, and zesty garlic, all wrapped in a warm tortilla. Perfect for busy weeknights or casual gatherings, these wraps deliver big on flavor without a hassle. Let me guide you through each step to create this mouthwatering dish that everyone will love!
Why I Love This Recipe
- Quick and Easy: This recipe comes together in just 30 minutes, making it perfect for busy weeknights.
- Cheesy Goodness: The combination of mozzarella and cream cheese creates a rich, creamy filling that’s irresistible.
- Customizable: You can easily swap out ingredients based on what you have on hand, such as different cheeses or vegetables.
- Perfect for Dipping: Serve these wraps with marinara or ranch for an added flavor boost that everyone will love.
Ingredients
Main Ingredients
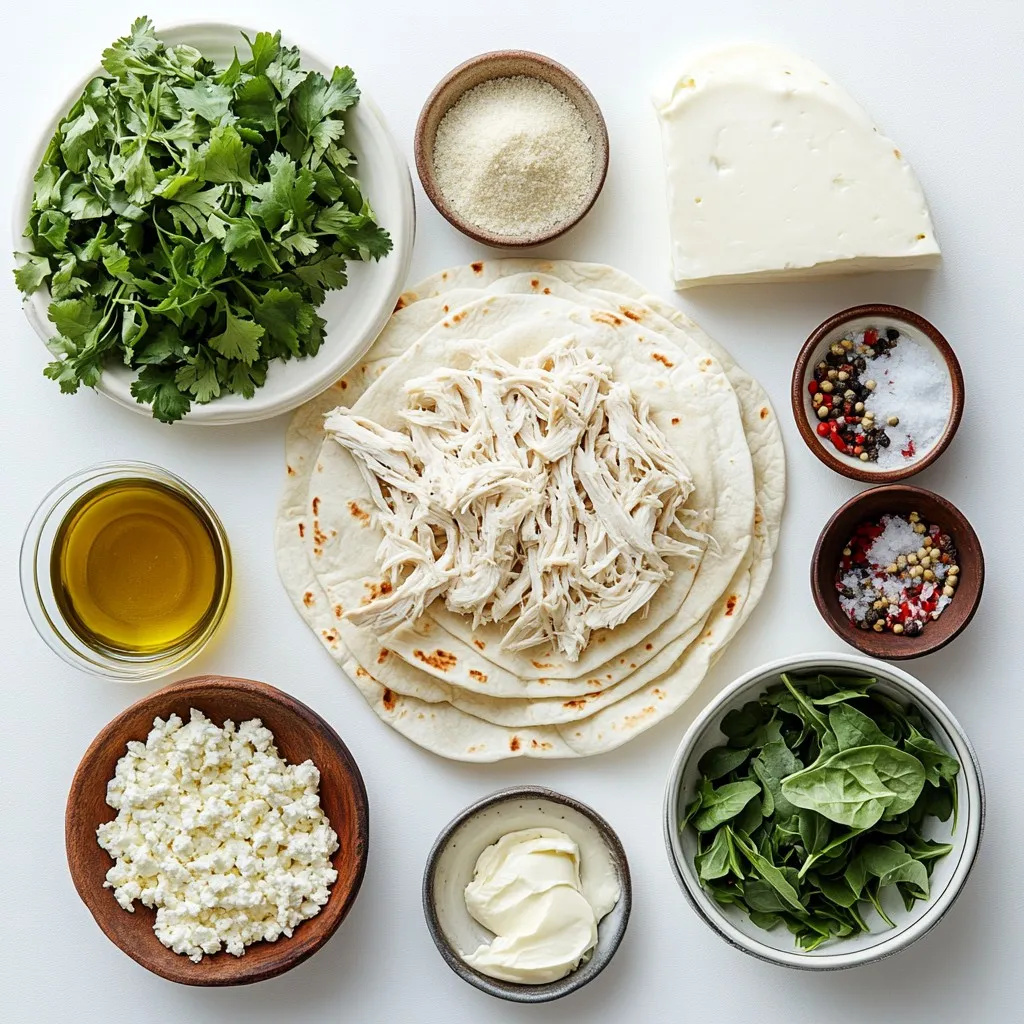
– 2 large chicken breasts, cooked and shredded
– 1 cup shredded mozzarella cheese
– 1/2 cup cream cheese, softened at room temperature
You need cooked chicken for this dish. Shredded chicken helps mix well with the creamy cheeses. Mozzarella gives a nice stretch, while cream cheese adds richness.
Flavor Enhancers
– 3 cloves garlic, minced
– 1/4 cup fresh parsley, finely chopped
– 1 teaspoon garlic powder
– 1 teaspoon onion powder
– Salt and freshly ground pepper, to taste
Garlic brings bold flavor to the wraps. Fresh parsley adds brightness. The garlic powder and onion powder boost taste without extra effort. Season with salt and pepper to make everything pop.
Wrapping Essentials
– 4 large tortillas (flour or whole wheat)
– 1 cup mixed greens (baby spinach and arugula)
– Olive oil, for cooking
Choose tortillas that fit your diet. Flour is soft, while whole wheat adds health benefits. Mixed greens give a fresh crunch. Olive oil helps crisp the outside of the wraps.
Step-by-Step Instructions
Preparation Steps
– In a large bowl, mix the shredded chicken with the cheeses, garlic, and herbs.
– Add salt and pepper to taste. Stir until smooth.
– Preheat your skillet over low heat.
– Heat the tortillas for a few seconds on each side in the skillet or microwave.
Assembly Instructions
– Lay a tortilla flat on a clean surface.
– Spoon a good amount of the cheesy chicken mixture onto the center.
– Add a handful of mixed greens on top for a fresh crunch.
– Fold in the sides of the tortilla.
– Starting from the bottom, roll it up tightly to secure the filling.
Cooking Method
– Drizzle olive oil in the hot skillet.
– Place the wraps seam side down in the skillet.
– Cook for 2-3 minutes until golden and crispy.
– Flip and cook the other side for another 2-3 minutes.
– Remove the wraps and let them cool for a minute.
– Slice the wraps in half diagonally to serve.
Tips & Tricks
Cooking Tips
Preheating your skillet is key. When you heat it first, it helps cook the wraps evenly. This step makes sure the outside gets crispy, while the inside stays warm and melted.
To get the perfect crispy texture, use medium heat. If it’s too low, they may not brown well. If it’s too high, you risk burning the outside before the inside warms up. Remember to flip them carefully, so both sides get that golden touch.
Serving Suggestions
For sides, try fresh veggies or a light salad. A simple green salad pairs well. You can also serve these wraps with dips like marinara sauce or ranch dressing. They add extra flavor and fun.
When presenting your wraps, think about the colors. Place them on a bright plate or a wooden board. This makes the meal look more inviting. A sprinkle of fresh parsley on top adds a nice touch too.
Common Mistakes to Avoid
One common mistake is overfilling the wraps. If you add too much filling, they can burst when cooking. Stick to a generous spoonful to keep things neat.
Another mistake is cooking on too high of heat. This can burn the wraps quickly. Always start at medium heat and adjust as needed. Enjoy cooking your Cheesy Garlic Chicken Wraps!
Pro Tips
- Mix It Up: Feel free to customize the filling by adding your favorite vegetables like bell peppers or mushrooms for extra flavor and nutrition.
- Perfectly Golden: To achieve a perfectly golden and crispy wrap, ensure your skillet is adequately heated before adding the wraps.
- Keep It Fresh: Use fresh herbs like basil or cilantro in place of parsley for a different flavor profile that complements the cheesy filling beautifully.
- Storage Solutions: If you have leftovers, wrap them tightly in foil or plastic wrap and refrigerate. They can be reheated in a skillet for a quick meal!
Variations
Ingredient Swaps
You can easily change the cheese in this recipe. Try using cheddar for a sharper taste. Pepper jack adds a spicy kick. You can also switch the protein. Turkey works well if you want a lighter option. For a vegetarian twist, use tofu as your main protein. Just make sure to press it before cooking to remove excess water.
Flavor Additions
To spice things up, add some jalapeños or a dash of hot sauce. This adds heat and excitement. You might also want to include extra veggies. Bell peppers add color and crunch. Corn brings natural sweetness that pairs well with the garlic. Feel free to mix and match based on your taste.
Serving Style Changes
If you prefer something different, turn your wrap into a burrito bowl. Just layer the ingredients in a bowl instead of a tortilla. Another great option is to make a salad wrap. Use lettuce leaves instead of tortillas for a fresh, low-carb choice. If you need gluten-free options, look for gluten-free tortillas. They work just as well and keep the meal tasty.
Storage Info
Short-Term Storage
To keep your Cheesy Garlic Chicken Wraps fresh, refrigerate them. Wrap each one tightly in plastic wrap. This helps prevent them from drying out. Place the wrapped wraps in an airtight container. This keeps smells and moisture away.
Long-Term Options
If you want to save wraps for later, you can freeze them. Make sure they are fully cooled before freezing. Wrap each wrap in plastic wrap and then in foil. This extra layer helps avoid freezer burn. You can keep them in the freezer for up to three months. To reheat, let them thaw in the fridge overnight for best results.
Reheating Tips
The best way to reheat wraps is in a skillet. Heat a little olive oil over medium heat. Place the wrap in the skillet for about 2-3 minutes on each side. This keeps the outside crispy and the inside warm. Always check the center is hot before serving. If using a microwave, cover with a damp paper towel. This helps keep it moist. Heat in short bursts to avoid sogginess.
FAQs
How do I make Cheesy Garlic Chicken Wraps ahead of time?
You can make these wraps ahead of time. Start by preparing the filling. Mix the chicken, cheeses, garlic, parsley, and spices in a bowl. Next, fill the tortillas. Roll them tightly. Wrap each one in plastic wrap. Place them in the fridge for up to two days. For longer storage, freeze them. Just make sure to wrap them well. When you’re ready, thaw and cook them as directed.
Can I substitute other meats in this recipe?
Yes, you can. Try using turkey or pork instead of chicken. Shredded rotisserie chicken works well, too. If you want a plant-based option, use tofu or tempeh. Each choice will give a different taste but can work nicely in this wrap.
What can I serve with Cheesy Garlic Chicken Wraps?
These wraps pair well with many sides. Serve them with a fresh salad or crispy fries. Dips like ranch or marinara add fun flavors. You could also try guacamole or salsa for a twist. A side of mixed veggies would be great, too!
You now know all the steps to make Cheesy Garlic Chicken Wraps. From gathering ingredients to cooking, every detail matters. Remember to preheat your skillet for that perfect crunch. Don’t hesitate to try different flavors or ingredients. This recipe is all about making it yours. Enjoy your wraps with tasty sides or dips for the full experience. Now, go ahead and make your meal special! Your kitchen adventure starts her