How to Make Gourmet Caramel Apples Effortlessly

WANT TO SAVE THIS RECIPE?

If you crave the sweet joy of gourmet caramel apples, you’re in the right place! I’ll show you how to make these tasty treats easily. With the right apples and toppings, your caramel apples can shine. From choosing the best ingredients to adding fun flavors, I’ll guide you step-by-step. Get ready to impress friends and family with your delicious creations. Let’s dive in and make caramel magic happen!

Ingredients

Required Ingredients for Gourmet Caramel Apples

To make gourmet caramel apples, you need a few key ingredients:

– 4 medium-sized Granny Smith apples

– 2 cups granulated sugar

– 1 cup light corn syrup

– 1/2 cup unsalted butter

– 1 cup sweetened condensed milk

– 1 teaspoon pure vanilla extract

– 1/2 teaspoon fine sea salt

– 4 popsicle sticks (one for each apple)

These Granny Smith apples give a nice tartness that pairs well with the sweet caramel.

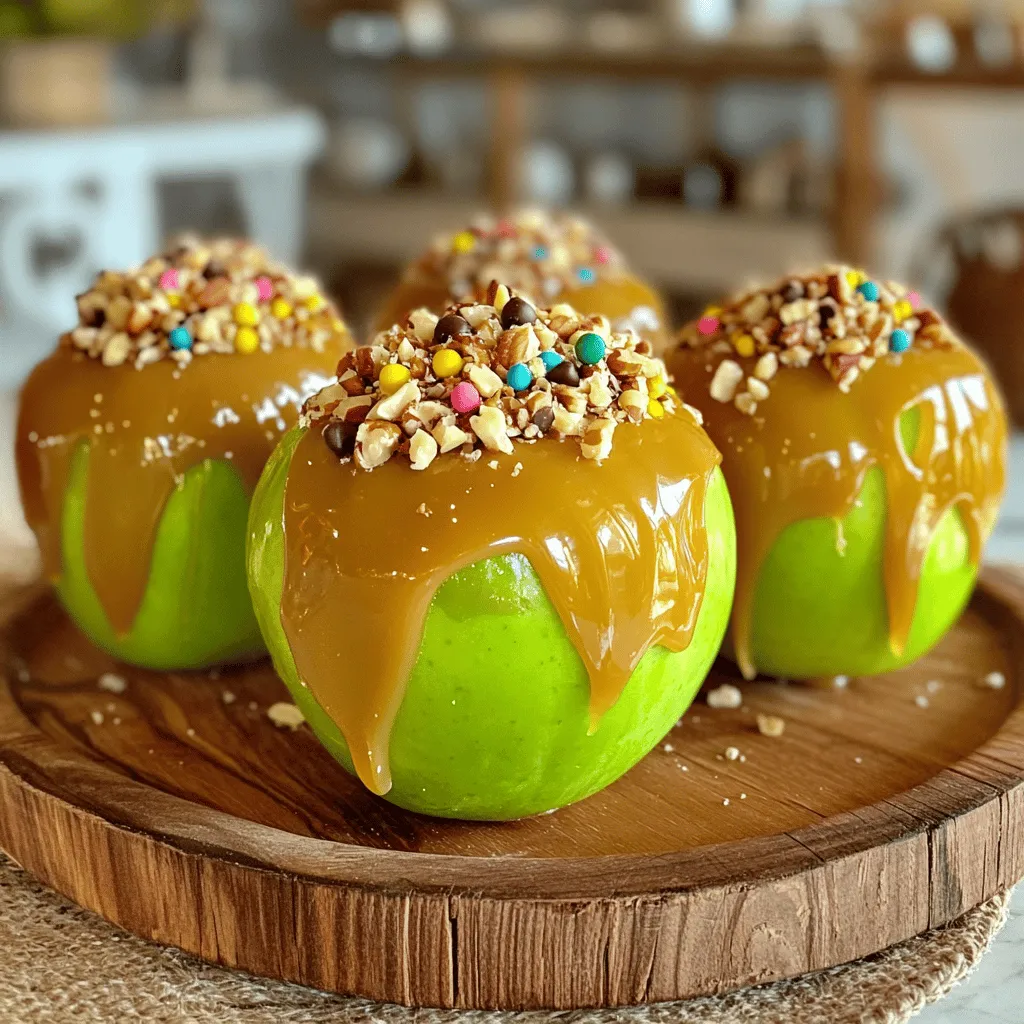
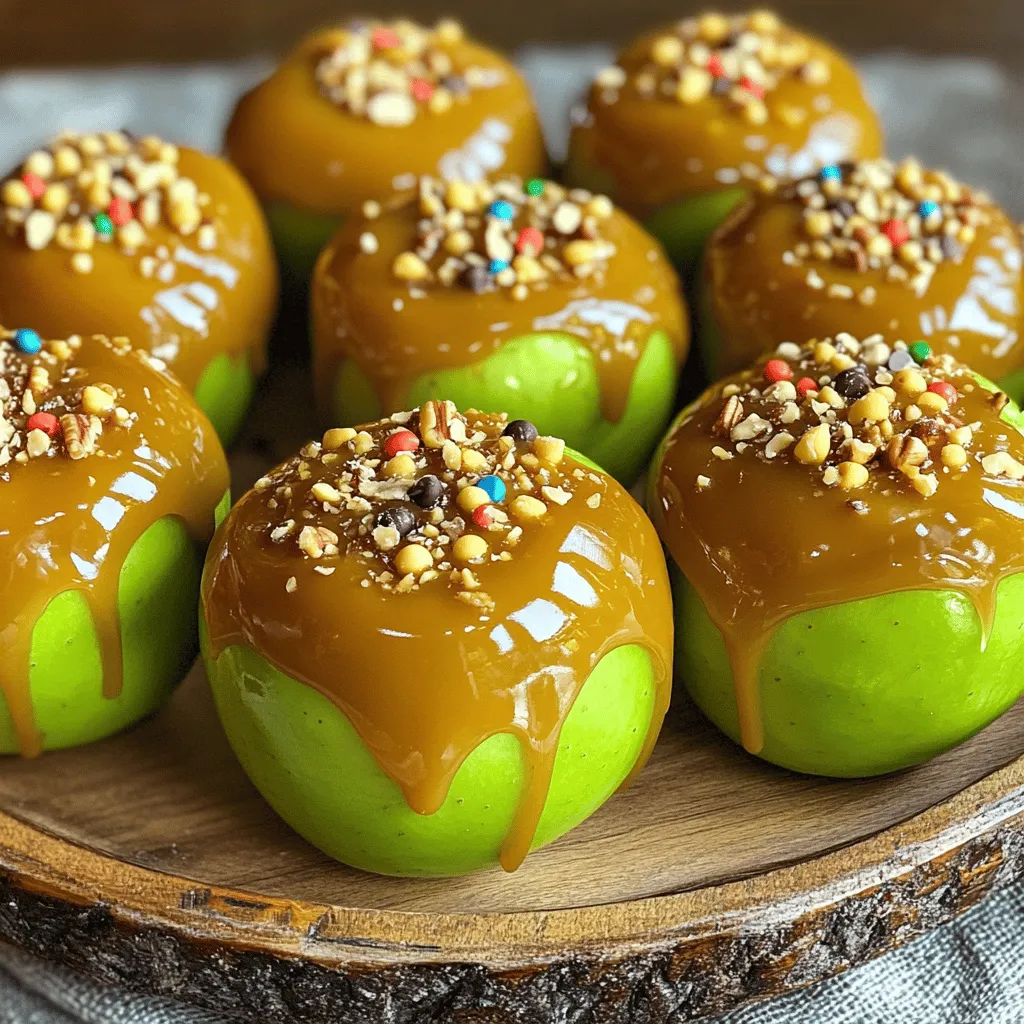
Optional Toppings to Elevate Your Caramel Apples

You can get creative with toppings to make your apples even better. Some great options include:

– Crushed nuts (like pecans or walnuts)

– Mini chocolate chips

– Colorful sprinkles

– Shredded coconut

Choose toppings that you love. This adds fun flavors and textures to each bite.

Tips for Choosing the Best Apples and Caramel

When picking apples, look for firm, fresh ones. They should have a nice color and no blemishes. Granny Smith apples are great for this recipe, but you can try others too. Just make sure they are crisp.

For caramel, homemade is best. It tastes rich and creamy. However, you can use store-bought caramel if you’re short on time. If you do, check the label to ensure it melts well.

Follow these tips for delicious results. You can find the Full Recipe above for all the steps!

Step-by-Step Instructions

Preparing the Apples

Start by washing the apples well. This removes any wax or dirt. After washing, dry each apple with a clean paper towel. Next, take a popsicle stick and insert it into the stem end of each apple. Push it in halfway. This helps the apple stay steady when you dip it.

Making the Caramel Sauce

To make the caramel, grab a medium-sized saucepan. Combine the granulated sugar, light corn syrup, unsalted butter, and sweetened condensed milk in it. Place the saucepan over medium heat. Stir the mix constantly as it heats. You want it to come to a gentle boil. Keep stirring for about 5-7 minutes. Watch as the caramel turns a deep golden color. This means it is ready.

Once it reaches that color, remove the pan from heat. Carefully stir in the vanilla extract and fine sea salt. Be cautious; the mix may bubble up a bit. Stir until everything is well combined.

Dipping and Decorating the Apples

Now it’s time to dip. Take each prepared apple and dip it into the warm caramel sauce. Rotate the apple to cover it evenly. Let any extra caramel drip back into the pan. After that, transfer the apple to the baking sheet.

While the caramel is still warm, add your favorite toppings. You can use crushed nuts, mini chocolate chips, or colorful sprinkles. Be creative with your choices! Once all the apples are coated, let them cool at room temperature for about 30 minutes. They are ready when the caramel is no longer tacky.

For the full recipe, check the [Full Recipe].

Tips & Tricks

How to Prevent Caramel from Burning

To avoid burning your caramel, use a heavy-bottomed saucepan. This helps distribute heat evenly. Always stir the mixture constantly as it heats. When the caramel starts to bubble, lower the heat slightly. Keep a close eye on the color. You want a deep golden hue, not dark brown.

Best Practices for Applying Toppings

When adding toppings, do it while the caramel is warm. The warmth helps the toppings stick better. Use your hands or a spoon to press toppings onto the caramel. Be creative! You can mix and match toppings like nuts, chocolate chips, and sprinkles. Try to cover the apple evenly for a nice look.

Troubleshooting Common Issues

If your caramel is too thick, add a splash of water and stir. If it’s too runny, let it cook a bit longer. If the caramel doesn’t stick to the apple, it might be too cold. Warm the apple slightly before dipping. If you have leftover caramel, pour it onto wax paper to set. You can break it into pieces later for treats.

For the complete recipe, check the Full Recipe section.

Variations

Unique Flavor Combinations to Try

You can mix flavors to make your caramel apples special. Try adding spices like cinnamon or nutmeg to your caramel. For a fruity twist, add orange or lemon zest. You can also infuse your caramel with coffee or espresso for a rich taste. Pairing caramel with sea salt and dark chocolate creates a sweet and salty balance. Each bite will surprise your taste buds!

Seasonal Toppings for Holiday-Themed Caramel Apples

Seasonal toppings can make your caramel apples festive. For Halloween, use crushed Oreos for a spooky look. In fall, sprinkle pumpkin spice and chopped pecans. For winter, try white chocolate drizzle and crushed candy canes. Around Valentine’s Day, add pink sprinkles or heart-shaped candies. Each season brings a chance to be creative and enjoy new flavors!

Alternative Caramel Recipes for Different Diets

If you follow a special diet, you can still enjoy caramel apples. For vegan options, use coconut cream and maple syrup instead of butter and cream. For sugar-free caramel, try using erythritol or monk fruit sweetener. These alternatives keep the sweet flavor while fitting your needs. Cooking for different diets means everyone can join in the fun of enjoying gourmet caramel apples!

Storage Information

How to Store Gourmet Caramel Apples

To store your gourmet caramel apples, place them in a cool, dry area. Use a tray lined with parchment paper or wax paper. Avoid stacking them to prevent sticking. If you have leftovers, wrap each apple in plastic wrap. This keeps them fresh and helps avoid moisture.

Best Practices for Maintaining Freshness

Keep your caramel apples away from heat and sunlight. A fridge can help, but wrap them well. Use a container that allows airflow. This keeps the caramel from becoming too hard or sticky. For extra crunch, store them with a paper towel to absorb moisture.

Shelf Life of Homemade Caramel Apples

Homemade caramel apples last about 2 to 3 days at room temperature. In the fridge, they can stay fresh for up to a week. After this time, the apples may start to lose their crispness. The caramel can also become too hard if stored too long. Enjoy them while they are fresh for the best taste!

FAQs

How to make caramel for caramel apples?

To make caramel for your apples, you need a few basic ingredients. You will mix granulated sugar, light corn syrup, unsalted butter, and sweetened condensed milk. Heat them in a medium saucepan over medium heat. Stir constantly until combined. Allow the mixture to boil gently. Keep stirring until it turns a deep golden color, about 5-7 minutes. This color shows it’s ready for dipping. Remove it from heat and mix in vanilla extract and sea salt. That’s how you create rich, smooth caramel.

Can I use store-bought caramel for this recipe?

Yes, you can use store-bought caramel. It saves time and is easy to use. Look for caramel candies that melt well. Simply follow the package instructions to melt the caramel. This option works well if you want a quick treat. However, homemade caramel adds a richer flavor that many prefer.

How do I keep caramel apples from sticking together?

To prevent caramel apples from sticking, allow them to cool on a parchment-lined baking sheet. Make sure the caramel sets for at least 30 minutes. If you plan to stack them, place a piece of wax paper between each apple. This keeps them from touching. Storing them in a cool, dry place also helps maintain their shape. Avoid humid areas to keep the caramel firm.

Gourmet caramel apples are fun to make and enjoy. We covered the key ingredients and optional toppings, plus tips for the best apples and caramel. I shared step-by-step instructions for preparation and decoration. You learned tricks to prevent burning and common issues. Explore variations, seasonal toppings, and recipes to suit different diets. Finally, we looked at how to store your treats properly. Enjoy making and sharing these delicious caramel apples!

To make gourmet caramel apples, you need a few key ingredients: - 4 medium-sized Granny Smith apples - 2 cups granulated sugar - 1 cup light corn syrup - 1/2 cup unsalted butter - 1 cup sweetened condensed milk - 1 teaspoon pure vanilla extract - 1/2 teaspoon fine sea salt - 4 popsicle sticks (one for each apple) These Granny Smith apples give a nice tartness that pairs well with the sweet caramel. You can get creative with toppings to make your apples even better. Some great options include: - Crushed nuts (like pecans or walnuts) - Mini chocolate chips - Colorful sprinkles - Shredded coconut Choose toppings that you love. This adds fun flavors and textures to each bite. When picking apples, look for firm, fresh ones. They should have a nice color and no blemishes. Granny Smith apples are great for this recipe, but you can try others too. Just make sure they are crisp. For caramel, homemade is best. It tastes rich and creamy. However, you can use store-bought caramel if you’re short on time. If you do, check the label to ensure it melts well. Follow these tips for delicious results. You can find the Full Recipe above for all the steps! Start by washing the apples well. This removes any wax or dirt. After washing, dry each apple with a clean paper towel. Next, take a popsicle stick and insert it into the stem end of each apple. Push it in halfway. This helps the apple stay steady when you dip it. To make the caramel, grab a medium-sized saucepan. Combine the granulated sugar, light corn syrup, unsalted butter, and sweetened condensed milk in it. Place the saucepan over medium heat. Stir the mix constantly as it heats. You want it to come to a gentle boil. Keep stirring for about 5-7 minutes. Watch as the caramel turns a deep golden color. This means it is ready. Once it reaches that color, remove the pan from heat. Carefully stir in the vanilla extract and fine sea salt. Be cautious; the mix may bubble up a bit. Stir until everything is well combined. Now it’s time to dip. Take each prepared apple and dip it into the warm caramel sauce. Rotate the apple to cover it evenly. Let any extra caramel drip back into the pan. After that, transfer the apple to the baking sheet. While the caramel is still warm, add your favorite toppings. You can use crushed nuts, mini chocolate chips, or colorful sprinkles. Be creative with your choices! Once all the apples are coated, let them cool at room temperature for about 30 minutes. They are ready when the caramel is no longer tacky. For the full recipe, check the [Full Recipe]. To avoid burning your caramel, use a heavy-bottomed saucepan. This helps distribute heat evenly. Always stir the mixture constantly as it heats. When the caramel starts to bubble, lower the heat slightly. Keep a close eye on the color. You want a deep golden hue, not dark brown. When adding toppings, do it while the caramel is warm. The warmth helps the toppings stick better. Use your hands or a spoon to press toppings onto the caramel. Be creative! You can mix and match toppings like nuts, chocolate chips, and sprinkles. Try to cover the apple evenly for a nice look. If your caramel is too thick, add a splash of water and stir. If it’s too runny, let it cook a bit longer. If the caramel doesn’t stick to the apple, it might be too cold. Warm the apple slightly before dipping. If you have leftover caramel, pour it onto wax paper to set. You can break it into pieces later for treats. For the complete recipe, check the Full Recipe section. {{image_4}} You can mix flavors to make your caramel apples special. Try adding spices like cinnamon or nutmeg to your caramel. For a fruity twist, add orange or lemon zest. You can also infuse your caramel with coffee or espresso for a rich taste. Pairing caramel with sea salt and dark chocolate creates a sweet and salty balance. Each bite will surprise your taste buds! Seasonal toppings can make your caramel apples festive. For Halloween, use crushed Oreos for a spooky look. In fall, sprinkle pumpkin spice and chopped pecans. For winter, try white chocolate drizzle and crushed candy canes. Around Valentine's Day, add pink sprinkles or heart-shaped candies. Each season brings a chance to be creative and enjoy new flavors! If you follow a special diet, you can still enjoy caramel apples. For vegan options, use coconut cream and maple syrup instead of butter and cream. For sugar-free caramel, try using erythritol or monk fruit sweetener. These alternatives keep the sweet flavor while fitting your needs. Cooking for different diets means everyone can join in the fun of enjoying gourmet caramel apples! To store your gourmet caramel apples, place them in a cool, dry area. Use a tray lined with parchment paper or wax paper. Avoid stacking them to prevent sticking. If you have leftovers, wrap each apple in plastic wrap. This keeps them fresh and helps avoid moisture. Keep your caramel apples away from heat and sunlight. A fridge can help, but wrap them well. Use a container that allows airflow. This keeps the caramel from becoming too hard or sticky. For extra crunch, store them with a paper towel to absorb moisture. Homemade caramel apples last about 2 to 3 days at room temperature. In the fridge, they can stay fresh for up to a week. After this time, the apples may start to lose their crispness. The caramel can also become too hard if stored too long. Enjoy them while they are fresh for the best taste! To make caramel for your apples, you need a few basic ingredients. You will mix granulated sugar, light corn syrup, unsalted butter, and sweetened condensed milk. Heat them in a medium saucepan over medium heat. Stir constantly until combined. Allow the mixture to boil gently. Keep stirring until it turns a deep golden color, about 5-7 minutes. This color shows it's ready for dipping. Remove it from heat and mix in vanilla extract and sea salt. That's how you create rich, smooth caramel. Yes, you can use store-bought caramel. It saves time and is easy to use. Look for caramel candies that melt well. Simply follow the package instructions to melt the caramel. This option works well if you want a quick treat. However, homemade caramel adds a richer flavor that many prefer. To prevent caramel apples from sticking, allow them to cool on a parchment-lined baking sheet. Make sure the caramel sets for at least 30 minutes. If you plan to stack them, place a piece of wax paper between each apple. This keeps them from touching. Storing them in a cool, dry place also helps maintain their shape. Avoid humid areas to keep the caramel firm. Gourmet caramel apples are fun to make and enjoy. We covered the key ingredients and optional toppings, plus tips for the best apples and caramel. I shared step-by-step instructions for preparation and decoration. You learned tricks to prevent burning and common issues. Explore variations, seasonal toppings, and recipes to suit different diets. Finally, we looked at how to store your treats properly. Enjoy making and sharing these delicious caramel apples!

How to Make Gourmet Caramel Apples

Indulge in the deliciousness of gourmet caramel apples with this simple and fun recipe! With just a handful of ingredients, you can create mouthwatering treats perfect for any occasion. Learn how to prep, dip, and decorate your apples with custom toppings like nuts, chocolate chips, and sprinkles. Don’t miss out on making these stunning caramel apples. Click through for the full recipe and tips to impress your loved ones!

Ingredients
  

4 medium-sized Granny Smith apples

2 cups granulated sugar

1 cup light corn syrup

1/2 cup unsalted butter

1 cup sweetened condensed milk

1 teaspoon pure vanilla extract

1/2 teaspoon fine sea salt

Optional toppings: crushed nuts (such as pecans or walnuts), mini chocolate chips, colorful sprinkles, or shredded coconut

4 popsicle sticks (one for each apple)

Instructions
 

Prepare the Apples: Start by washing the apples thoroughly to remove any wax. Pat them dry with a clean paper towel. Carefully insert a popsicle stick into the stem end of each apple, pushing it about halfway in to ensure stability during dipping.

    Set Up Your Work Area: Line a baking sheet with parchment paper or a silicone mat. This will serve as the cooling area for your caramel-coated apples, preventing them from sticking.

      Make the Caramel Sauce: In a medium-sized saucepan, combine the granulated sugar, light corn syrup, unsalted butter, and sweetened condensed milk. Place the saucepan over medium heat. Stir constantly to combine as the mixture warms.

        Cook the Caramel: Allow the mixture to come to a gentle boil. Continue to cook it, stirring regularly, for about 5-7 minutes, or until the caramel turns a rich, deep golden color. This color indicates that it has reached the perfect temperature for coating.

          Add Flavor: Remove the saucepan from heat. Carefully stir in the vanilla extract and sea salt, being mindful as the mixture may bubble up slightly upon adding the extract. Mix until everything is well combined.

            Dip the Apples: Take each prepared apple and dip it into the warm caramel sauce. Rotate the apple to ensure even coverage, letting any excess caramel drip back into the saucepan before transferring it to the prepared baking sheet.

              Add Toppings: While the caramel is still warm and sticky, generously sprinkle your chosen toppings over each apple for extra flavor and texture. Get creative with combinations!

                Allow to Set: Once all apples are coated and topped, let them cool at room temperature for about 30 minutes or until the caramel has fully set and is no longer tacky.

                  Prep Time: 15 minutes | Total Time: 45 minutes | Servings: 4

                    - Presentation Tips: Present the gourmet caramel apples on a rustic wooden platter for a charming display. For a special gift, wrap each apple in clear cellophane and secure with a colorful ribbon, making them a delightful treat for friends and family!

                      WANT TO SAVE THIS RECIPE?