Ingredient No-Bake Brownie Bites Simple Recipe Guide

WANT TO SAVE THIS RECIPE?

Craving a healthy treat that satisfies your sweet tooth? You’re in the right place! In this guide, I’ll walk you through a simple recipe for ingredient no-bake brownie bites. You only need a few wholesome ingredients, like pitted dates and walnuts, to create these delicious snacks. Plus, they’re easy to customize! Ready to dive in and make something tasty? Let’s get started!

Why I Love This Recipe

  1. Healthy Indulgence: These brownie bites offer a guilt-free way to satisfy your chocolate cravings while using wholesome ingredients like dates and nuts.
  2. No Baking Required: Perfect for those hot days or when you’re short on time, these treats come together in just a few minutes without needing to turn on the oven.
  3. Customizable Flavors: You can easily adapt the recipe by adding your favorite mix-ins, such as different nuts, seeds, or dried fruits, to suit your taste.
  4. Perfect for Sharing: These bite-sized treats are great for parties or gatherings, making them a delightful snack that everyone can enjoy.

Ingredients

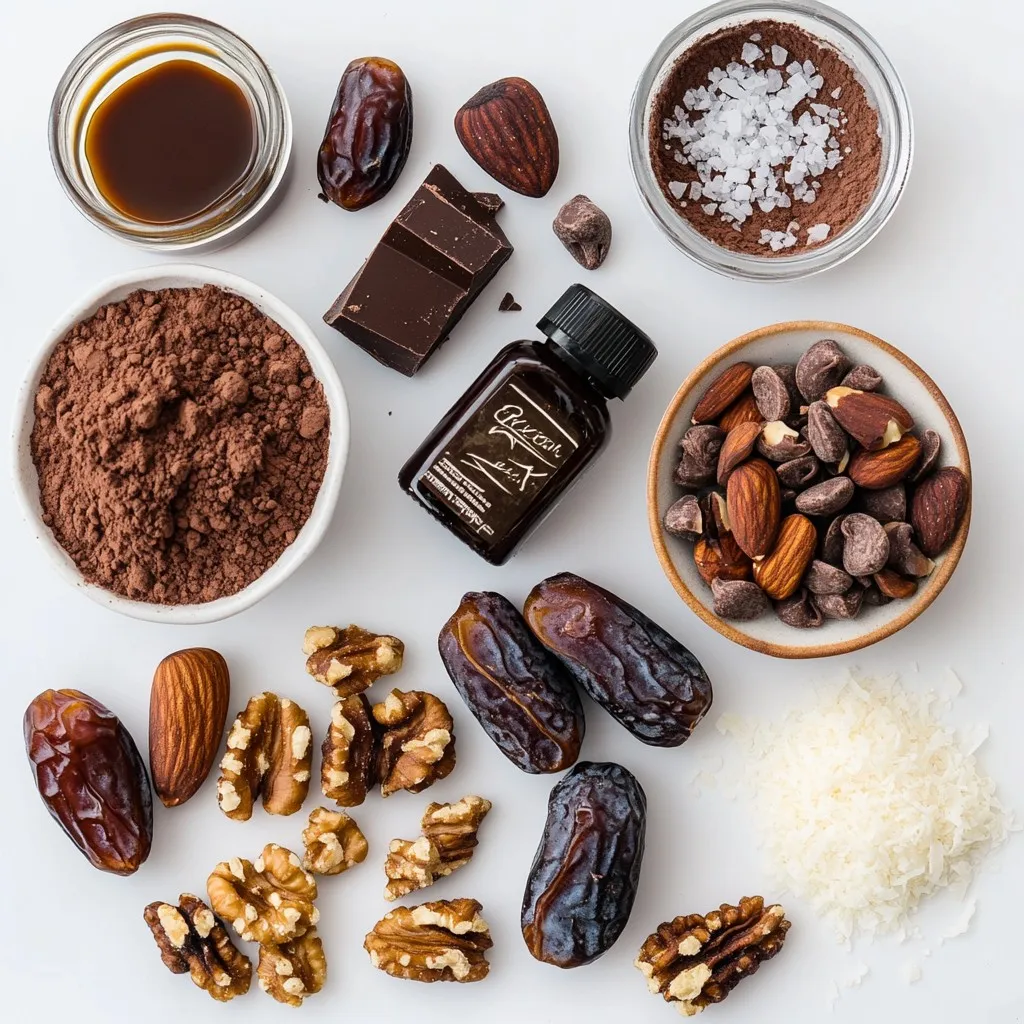
List of Essential Ingredients

– 1 cup pitted dates

– 1 cup walnuts

– 1/2 cup unsweetened cocoa powder

– 1/2 cup almond flour

– 1/4 teaspoon sea salt

– 1 tablespoon pure vanilla extract

– 1/4 cup pure maple syrup

– 1/2 cup dark chocolate chips

To make these no-bake brownie bites, gather your essential ingredients first. Start with pitted dates. They add natural sweetness and help bind the mixture. Walnuts give a nice crunch and healthy fats. For richness, use high-quality unsweetened cocoa powder. Almond flour adds a nice texture while keeping it gluten-free. Sea salt enhances the flavor, so don’t skip it. Pure vanilla extract brings out the sweetness. Maple syrup or agave syrup adds more moisture and sweetness. Lastly, dark chocolate chips add indulgence.

Optional Ingredients

– Shredded coconut

– Crushed nuts (pistachios or almonds)

You can add some fun with optional ingredients. Shredded coconut gives a tropical twist. Crushed nuts like pistachios or almonds add crunch and flavor. These extras can make your brownie bites even more special.

Ingredient Substitutions

– Gluten-free options: Use gluten-free oats instead of almond flour.

– Vegan alternatives: Maple syrup is already vegan. Use coconut oil instead of butter if needed.

If you need substitutions, don’t worry! For gluten-free options, try gluten-free oats in place of almond flour. This keeps the bites tasty and safe for those with gluten sensitivities. If you want to make them vegan, you’re already on track with maple syrup. Swap butter for coconut oil in any other recipe you create. This way, everyone can enjoy these treats!

Step-by-Step Instructions

Prepare the Base

– Start with 1 cup of pitted dates. Make sure they are soft and fresh.

– Add 1 cup of toasted walnuts to the food processor.

– Pulse the mixture until it has a crumbly texture. It should look like coarse sand.

– Check for any large walnut pieces. If you find them, pulse again.

Combine Remaining Ingredients

– Next, add 1/2 cup of unsweetened cocoa powder.

– Include 1/2 cup of almond flour for texture.

– Sprinkle in 1/4 teaspoon of sea salt to enhance flavor.

– Pour in 1 tablespoon of pure vanilla extract.

– Add 1/4 cup of pure maple syrup for sweetness.

– Blend until a sticky dough forms and all ingredients mix well.

Adjust Consistency

– Check if the dough feels dry or crumbly.

– If it does, add a teaspoon of water and blend.

– Keep adding water little by little until the dough holds together well.

Incorporate Chocolate

– Now, take 1/2 cup of dark chocolate chips.

– Gently fold them into the dough by hand. Make sure they are evenly spread.

Form the Bites

– With clean hands, take small portions of the dough.

– Roll them into bite-sized balls, about 1 inch wide.

– Aim for uniform size to ensure even servings.

Optional Coating and Chilling

– If you like, roll the bites in shredded coconut or crushed nuts.

– This adds extra texture and flavor.

– Place the rolled bites on a parchment-lined tray.

– Refrigerate for at least 30 minutes to let them set.

Tips & Tricks

Perfecting the Texture

Adjusting wetness of the dough: If your dough seems too dry, add a teaspoon of water. Blend well after each addition. You want a sticky and cohesive dough, not too wet. This balance keeps your bites from being crumbly.

Optimal cooling time: Chill the brownie bites for at least 30 minutes. This helps them firm up nicely. Longer chilling can enhance the flavor and texture too.

Serving Suggestions

Presentation tips: For a beautiful display, arrange the bites on a fancy plate. Drizzle melted dark chocolate on top or sprinkle cacao nibs for extra flair. This makes them look even more tempting!

Pairing with beverages: Enjoy these brownie bites with a glass of almond milk or your favorite herbal tea. The rich flavors pair perfectly with a warm drink.

Enhancing Flavor

Using flavored extracts: Try adding almond or orange extract for a new twist. Just a drop can uplift the flavor in a fun way.

Adding spices or zests: Consider mixing in a pinch of cinnamon or orange zest. These simple additions can deepen the taste and make the brownie bites more exciting.

Pro Tips

  1. Use Fresh Dates: Make sure to use soft and fresh pitted dates for the best sweetness and texture in your brownie bites.
  2. Toast Your Walnuts: Toasting the walnuts not only enhances their flavor but also adds a delightful crunch to the brownie bites.
  3. Quality Cocoa Powder: Opt for high-quality cocoa powder, as it significantly impacts the richness and overall taste of your brownie bites.
  4. Experiment with Coatings: Feel free to get creative with your coatings; try different nuts, seeds, or even a dusting of cocoa powder for unique flavors.

Variations

Flavor Variations

You can easily switch up the flavor of your brownie bites. Here are two fun ideas:

Mint chocolate brownie bites: Add a few drops of peppermint extract to the mixture. This gives a refreshing twist to your bites. The mint pairs well with chocolate, making them extra special.

Peanut butter swirl version: Mix in some creamy peanut butter while blending. This adds a rich, nutty flavor that complements the cocoa. You can also swirl it in after forming the bites for a beautiful look.

Texture Variations

Adjusting the texture can make your brownie bites even more exciting. Try these methods:

Adding seeds: Incorporate chia or flax seeds into the mix. They add crunch and boost nutrition. Just a couple of tablespoons will do!

Incorporating dried fruits: Toss in some chopped dried fruits like cranberries or apricots. They provide sweetness and chewiness, making each bite delightful.

Dietary Variations

You can adapt the recipe to fit different diets. Here are some options:

Paleo-friendly options: Use almond butter instead of walnuts. This keeps it aligned with paleo guidelines while adding creaminess.

Nut-free alternatives: Replace nuts with seeds like sunflower or pumpkin seeds. They give a similar texture and flavor without using nuts.

Storage Info

Best Storage Practices

To keep your no-bake brownie bites fresh, store them in the fridge. Use an airtight container to keep them moist. They stay tasty for up to a week this way. If you want to save them longer, freeze them. Place the bites in a single layer on a baking sheet. Once they freeze, transfer them to a freezer bag. They can last for up to three months in the freezer.

Shelf Life

In the fridge, your brownie bites last about a week. To avoid spoilage, check for any signs of mold or unusual smells. If you notice any, it’s best to toss them. Always ensure they are sealed tightly. This keeps out moisture and other odors that can affect taste.

Reusing or Repurposing

If you have leftover brownie bits, don’t worry! You can use them in different ways. Crumble them over yogurt for added texture. Mix them into smoothies for a chocolatey boost. You can also use extra ingredients in other recipes. For example, walnuts and cocoa powder can enhance oatmeal or pancakes. Get creative and enjoy your treats in new ways!

FAQs

Can I make these brownie bites without nuts?

Yes, you can make these brownie bites without nuts. Instead of walnuts, try using seeds. Sunflower seeds or pumpkin seeds work well. You can also use rolled oats for a chewy texture. Just make sure to adjust the amount of almond flour. This keeps the bites moist and delicious.

What are the health benefits of these ingredients?

These brownie bites are packed with nutrients. Here’s a quick look:

Pitted Dates: High in fiber and natural sugars for energy.

Walnuts: Good source of omega-3 fatty acids, great for heart health.

Cocoa Powder: Rich in antioxidants, can boost mood.

Almond Flour: Low in carbs, high in healthy fats and protein.

Dark Chocolate Chips: Contains iron and magnesium, plus it tastes amazing!

Eating these bites can satisfy your sweet tooth while providing health benefits. They do not have refined sugar and are a great snack option.

How long do these brownie bites take to prepare?

The prep time for these brownie bites is about 15 minutes. After that, you need to chill them for at least 30 minutes. So, the total time is around 45 minutes. This makes them quick and easy to enjoy fresh!

Can I use a different sweetener?

Yes, you can use other sweeteners in place of maple syrup. Agave syrup is a good choice. Honey can also work, but it isn’t vegan. If you want a lower-calorie option, consider using stevia or erythritol. Just adjust the amount to taste, as these may be sweeter than maple syrup.

In this blog post, we explored how to make delicious brownie bites. I shared essential ingredients like dates, walnuts, and cocoa powder. You learned step-by-step instructions for mixing and forming the bites. We discussed tips for perfecting texture and ways to enhance flavors. I also covered variations and storage methods for your treats.

In summary, these bites are easy to make and adaptable. Enjoy experimenting with flavors and share them with others. Your healthy snack can be a hi

- 1 cup pitted dates - 1 cup walnuts - 1/2 cup unsweetened cocoa powder - 1/2 cup almond flour - 1/4 teaspoon sea salt - 1 tablespoon pure vanilla extract - 1/4 cup pure maple syrup - 1/2 cup dark chocolate chips To make these no-bake brownie bites, gather your essential ingredients first. Start with pitted dates. They add natural sweetness and help bind the mixture. Walnuts give a nice crunch and healthy fats. For richness, use high-quality unsweetened cocoa powder. Almond flour adds a nice texture while keeping it gluten-free. Sea salt enhances the flavor, so don’t skip it. Pure vanilla extract brings out the sweetness. Maple syrup or agave syrup adds more moisture and sweetness. Lastly, dark chocolate chips add indulgence. - Shredded coconut - Crushed nuts (pistachios or almonds) You can add some fun with optional ingredients. Shredded coconut gives a tropical twist. Crushed nuts like pistachios or almonds add crunch and flavor. These extras can make your brownie bites even more special. - Gluten-free options: Use gluten-free oats instead of almond flour. - Vegan alternatives: Maple syrup is already vegan. Use coconut oil instead of butter if needed. If you need substitutions, don’t worry! For gluten-free options, try gluten-free oats in place of almond flour. This keeps the bites tasty and safe for those with gluten sensitivities. If you want to make them vegan, you’re already on track with maple syrup. Swap butter for coconut oil in any other recipe you create. This way, everyone can enjoy these treats! {{ingredient_image_2}} - Start with 1 cup of pitted dates. Make sure they are soft and fresh. - Add 1 cup of toasted walnuts to the food processor. - Pulse the mixture until it has a crumbly texture. It should look like coarse sand. - Check for any large walnut pieces. If you find them, pulse again. - Next, add 1/2 cup of unsweetened cocoa powder. - Include 1/2 cup of almond flour for texture. - Sprinkle in 1/4 teaspoon of sea salt to enhance flavor. - Pour in 1 tablespoon of pure vanilla extract. - Add 1/4 cup of pure maple syrup for sweetness. - Blend until a sticky dough forms and all ingredients mix well. - Check if the dough feels dry or crumbly. - If it does, add a teaspoon of water and blend. - Keep adding water little by little until the dough holds together well. - Now, take 1/2 cup of dark chocolate chips. - Gently fold them into the dough by hand. Make sure they are evenly spread. - With clean hands, take small portions of the dough. - Roll them into bite-sized balls, about 1 inch wide. - Aim for uniform size to ensure even servings. - If you like, roll the bites in shredded coconut or crushed nuts. - This adds extra texture and flavor. - Place the rolled bites on a parchment-lined tray. - Refrigerate for at least 30 minutes to let them set. - Adjusting wetness of the dough: If your dough seems too dry, add a teaspoon of water. Blend well after each addition. You want a sticky and cohesive dough, not too wet. This balance keeps your bites from being crumbly. - Optimal cooling time: Chill the brownie bites for at least 30 minutes. This helps them firm up nicely. Longer chilling can enhance the flavor and texture too. - Presentation tips: For a beautiful display, arrange the bites on a fancy plate. Drizzle melted dark chocolate on top or sprinkle cacao nibs for extra flair. This makes them look even more tempting! - Pairing with beverages: Enjoy these brownie bites with a glass of almond milk or your favorite herbal tea. The rich flavors pair perfectly with a warm drink. - Using flavored extracts: Try adding almond or orange extract for a new twist. Just a drop can uplift the flavor in a fun way. - Adding spices or zests: Consider mixing in a pinch of cinnamon or orange zest. These simple additions can deepen the taste and make the brownie bites more exciting. Pro Tips Use Fresh Dates: Make sure to use soft and fresh pitted dates for the best sweetness and texture in your brownie bites. Toast Your Walnuts: Toasting the walnuts not only enhances their flavor but also adds a delightful crunch to the brownie bites. Quality Cocoa Powder: Opt for high-quality cocoa powder, as it significantly impacts the richness and overall taste of your brownie bites. Experiment with Coatings: Feel free to get creative with your coatings; try different nuts, seeds, or even a dusting of cocoa powder for unique flavors. {{image_4}} You can easily switch up the flavor of your brownie bites. Here are two fun ideas: - Mint chocolate brownie bites: Add a few drops of peppermint extract to the mixture. This gives a refreshing twist to your bites. The mint pairs well with chocolate, making them extra special. - Peanut butter swirl version: Mix in some creamy peanut butter while blending. This adds a rich, nutty flavor that complements the cocoa. You can also swirl it in after forming the bites for a beautiful look. Adjusting the texture can make your brownie bites even more exciting. Try these methods: - Adding seeds: Incorporate chia or flax seeds into the mix. They add crunch and boost nutrition. Just a couple of tablespoons will do! - Incorporating dried fruits: Toss in some chopped dried fruits like cranberries or apricots. They provide sweetness and chewiness, making each bite delightful. You can adapt the recipe to fit different diets. Here are some options: - Paleo-friendly options: Use almond butter instead of walnuts. This keeps it aligned with paleo guidelines while adding creaminess. - Nut-free alternatives: Replace nuts with seeds like sunflower or pumpkin seeds. They give a similar texture and flavor without using nuts. To keep your no-bake brownie bites fresh, store them in the fridge. Use an airtight container to keep them moist. They stay tasty for up to a week this way. If you want to save them longer, freeze them. Place the bites in a single layer on a baking sheet. Once they freeze, transfer them to a freezer bag. They can last for up to three months in the freezer. In the fridge, your brownie bites last about a week. To avoid spoilage, check for any signs of mold or unusual smells. If you notice any, it’s best to toss them. Always ensure they are sealed tightly. This keeps out moisture and other odors that can affect taste. If you have leftover brownie bits, don’t worry! You can use them in different ways. Crumble them over yogurt for added texture. Mix them into smoothies for a chocolatey boost. You can also use extra ingredients in other recipes. For example, walnuts and cocoa powder can enhance oatmeal or pancakes. Get creative and enjoy your treats in new ways! Yes, you can make these brownie bites without nuts. Instead of walnuts, try using seeds. Sunflower seeds or pumpkin seeds work well. You can also use rolled oats for a chewy texture. Just make sure to adjust the amount of almond flour. This keeps the bites moist and delicious. These brownie bites are packed with nutrients. Here’s a quick look: - Pitted Dates: High in fiber and natural sugars for energy. - Walnuts: Good source of omega-3 fatty acids, great for heart health. - Cocoa Powder: Rich in antioxidants, can boost mood. - Almond Flour: Low in carbs, high in healthy fats and protein. - Dark Chocolate Chips: Contains iron and magnesium, plus it tastes amazing! Eating these bites can satisfy your sweet tooth while providing health benefits. They do not have refined sugar and are a great snack option. The prep time for these brownie bites is about 15 minutes. After that, you need to chill them for at least 30 minutes. So, the total time is around 45 minutes. This makes them quick and easy to enjoy fresh! Yes, you can use other sweeteners in place of maple syrup. Agave syrup is a good choice. Honey can also work, but it isn’t vegan. If you want a lower-calorie option, consider using stevia or erythritol. Just adjust the amount to taste, as these may be sweeter than maple syrup. In this blog post, we explored how to make delicious brownie bites. I shared essential ingredients like dates, walnuts, and cocoa powder. You learned step-by-step instructions for mixing and forming the bites. We discussed tips for perfecting texture and ways to enhance flavors. I also covered variations and storage methods for your treats. In summary, these bites are easy to make and adaptable. Enjoy experimenting with flavors and share them with others. Your healthy snack can be a hit!

Decadent No-Bake Brownie Bites

Delicious and healthy no-bake brownie bites made with dates, walnuts, and cocoa.
Course Dessert
Cuisine American
Servings 12
Calories 150 kcal

Ingredients
  

  • 1 cup pitted dates (soft and fresh)
  • 1 cup walnuts (toasted for enhanced flavor)
  • 0.5 cup unsweetened cocoa powder (high quality for richness)
  • 0.5 cup almond flour (or finely ground almonds)
  • 0.25 teaspoon sea salt (adjust to taste)
  • 1 tablespoon pure vanilla extract
  • 0.25 cup pure maple syrup (or agave syrup)
  • 0.5 cup dark chocolate chips (dairy-free if preferred)
  • optional shredded coconut or crushed nuts (such as pistachios or almonds) for rolling

Instructions
 

  • In a high-speed food processor, add the pitted dates and toasted walnuts. Pulse until the mixture takes on a crumbly texture that resembles coarse sand.
  • To the date and walnut mixture, add the unsweetened cocoa powder, almond flour, sea salt, pure vanilla extract, and pure maple syrup. Process the mixture again until all the ingredients are thoroughly blended and a sticky, cohesive dough forms.
  • If the dough feels too crumbly or dry, gradually add a teaspoon of water, blending after each addition.
  • Gently fold in the dark chocolate chips by hand, ensuring they are evenly distributed throughout the brownie mixture.
  • With clean hands, take small portions of the chocolate mixture and roll them into bite-sized balls, about 1 inch in diameter.
  • If desired, roll each brownie bite in shredded coconut or crushed nuts to coat the outside.
  • Arrange the rolled brownie bites on a parchment-lined plate or tray. Place them in the refrigerator and chill for at least 30 minutes.

Notes

For an elegant presentation, arrange the brownie bites on a decorative serving plate. Drizzle melted dark chocolate over the top or sprinkle with cacao nibs for a finishing touch.
Keyword brownies, healthy snacks, no-bake

WANT TO SAVE THIS RECIPE?