No Bake Banana Peanut Butter Oat Bars Quick Treat

WANT TO SAVE THIS RECIPE?

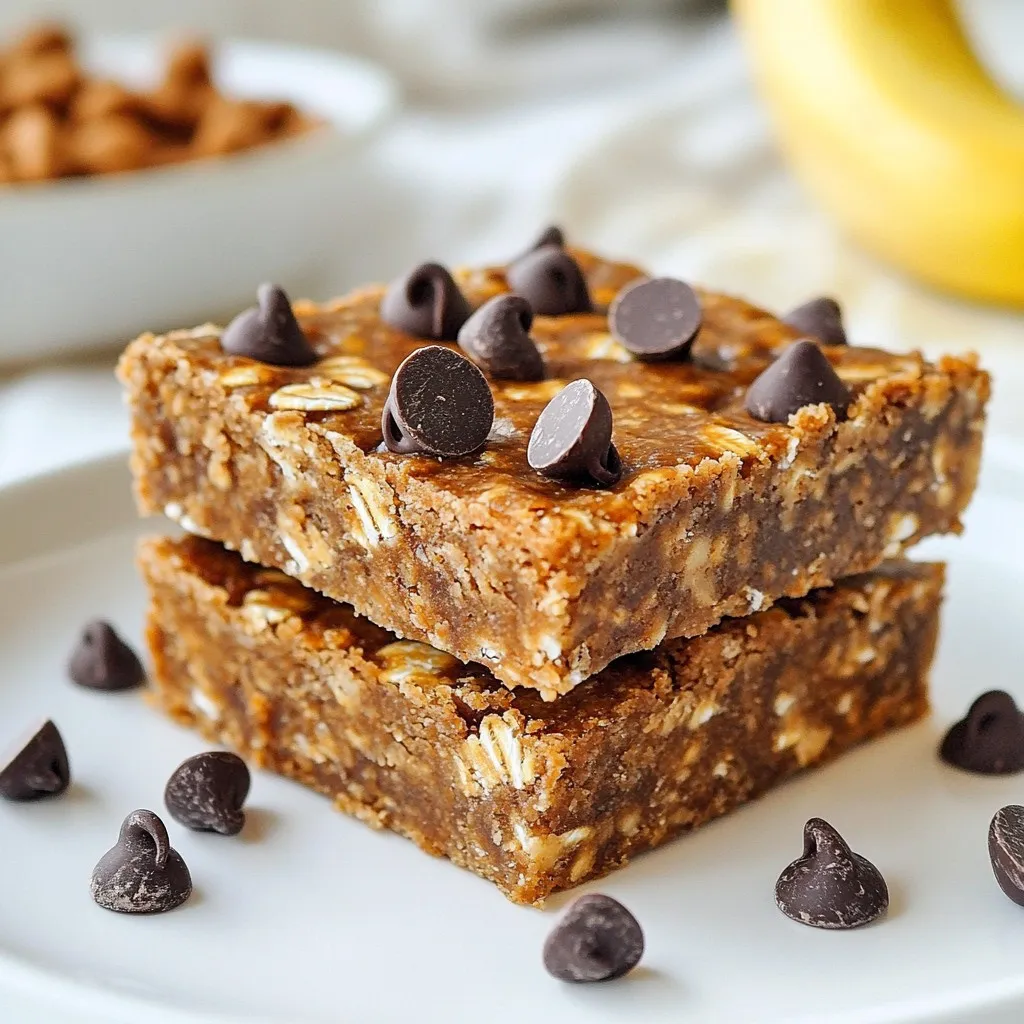
Craving a quick and healthy snack? You’ll love these No Bake Banana Peanut Butter Oat Bars! They are easy to make, super tasty, and perfect for any time of day. This guide will walk you through the simple steps to create these delicious bars, plus tips to customize them for your needs. Let’s get started on making this quick treat that satisfies your sweet tooth without the oven!

Why I Love This Recipe

  1. Easy Preparation: This recipe requires no baking, making it perfect for quick and effortless snacking.
  2. Wholesome Ingredients: Made with natural peanut butter, bananas, and oats, these bars are nutritious and satisfying.
  3. Customizable: You can easily modify the recipe by adding your favorite mix-ins like nuts or dried fruits.
  4. Kid-Friendly: These bars are a hit with kids and adults alike, making them a great snack option for the whole family.

Ingredients

List of Ingredients with Measurements

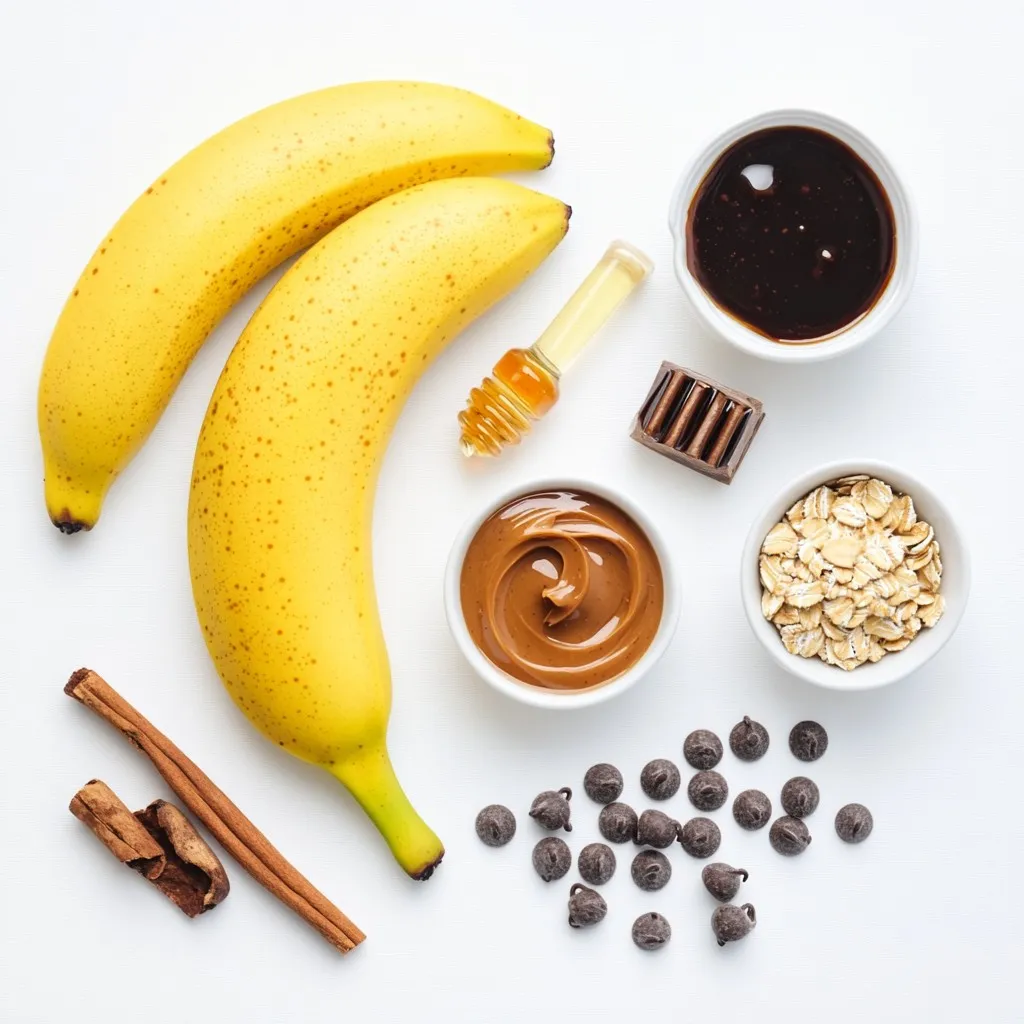
– 2 ripe bananas, well-mashed

– 1 cup creamy natural peanut butter

– 2 cups rolled oats (preferably old-fashioned)

– 1/4 cup honey or pure maple syrup (for a vegan option)

– 1/2 teaspoon ground cinnamon

– 1/2 teaspoon pure vanilla extract

– 1/2 cup dark chocolate chips (optional for added sweetness and richness)

– A pinch of sea salt

Alternative Ingredients for Dietary Needs

If you have dietary needs, you can swap some ingredients. Use sunflower seed butter instead of peanut butter for nut allergies. For a vegan option, choose maple syrup instead of honey. You can leave out the chocolate chips if you want fewer sugars.

Importance of Ingredient Quality

Using high-quality ingredients makes a big difference in flavor and texture. Choose ripe bananas; they should be soft and sweet. Use natural peanut butter with no added sugar or oils. Old-fashioned rolled oats give the best texture. Fresh spices like cinnamon and pure vanilla extract add depth to the bars. Quality ingredients lead to a better treat.

Step-by-Step Instructions

Detailed Mixing Process

First, grab a large mixing bowl. In it, mash two ripe bananas until smooth. Use a fork or spatula for this. Next, add one cup of creamy natural peanut butter. Mix them well until you have a smooth blend.

Now, add a quarter cup of honey or pure maple syrup for sweetness. If you want a vegan treat, choose the maple syrup. Then, sprinkle in half a teaspoon of ground cinnamon and half a teaspoon of pure vanilla extract. Don’t forget a pinch of sea salt! Stir everything until it’s perfectly mixed.

How to Layer the Mixture in the Dish

Prepare an 8×8 inch baking dish by lining it with parchment paper. Make sure to leave some paper hanging over the edges for easy removal later. Pour the banana-peanut butter mixture into the dish. Use a spatula or your hands to press it firmly down. This helps create an even layer.

Chilling and Cutting the Bars

Cover the dish with plastic wrap or foil. Place it in the fridge for at least one hour. This time helps the bars set and firm up nicely. After chilling, carefully lift the mixture out using the parchment paper overhang.

Now, grab a sharp knife and cut the mixture into squares or rectangles. Store any leftover bars in an airtight container in the fridge to keep them fresh.

Tips & Tricks

How to Make Bars Firm

To make your no bake bars firm, chilling is key. After mixing, press the mixture into the dish tightly. Use a spatula or your hands to compact it. This helps the bars hold their shape. Refrigerate them for at least one hour. This time allows the mixture to set well. If they still feel soft, let them chill longer.

Serving Suggestions and Presentation Tips

For a fun touch, serve bars on a colorful platter. Add banana slices on top for a fresh look. A sprinkle of cinnamon can elevate their visual appeal. You can also drizzle some melted chocolate over the top. This adds a sweet and inviting finish. Offer them with a side of yogurt for dipping or spreading.

Common Mistakes to Avoid

A common mistake is not mashing the bananas well. If they are chunky, the bars may not hold together. Another mistake is not pressing the mixture firmly. Skipping the chill time will also lead to softer bars. Lastly, be careful not to overmix the oats. This can make the texture too dense. Keep these tips in mind for perfect no bake bars!

Pro Tips

  1. Use Overripe Bananas: The riper the bananas, the sweeter your bars will be. Look for bananas with brown spots for the best flavor.
  2. Customize Your Sweetness: Adjust the amount of honey or maple syrup to your taste. If you prefer a less sweet bar, reduce the sweetener.
  3. Experiment with Add-ins: Feel free to add nuts, seeds, or dried fruits to the mixture for added texture and flavor.
  4. Store Properly: Keep the bars in an airtight container in the refrigerator to maintain freshness for up to a week.

Variations

Nut-Free Options

If you want a nut-free version, try sunflower seed butter. It blends well with bananas. You can also use soy nut butter. Both options keep the creamy texture. This way, kids with nut allergies can enjoy these bars too.

Adding Superfoods for Extra Nutrition

You can boost the nutrition of your bars easily. Try adding chia seeds, flaxseeds, or hemp hearts. Just a few tablespoons can add fiber and omega-3s. You could also mix in some protein powder. This twist makes the bars even better for a snack or meal.

Flavor Variations

Feel free to get creative with flavors! You can add a dash of nutmeg for warmth. A splash of almond extract can give a nice twist. For chocolate lovers, mix in cocoa powder or use dark chocolate chips. Cinnamon is also a great addition to enhance the taste. Enjoy experimenting with these flavors!

Storage Info

Best Practices for Storing No Bake Bars

To keep your no bake banana peanut butter oat bars fresh, store them in an airtight container. This helps keep moisture out and maintains their chewy texture. Layer parchment paper between bars if you stack them. This prevents them from sticking together. Always keep them in the fridge if you want them to last longer.

Freezing Instructions for Long-Term Storage

If you want to save your bars for later, freezing works great! Wrap each bar in plastic wrap or foil. Then, place them in a freezer-safe bag or container. Be sure to label it with the date. These bars can last up to three months in the freezer. When you’re ready to eat one, thaw it in the fridge overnight.

Shelf Life of the Bars

When stored correctly in the fridge, these bars last about a week. You might notice they get a bit softer over time, but they still taste great. If you freeze them, you can enjoy them even longer. Just remember to check for any signs of freezer burn before eating. Keeping an eye on freshness helps you enjoy them at their best!

FAQs

Can I use different types of nut butter?

Yes, you can use different nut butters. Almond butter, cashew butter, or sunflower seed butter work well. Each nut butter adds its own unique flavor. Just choose one that you enjoy. Make sure it’s creamy for the best texture. If you want a nut-free option, sunflower seed butter is a great choice!

How can I make these bars vegan?

To make these bars vegan, use pure maple syrup instead of honey. Choose dark chocolate chips that are dairy-free. The rest of the ingredients are already plant-based. This way, you can enjoy the bars without any animal products. They will still taste delicious!

What is the best way to cut the bars?

To cut the bars, first chill them in the fridge for at least one hour. This helps them firm up. Lift the bars out using the parchment paper. Use a sharp knife to cut them into squares or rectangles. For neat cuts, wipe the knife with a damp cloth after each cut. Enjoy your perfectly cut treats!

In this post, we explored key ingredients and detailed steps to make tasty no-bake bars. We discussed how to choose quality ingredients and provided tips for firm bars and presentation. You learned about flavor variations, storage, and common mistakes.

Remember, using your favorite substitutes can make these bars truly yours. Try new flavors and enjoy sharing them. With these easy steps, you can impress friends and family with delicious snacks. Now, it’s time to get cooking and make your own bar

- 2 ripe bananas, well-mashed - 1 cup creamy natural peanut butter - 2 cups rolled oats (preferably old-fashioned) - 1/4 cup honey or pure maple syrup (for a vegan option) - 1/2 teaspoon ground cinnamon - 1/2 teaspoon pure vanilla extract - 1/2 cup dark chocolate chips (optional for added sweetness and richness) - A pinch of sea salt If you have dietary needs, you can swap some ingredients. Use sunflower seed butter instead of peanut butter for nut allergies. For a vegan option, choose maple syrup instead of honey. You can leave out the chocolate chips if you want fewer sugars. Using high-quality ingredients makes a big difference in flavor and texture. Choose ripe bananas; they should be soft and sweet. Use natural peanut butter with no added sugar or oils. Old-fashioned rolled oats give the best texture. Fresh spices like cinnamon and pure vanilla extract add depth to the bars. Quality ingredients lead to a better treat. {{ingredient_image_2}} First, grab a large mixing bowl. In it, mash two ripe bananas until smooth. Use a fork or spatula for this. Next, add one cup of creamy natural peanut butter. Mix them well until you have a smooth blend. Now, add a quarter cup of honey or pure maple syrup for sweetness. If you want a vegan treat, choose the maple syrup. Then, sprinkle in half a teaspoon of ground cinnamon and half a teaspoon of pure vanilla extract. Don't forget a pinch of sea salt! Stir everything until it’s perfectly mixed. Prepare an 8x8 inch baking dish by lining it with parchment paper. Make sure to leave some paper hanging over the edges for easy removal later. Pour the banana-peanut butter mixture into the dish. Use a spatula or your hands to press it firmly down. This helps create an even layer. Cover the dish with plastic wrap or foil. Place it in the fridge for at least one hour. This time helps the bars set and firm up nicely. After chilling, carefully lift the mixture out using the parchment paper overhang. Now, grab a sharp knife and cut the mixture into squares or rectangles. Store any leftover bars in an airtight container in the fridge to keep them fresh. To make your no bake bars firm, chilling is key. After mixing, press the mixture into the dish tightly. Use a spatula or your hands to compact it. This helps the bars hold their shape. Refrigerate them for at least one hour. This time allows the mixture to set well. If they still feel soft, let them chill longer. For a fun touch, serve bars on a colorful platter. Add banana slices on top for a fresh look. A sprinkle of cinnamon can elevate their visual appeal. You can also drizzle some melted chocolate over the top. This adds a sweet and inviting finish. Offer them with a side of yogurt for dipping or spreading. A common mistake is not mashing the bananas well. If they are chunky, the bars may not hold together. Another mistake is not pressing the mixture firmly. Skipping the chill time will also lead to softer bars. Lastly, be careful not to overmix the oats. This can make the texture too dense. Keep these tips in mind for perfect no bake bars! Pro Tips Use Overripe Bananas: The riper the bananas, the sweeter your bars will be. Look for bananas with brown spots for the best flavor. Customize Your Sweetness: Adjust the amount of honey or maple syrup to your taste. If you prefer a less sweet bar, reduce the sweetener. Experiment with Add-ins: Feel free to add nuts, seeds, or dried fruits to the mixture for added texture and flavor. Store Properly: Keep the bars in an airtight container in the refrigerator to maintain freshness for up to a week. {{image_4}} If you want a nut-free version, try sunflower seed butter. It blends well with bananas. You can also use soy nut butter. Both options keep the creamy texture. This way, kids with nut allergies can enjoy these bars too. You can boost the nutrition of your bars easily. Try adding chia seeds, flaxseeds, or hemp hearts. Just a few tablespoons can add fiber and omega-3s. You could also mix in some protein powder. This twist makes the bars even better for a snack or meal. Feel free to get creative with flavors! You can add a dash of nutmeg for warmth. A splash of almond extract can give a nice twist. For chocolate lovers, mix in cocoa powder or use dark chocolate chips. Cinnamon is also a great addition to enhance the taste. Enjoy experimenting with these flavors! To keep your no bake banana peanut butter oat bars fresh, store them in an airtight container. This helps keep moisture out and maintains their chewy texture. Layer parchment paper between bars if you stack them. This prevents them from sticking together. Always keep them in the fridge if you want them to last longer. If you want to save your bars for later, freezing works great! Wrap each bar in plastic wrap or foil. Then, place them in a freezer-safe bag or container. Be sure to label it with the date. These bars can last up to three months in the freezer. When you're ready to eat one, thaw it in the fridge overnight. When stored correctly in the fridge, these bars last about a week. You might notice they get a bit softer over time, but they still taste great. If you freeze them, you can enjoy them even longer. Just remember to check for any signs of freezer burn before eating. Keeping an eye on freshness helps you enjoy them at their best! Yes, you can use different nut butters. Almond butter, cashew butter, or sunflower seed butter work well. Each nut butter adds its own unique flavor. Just choose one that you enjoy. Make sure it's creamy for the best texture. If you want a nut-free option, sunflower seed butter is a great choice! To make these bars vegan, use pure maple syrup instead of honey. Choose dark chocolate chips that are dairy-free. The rest of the ingredients are already plant-based. This way, you can enjoy the bars without any animal products. They will still taste delicious! To cut the bars, first chill them in the fridge for at least one hour. This helps them firm up. Lift the bars out using the parchment paper. Use a sharp knife to cut them into squares or rectangles. For neat cuts, wipe the knife with a damp cloth after each cut. Enjoy your perfectly cut treats! In this post, we explored key ingredients and detailed steps to make tasty no-bake bars. We discussed how to choose quality ingredients and provided tips for firm bars and presentation. You learned about flavor variations, storage, and common mistakes. Remember, using your favorite substitutes can make these bars truly yours. Try new flavors and enjoy sharing them. With these easy steps, you can impress friends and family with delicious snacks. Now, it’s time to get cooking and make your own bars!

No Bake Banana Peanut Butter Oat Bars

Delicious and easy-to-make no-bake bars made with ripe bananas, peanut butter, and oats.
Course Snack
Cuisine American
Servings 12
Calories 150 kcal

Ingredients
  

  • 2 whole ripe bananas, well-mashed
  • 1 cup creamy natural peanut butter
  • 2 cups rolled oats (preferably old-fashioned)
  • 1 4 cup honey or pure maple syrup
  • 1 2 teaspoon ground cinnamon
  • 1 2 teaspoon pure vanilla extract
  • 1 2 cup dark chocolate chips (optional)
  • 1 pinch sea salt

Instructions
 

  • In a large mixing bowl, thoroughly combine the well-mashed bananas and peanut butter using a fork or spatula until the mixture is smooth and homogenous.
  • Next, incorporate the honey or maple syrup, ground cinnamon, vanilla extract, and a pinch of sea salt into the banana-peanut butter blend. Stir until all ingredients are evenly mixed together.
  • Gradually fold in the rolled oats, carefully ensuring each oat gets coated in the banana-peanut butter mixture. If you’re adding dark chocolate chips, gently fold them in at this stage so they’re evenly dispersed throughout the mixture.
  • Prepare an 8x8 inch baking dish by lining it with parchment paper, leaving some overhang for easy removal. Pour the oat mixture into the prepared dish. Using a spatula or your hands, press the mixture firmly down to form an even layer across the bottom of the dish.
  • Cover the dish with plastic wrap or foil and refrigerate for at least 1 hour. This chilling time will help the bars firm up nicely. Once they are set, carefully lift them out of the dish using the parchment paper overhang.
  • Using a sharp knife, cut the mixture into squares or rectangles, depending on your preference. Store any leftover bars in an airtight container in the refrigerator for freshness.

Notes

For a delightful touch, serve the bars on a colorful platter and garnish with banana slices or a sprinkle of cinnamon on top before enjoying!
Keyword banana, healthy snack, no-bake, oat bars, peanut butter

WANT TO SAVE THIS RECIPE?