
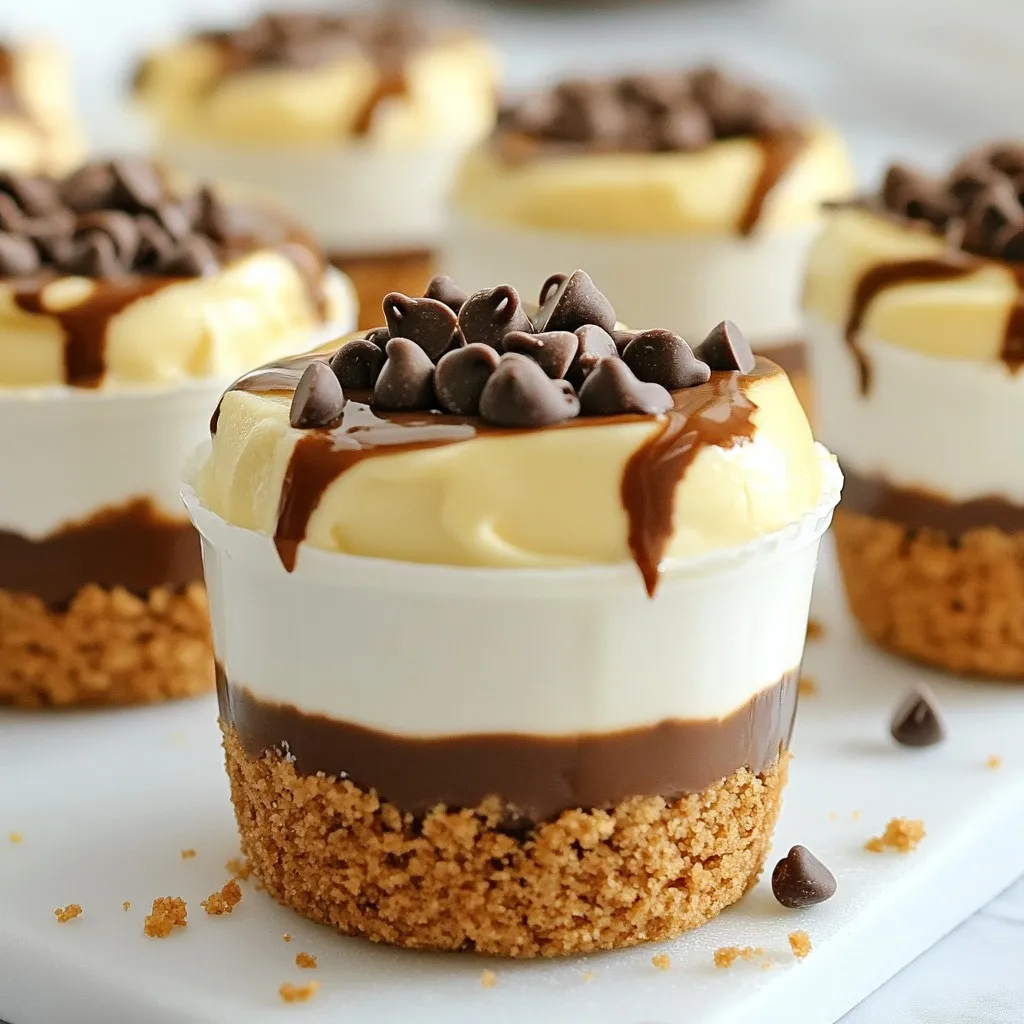
Are you ready to treat yourself to something sweet and easy? These No-Bake Cookie Butter Cheesecake Cups are a delightful dessert that anyone can make. With just a few simple ingredients like cream cheese, cookie butter, and graham crackers, you’ll whip up a tasty treat in no time. Perfect for gatherings or just a cozy night in, these cups promise a creamy, crunchy experience you won’t forget. Let’s get started!
Why I Love This Recipe
- Decadent Flavor: This cheesecake cups are rich and creamy, delivering an indulgent dessert experience in every bite.
- No-Bake Convenience: With no baking required, this recipe is quick and easy, perfect for any last-minute gatherings.
- Customizable Toppings: Add your favorite toppings like mini chocolate chips or extra cookie butter for a personal touch.
- Perfectly Portable: These individual cups are not only cute but also make for easy serving and sharing at parties.
Ingredients
Main Ingredients
– 8 oz cream cheese, softened to room temperature
– 1/2 cup creamy cookie butter
– 1/2 cup powdered sugar, sifted
– 1 teaspoon pure vanilla extract
– 1 cup heavy whipping cream, chilled
Crust Ingredients
– 1/2 cup crushed graham crackers
– 2 tablespoons unsalted butter, melted
Optional Garnishes
– Extra cookie butter for drizzling
– Mini chocolate chips for a fun touch
The main ingredients give our no-bake cheesecake cups a rich flavor. Cream cheese adds creaminess. Cookie butter brings a sweet, spiced taste. Powdered sugar sweetens the mix just right. Vanilla extract adds warmth that balances the flavors. Heavy whipping cream lightens the texture, making it fluffy.
The crust is simple yet satisfying. Crushed graham crackers are the base. They provide a nice crunch. Unsalted butter binds the crumbs together. This mix forms a solid, tasty base for the cheesecake.
You can add fun garnishes if you like. Extra cookie butter drizzled on top looks great. Mini chocolate chips add a sweet crunch. Both make the dessert even more exciting and delicious.
Step-by-Step Instructions
Prep the Cheesecake Mixture
– Blend cream cheese until smooth.
– Mix in cookie butter and powdered sugar.
Start by taking your room-temperature cream cheese. Use an electric mixer to whip it until it’s smooth and creamy. This step is key for a nice texture. Next, add the cookie butter and powdered sugar. Blend these together until they are fully mixed. You want a creamy and lump-free mixture for the best results. This base is where the magic begins!
Whip and Fold
– Beat heavy cream to stiff peaks.
– Gently fold whipped cream into mixture.
In a clean bowl, whip the chilled heavy cream. Use a mixer until it forms stiff peaks. This means the cream should hold its shape when you lift the beaters. Now, take this fluffy whipped cream and gently fold it into your cookie butter mixture. Use a spatula and be careful not to deflate the cream. This folding method keeps your cheesecake light and airy.
Prepare the Graham Cracker Base
– Combine crushed graham crackers with butter.
– Mix until evenly coated.
For the crust, grab some crushed graham crackers. In a bowl, mix them with melted butter. Stir until all the crumbs are coated. This step is vital for a tasty and sturdy base. The butter binds the crumbs together, making a great foundation for your cheesecake cups.
Layering the Cups
– Add graham cracker mixture to cups.
– Spoon cheesecake mixture on top.
– Optional second layer.
Now for the fun part: layering! Take about a tablespoon of the graham cracker mix and press it into the bottom of each cup. This creates a firm base. Next, spoon the cheesecake mixture on top, filling each cup almost to the brim. If you want more flavor, add another layer of graham cracker mix followed by more cheesecake.
Final Touches
– Drizzle with cookie butter.
– Add mini chocolate chips.
To make it look special, drizzle extra cookie butter over each cup. This adds a nice touch of flavor too. If you like chocolate, sprinkle some mini chocolate chips on top. They add a sweet crunch that pairs perfectly with the creamy cheesecake.
Chill and Serve
– Refrigerate for 2 hours.
– Presentation tips.
Finally, place your cheesecake cups in the fridge. Let them chill for at least 2 hours. This helps them set and makes them easier to serve. For a great presentation, arrange the cups on a nice platter. You can also add mini spoons for easy serving. A sprinkle of cinnamon or a dollop of whipped cream on top can impress your guests. Enjoy!
Tips & Tricks
Perfecting the Cheesecake Texture
To get the best texture, use softened cream cheese. It blends well and avoids lumps. Be sure to mix it until it’s very smooth. Next, whip the cold heavy cream until it forms stiff peaks. This step gives the cheesecake its light and airy feel.
Preventing Crust Crumble
A good crust holds the cheesecake together. Use enough melted butter to bind the crushed graham crackers. This mixture needs to stick well. Pack the crust tightly into your serving cups. This will keep it firm and prevent crumbling when you serve it.
Enhancing Flavor
You can make your cheesecake even tastier. Try adding flavored extracts like almond or hazelnut. Spices like cinnamon or nutmeg can also add warmth and depth. Just a pinch can change the whole taste of your dessert, making it special.
Pro Tips
- Use Room Temperature Cream Cheese: Ensuring your cream cheese is at room temperature will help achieve a smoother and creamier cheesecake mixture, preventing lumps.
- Chill the Whipping Cream: For the best results, make sure your heavy cream is thoroughly chilled before whipping. This helps it whip to stiff peaks more easily.
- Customize the Crust: Feel free to experiment with different types of cookies for the crust, such as Oreos or Biscoff cookies, for a unique flavor profile.
- Let It Set: Allow the cheesecake cups to chill for a full 2 hours or longer. This will ensure they set properly and hold their shape when served.
Variations
Flavor Add-ins
You can change the flavor of your cheesecake cups easily. Try using peanut butter or chocolate cookie butter instead of regular cookie butter. This swap adds a rich twist. You can also swirl in fruit preserves for a fruity layer. Jam like strawberry or raspberry brings a fresh taste.
Different Crust Options
If you want a new crust, use Oreos or digestive biscuits. These options add a different flavor and texture. You can also mix in some chopped nuts, like almonds or walnuts, for a crunchy bite. This change gives a nice contrast to the creamy cheesecake.
Mini or Full-Sized Cheesecake
You can make mini cups or a full-sized cheesecake. If you want larger servings, just adjust the portions. For a full cheesecake, use a springform pan. The baking time will change if you decide to bake it. No matter the size, it will taste delicious!
Storage Info
Best Storage Practices
– Store in an airtight container.
– Keep refrigerated to maintain freshness.
When you make these No-Bake Cookie Butter Cheesecake Cups, you want them to last. An airtight container helps keep them fresh. It also prevents other fridge smells from sneaking in. Always remember to put them in the fridge right after making them.
Shelf Life
– These cheesecake cups are best when eaten within 3 to 5 days.
– You can freeze them for later enjoyment.
For the best taste, eat these cups within 3 to 5 days. If you want to save some for later, you can freeze them. Just make sure to wrap each cup tightly in plastic wrap. When you’re ready to enjoy them, let them thaw in the fridge for a few hours.
Serving Suggestions
– Pair with fresh fruit or whipped cream for a tasty twist.
– Enjoy with coffee or tea for a perfect dessert pairing.
These cheesecake cups shine when you add fresh fruit or a dollop of whipped cream on top. They also go well with a hot cup of coffee or tea. This combo makes for a delightful treat any time of day.
FAQs
Can I make this recipe dairy-free?
Yes, you can! For cream cheese, use a dairy-free cream cheese. Brands like Kite Hill or Tofutti work well. For heavy cream, try coconut cream or a dairy-free whipped topping. Both options keep the flavor rich and creamy.
How long do these cheesecake cups last?
These cheesecake cups last about 3 days in the fridge. After day three, the texture may change. For the best taste and texture, enjoy them within two days.
Can I use non-crushed graham crackers?
Yes, you can! To prepare non-crushed graham crackers, place them in a zip-top bag and crush them with a rolling pin. This will give you fine crumbs. Alternatively, you can use a food processor for a quicker method.
This blog post shares an easy, fun recipe for cheesecake cups. We covered the key ingredients, like cream cheese and cookie butter, and how to make a perfect crust. I explained how to layer the cups and add tasty garnishes. You can also try various flavor add-ins and crust options.
Remember to store your treats properly to keep them fresh. I hope you enjoy making and sharing these cheesecake cups as much as I do. Happy bakin


