
Looking for a fun and easy treat? You can’t go wrong with Zesty Lemon Coconut Truffles! These tasty bites combine coconut’s creaminess with a burst of lemony zing, hitting all the right notes. Plus, you’ll love how simple they are to make. Let’s dive into the ingredients, tips, and steps to create your new favorite snack, perfect for any occasion. Ready to impress your friends and family? Let’s get started!
Why I Love This Recipe
- Bright and Refreshing Flavor: The combination of zesty lemon and creamy coconut creates a delightful burst of flavor that is perfect for any occasion.
- Easy to Make: With simple ingredients and straightforward steps, this recipe is a breeze to prepare, making it great for both beginners and experienced cooks.
- Healthy Indulgence: These truffles are made with wholesome ingredients, making them a guilt-free treat that you can enjoy without compromising your health.
- Perfect for Sharing: These truffles are great for parties, potlucks, or as a homemade gift, ensuring that everyone can enjoy a little taste of tropical bliss.
Ingredients
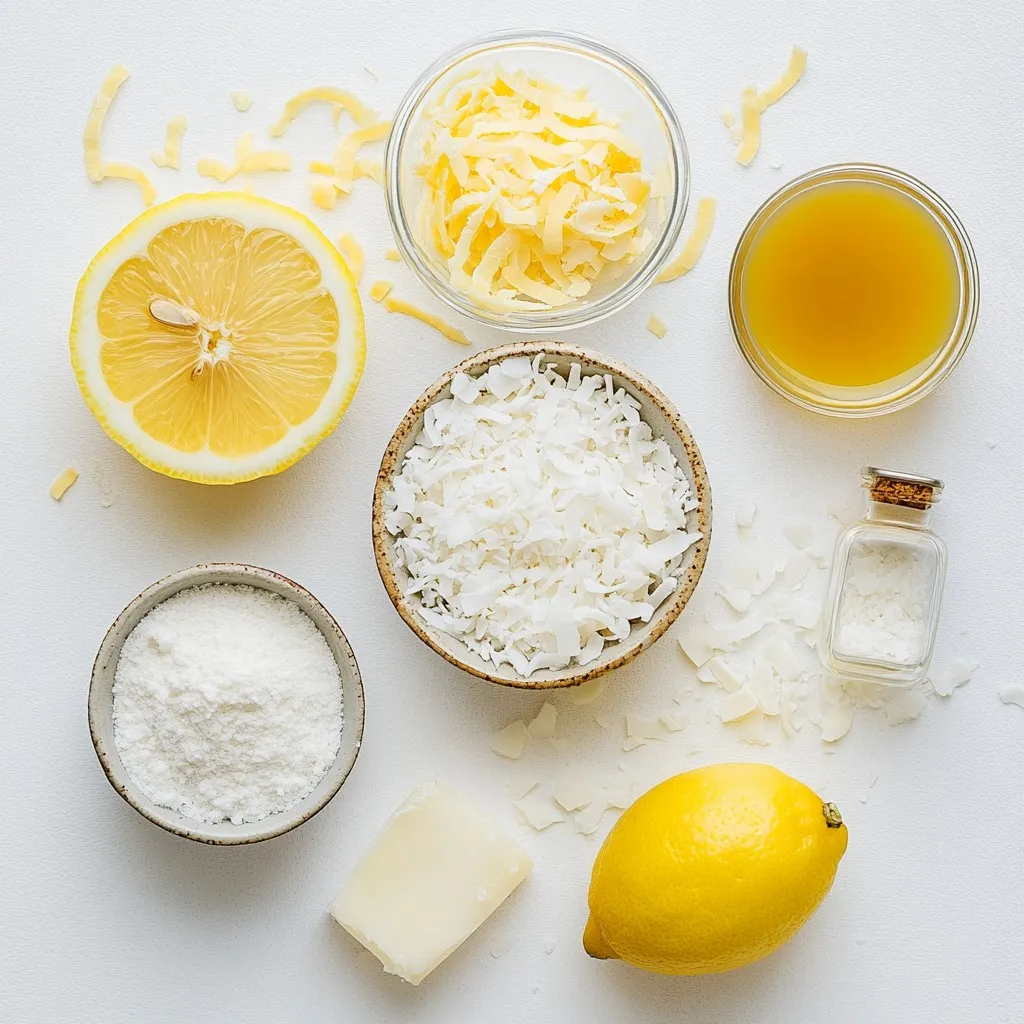
List of Ingredients
– 1 cup shredded unsweetened coconut
– 1/2 cup almond flour
– 1/2 cup coconut cream (chilled)
– Zest of 1 lemon
– 2 tablespoons fresh lemon juice
– 1/4 cup maple syrup
– 1 teaspoon vanilla extract
– Pinch of salt
– Extra shredded coconut for rolling
Measurement Tips
When measuring ingredients, use dry measuring cups for solids like almond flour and coconut. Level off the top with a straight edge for accuracy. For coconut cream, scoop it out of the can carefully, as it can be thick. Use a tablespoon to measure liquids like lemon juice and maple syrup. This helps avoid spills and keeps your kitchen clean.
Ingredient Substitutions
If you don’t have almond flour, you can use cashew flour or oat flour. Both options work well for texture. For a nut-free option, try sunflower seed flour. If you want a different sweetener, honey or agave syrup can replace maple syrup. Keep in mind that each sweetener has a unique flavor. For a dairy-free option, ensure your coconut cream is labeled as such.
Step-by-Step Instructions
Preparation Overview
This is a simple recipe. You only need 15 minutes to prep. The total time is about 1 hour and 15 minutes. You will make around 12 truffles. Gather all your ingredients first.
Mixing Dry Ingredients
In a large mixing bowl, add:
– 1 cup shredded unsweetened coconut
– 1/2 cup almond flour
Stir these together well. Make sure they blend evenly. This step is key for flavor and texture.
Preparing the Wet Ingredients
In another bowl, take:
– 1/2 cup chilled coconut cream
– Zest of 1 lemon
– 2 tablespoons fresh lemon juice
– 1/4 cup maple syrup
– 1 teaspoon vanilla extract
– Pinch of salt
Whisk these until smooth and creamy. This mixture gives the truffles their rich taste.
Combining Ingredients
Now, add the dry mix to the wet mix. Stir them together until you see a thick, sticky dough. If it feels too dry, add a tiny bit of coconut cream.
Chilling and Rolling Truffles
Cover the bowl with plastic wrap. Put it in the fridge for 30 minutes. This makes it easier to form balls. After chilling, scoop out small tablespoons of dough. Roll them into bite-sized balls with your hands.
Final Presentation
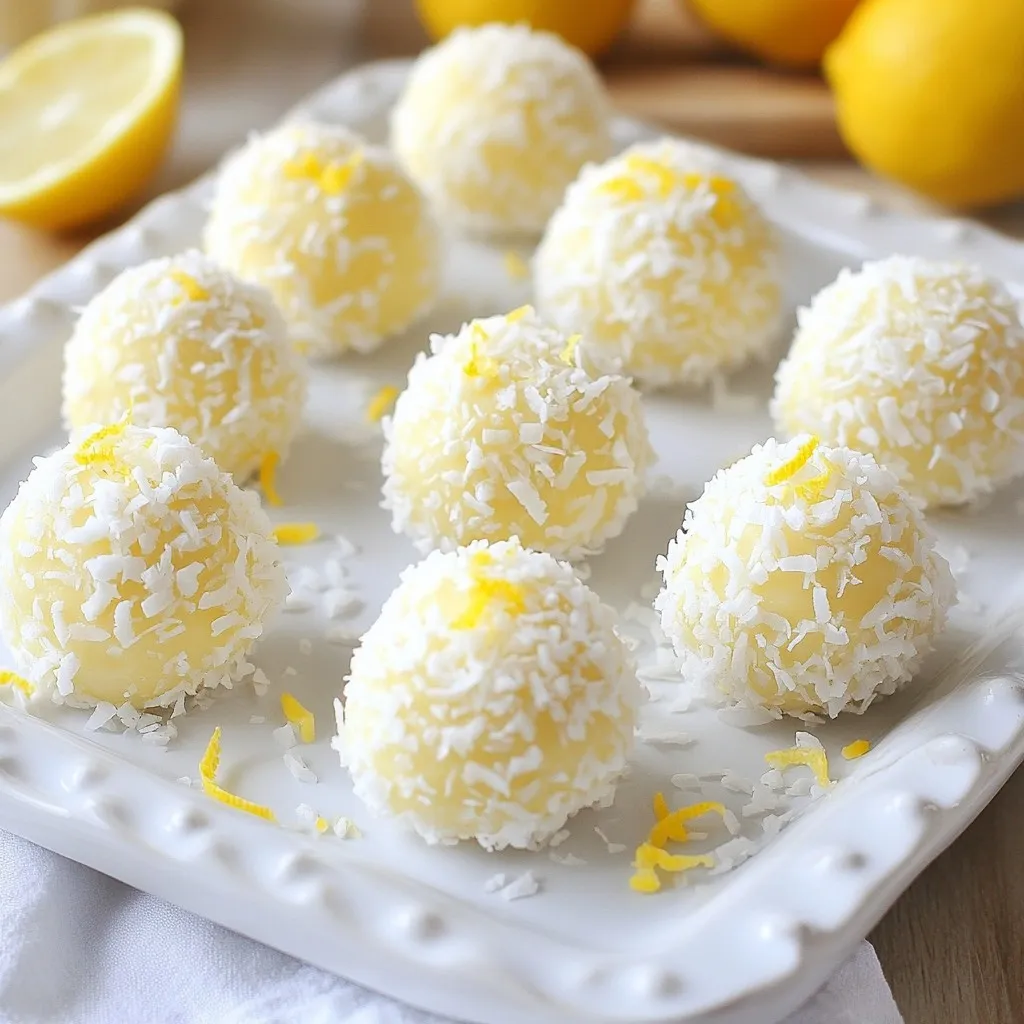
Roll each truffle in extra shredded coconut. This gives the truffles a nice look and texture. Place them on a lined baking sheet. Chill again for 30 minutes to let them set. For a nice touch, serve them in a decorative box or on a platter with lemon zest on top. Enjoy!
Tips & Tricks
How to Achieve the Perfect Texture
To get the best texture in your truffles, use chilled coconut cream. It helps make the mixture rich and creamy. Mix the shredded coconut and almond flour well. This ensures a smooth blend. When you form the truffles, make sure they are not too wet. If they are, add a bit more almond flour. Chilling the mixture for 30 minutes is key. It makes handling easier and helps shape the truffles.
Common Mistakes to Avoid
One common mistake is not chilling the mixture enough. If it’s too soft, the truffles won’t hold their shape. Avoid using sweetened coconut. It can make your truffles too sweet. Do not skip the pinch of salt. It enhances the flavors of lemon and coconut. Lastly, make sure to roll the truffles in extra shredded coconut. This adds texture and makes them look nice.
Serving Suggestions
You can serve these truffles in many fun ways. Place them in a decorative box for gifts. Arrange them on a platter with fresh lemon slices. For a pop of color, sprinkle lemon zest on top. These truffles pair well with tea or coffee. They also make a great dessert for parties. Enjoy them at events, or keep them as a treat at home!
Pro Tips
- Texture Matters: Ensure your coconut cream is well-chilled for a smooth mixture that helps the truffles firm up perfectly.
- Flavor Boost: Adding a pinch of lemon zest to the rolling coconut can enhance the citrus flavor and add visual appeal.
- Rolling Technique: To avoid sticky hands, lightly dampen your palms with water before rolling the truffles.
- Storage Tips: Keep your truffles in an airtight container in the fridge to maintain freshness and texture for up to a week.
Variations
Flavored Additions
You can add fun flavors to your lemon coconut truffles. Try mixing in some finely chopped nuts like walnuts or pecans. They add a nice crunch. You can also incorporate a teaspoon of almond extract for a nutty taste. If you want a berry twist, fold in some dried cranberries or blueberries. This gives a sweet and tart balance that enhances the lemon flavor.
Alternative Coatings
While shredded coconut is classic, you can switch things up. Try rolling the truffles in cocoa powder for a rich chocolate vibe. You could also use crushed nuts or seeds for a different texture. For a fun look, dip them in melted dark chocolate and let them set. This gives a beautiful contrast to the bright lemon flavor.
Dietary Modifications (Vegan, Gluten-Free)
These truffles are already vegan and gluten-free! To keep them vegan, always check the maple syrup label. For a nut-free option, use sunflower seed flour instead of almond flour. You can also swap the coconut cream for silken tofu blended until smooth. This keeps the truffles creamy without nuts. These simple swaps make the truffles friendly for various diets.
Storage Info
How to Store Leftover Truffles
To keep your truffles fresh, place them in an airtight container. Store them in the fridge. They will stay tasty for about one week. If you notice any moisture or odor, it’s best to toss them.
Freezing Instructions
You can freeze truffles for longer storage. Place them in a single layer on a baking sheet first. Freeze for about an hour. Once solid, transfer them to a freezer-safe bag. Label the bag with the date. They can last up to three months in the freezer.
Shelf Life Tips
Truffles are best enjoyed fresh, but they last. Stored in the fridge, they are good for seven days. In the freezer, they hold flavor for three months. Always check for any signs of spoilage before eating.
FAQs
Can I use sweetened coconut instead of unsweetened?
Yes, you can use sweetened coconut. However, it will make the truffles sweeter. Adjust the maple syrup to balance the taste. Sweetened coconut can add nice flavor but check if you like it sweeter.
How long can I keep these truffles?
You can keep these truffles in the fridge for up to one week. Store them in an airtight container. This keeps them fresh and tasty. If you want them to last longer, consider freezing them.
Can I make these truffles ahead of time?
Absolutely! You can make these truffles a few days in advance. Just store them in the fridge until you’re ready to serve. Chilling them helps the flavors meld nicely. Plus, they make a great treat to have ready for guests.
What can I substitute for maple syrup?
If you don’t have maple syrup, you can use agave syrup or honey. Both options bring sweetness. Keep in mind, each will slightly change the flavor. Use what you have on hand for a tasty result.
This article covered all you need to know about making delicious truffles. We explored ingredients, measurements, and smart substitutions. You learned step-by-step instructions for preparing your truffles, along with tips for the best texture. Variations help you personalize, while storage tips keep them fresh longer.
Enjoy using these ideas and techniques. With practice, your truffles will impress everyone. Happy makin


